|
|
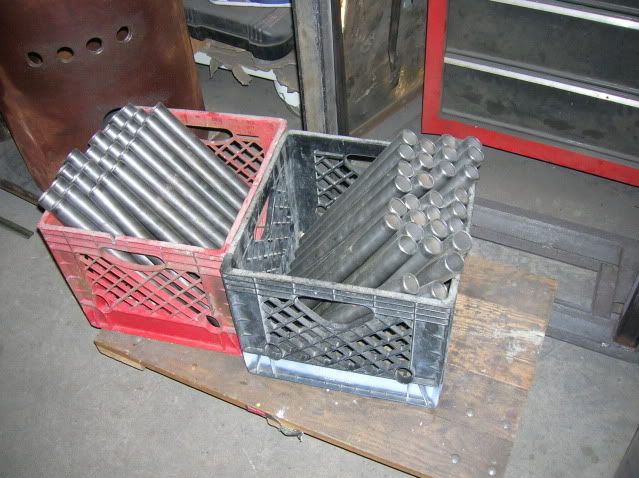
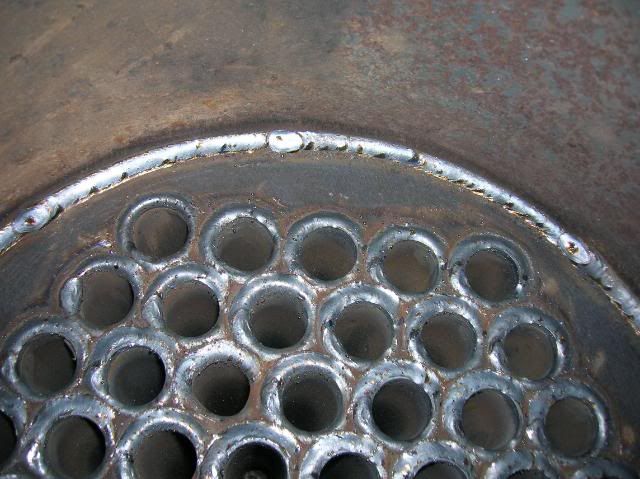
--------------------------------------------------------------------------------I have built over 130 of these boilers over the last 20 years. These boilers are used in custom built steam boats, and to power steam generators, as well as various other applications.Typically, my customers send me a drawing of what they need, and I build it. I usually cut metal using a shear, ironworker, bandsaw, or I order burnouts from my steel supplier.I try to use semi-modern techniques, but once in a while I build these steam boilers for a customer of mine that builds small, custom steam boats. This job requires me to get back to a few down-and-dirty fabbing techniques, lots of hand grinding, etc. Pounds of grinding dust, all over everything, if you know what I mean!I want the boilers to be respectable, but I don't go crazy, trying to obtain the prettiest welds that I can. I don't clean all the welds, or remove the spatter. The customer does all that, then he sand blasts them, as well as paints them.The thing that I focus on with the welding is to make sure that they're GOOD, STRONG, WELDS! They get tested with 250 lbs./sq. in. of pressure! There can't be any leaks. So, I overlap all my restarts and stops.I've built quite a few of these boilers (as well as other designs, and sizes of them), but have never taken any photo's of the progress. This time I did.To some of you, this will just be "old hat", but hopefully, some of you will enjoy it.Here are the tube plates, with the tubes tacked in...


to be continued...Last edited by steelsurgeon; 10-10-2015 at 09:27 PM.
Reply:Next, I make the door coaming, out of 8" sch. 40 pipe. It gets squashed to fit the cast iron door...
to be continued...
Reply:Then, the ashpit door gets built...
to be continued...
Reply:Then, they get fishmouthed to fit the large tubes that they will eventually get welded to...
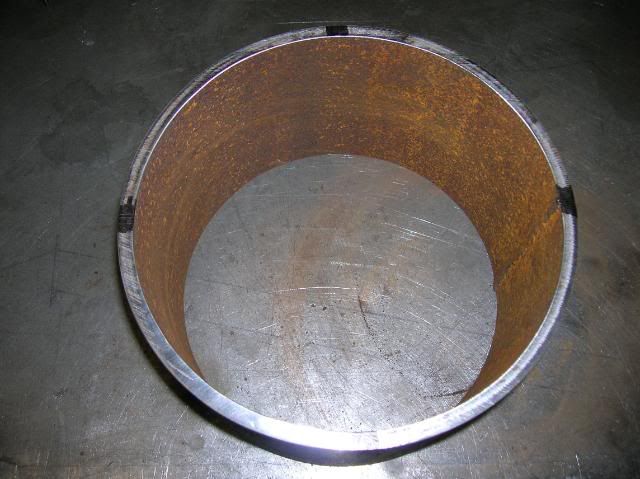
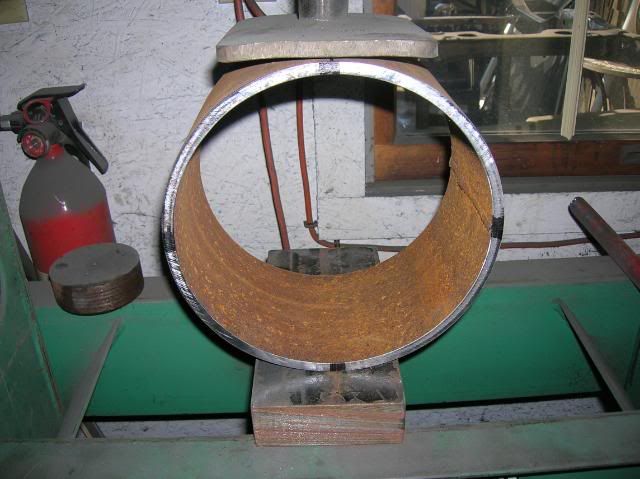
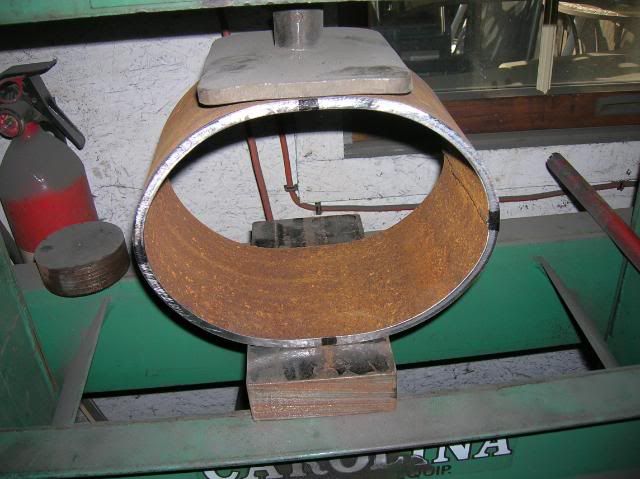
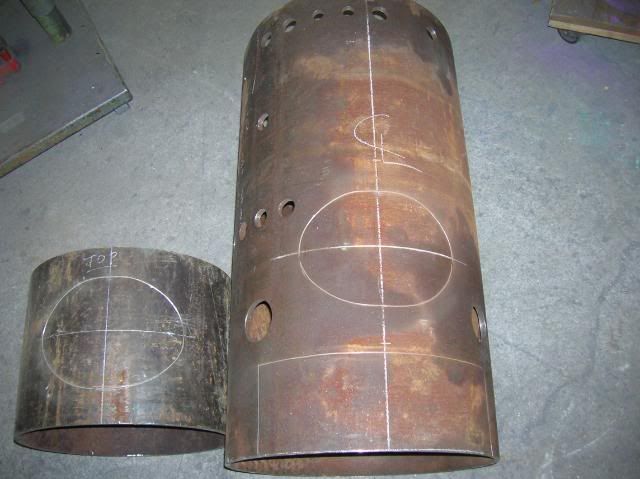
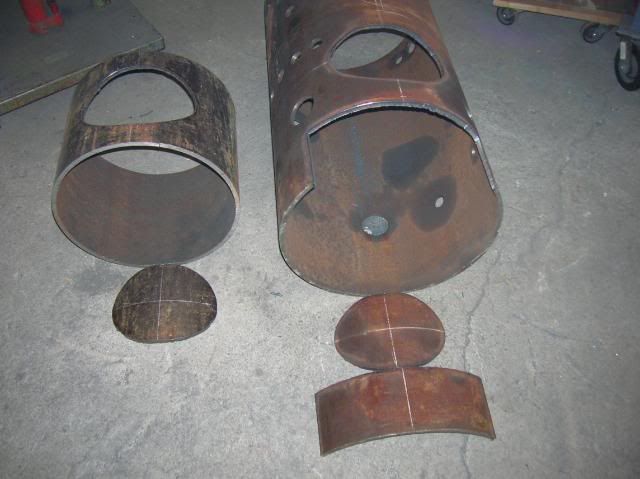
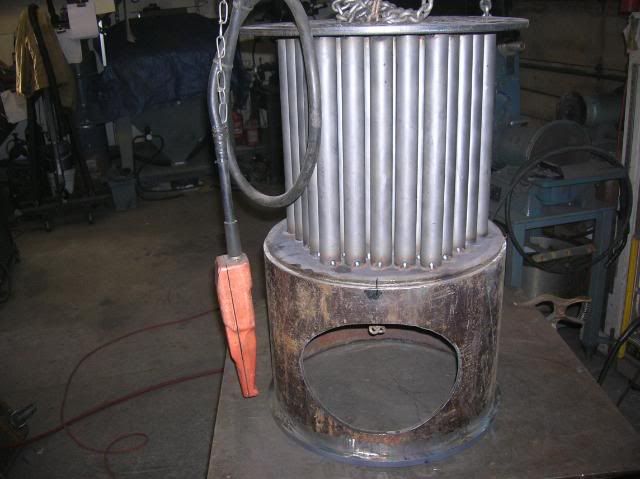
Here's the outer tube, 18" pipe...
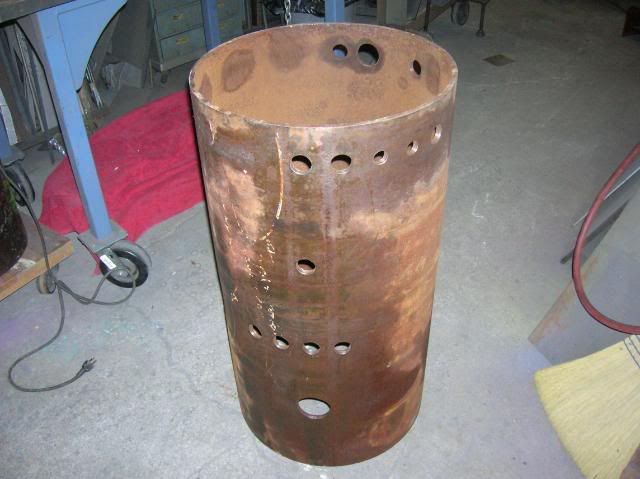
...and the firebox (inner tube), 16 in. pipe...

Layouts for cutting out for the door coaming, and ashpit door...
...and the cutouts...
to be continued...
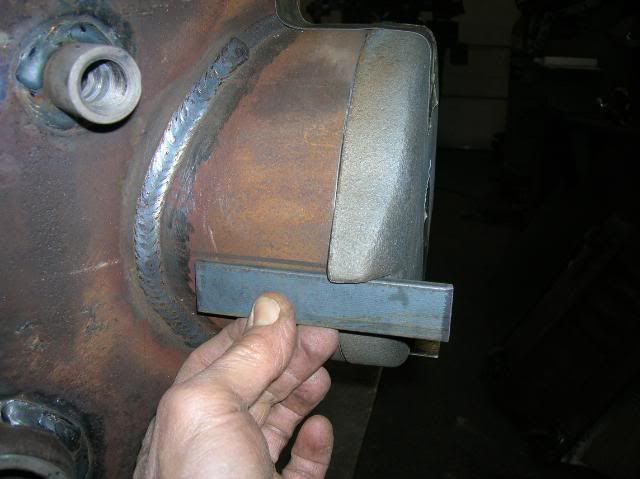
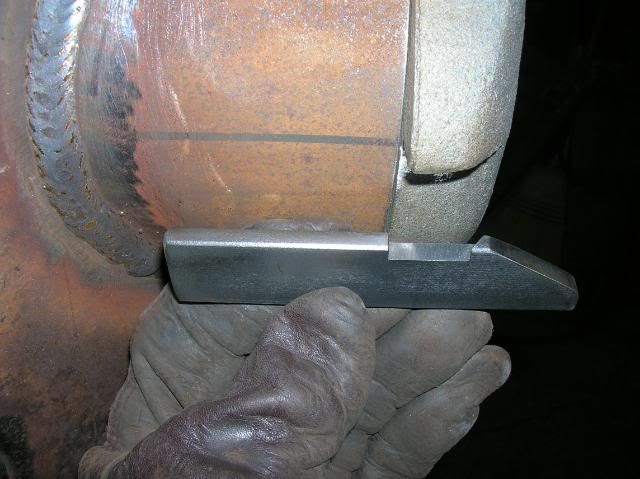
Reply:Time to wrap a length of 1/2" square bar around the bottom edge of the firebox, to act as a filler piece, for later on...


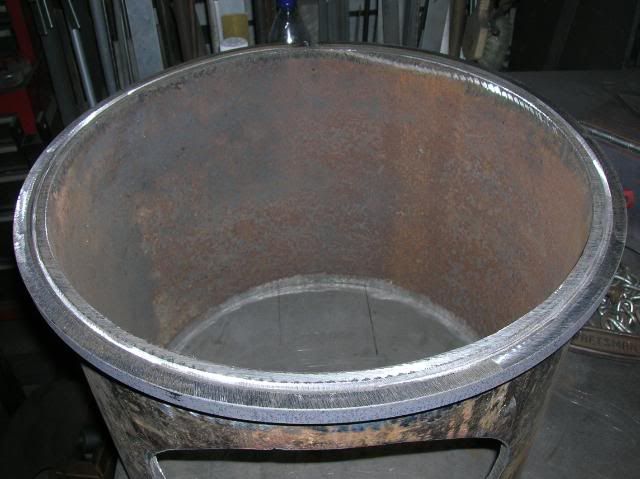
I tig weld this piece, because I don't want any weld above flush...
to be continued...
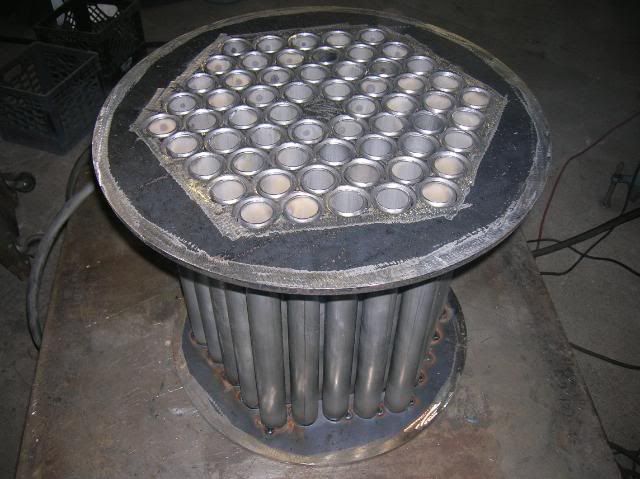
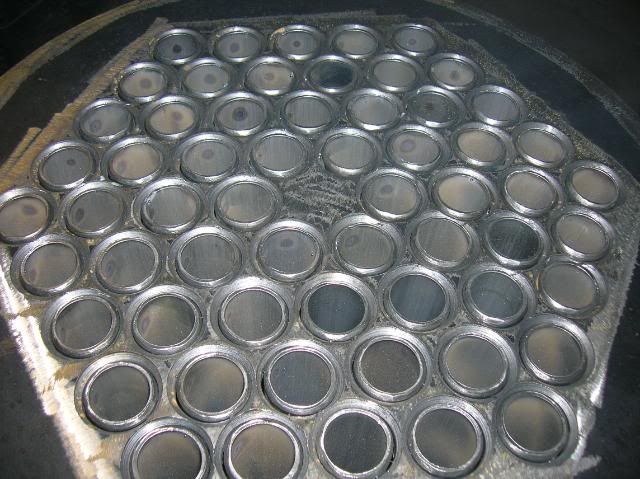
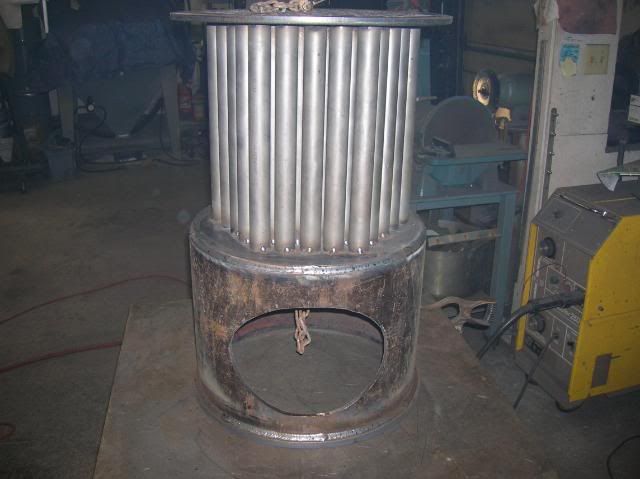
Reply:The tube assembly gets set upon the firebox...
...then welded...
It gets flipped upside down, to weld the inside...
to be continued...
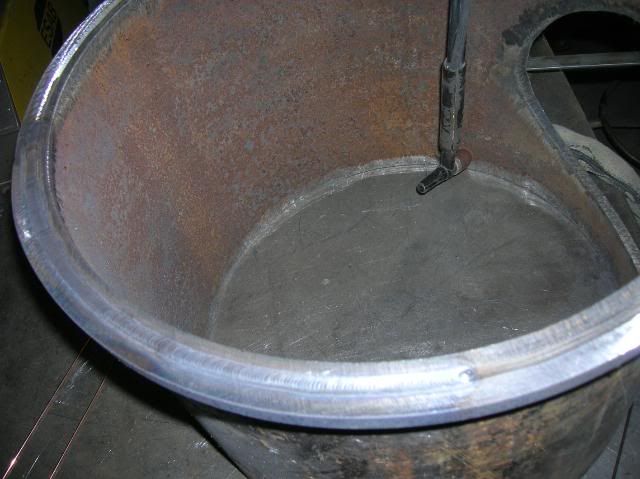
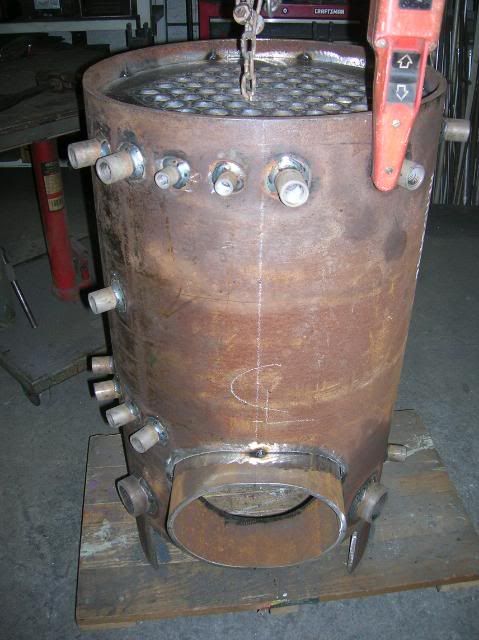
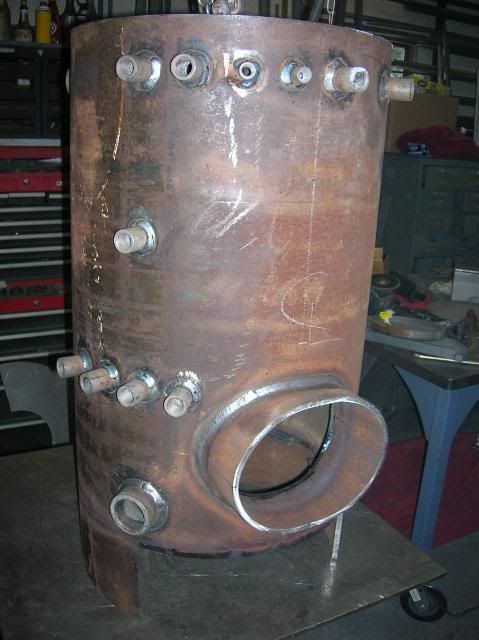
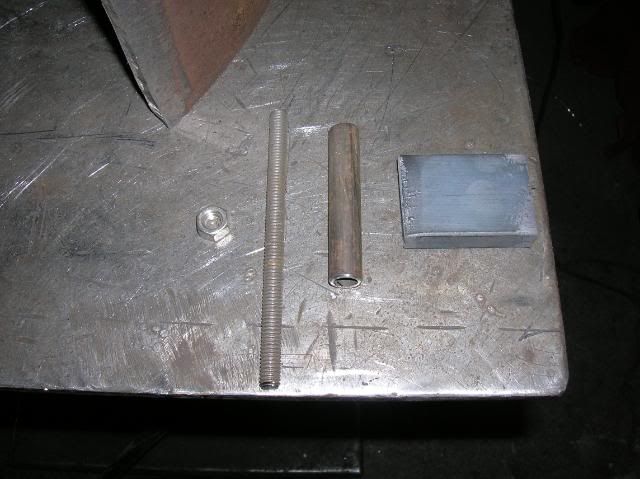
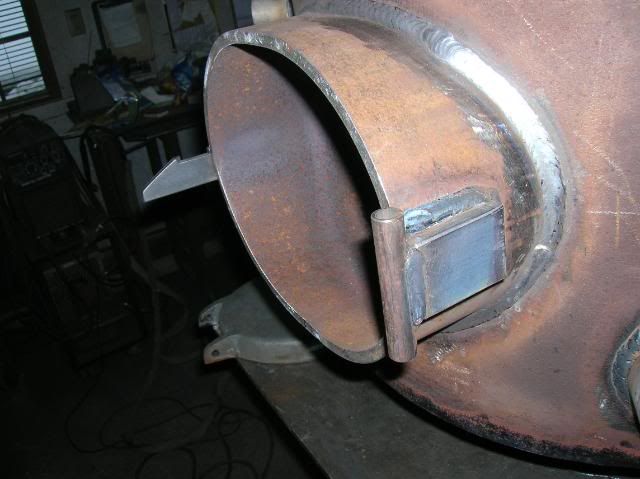
Reply:All the couplings get welded in...
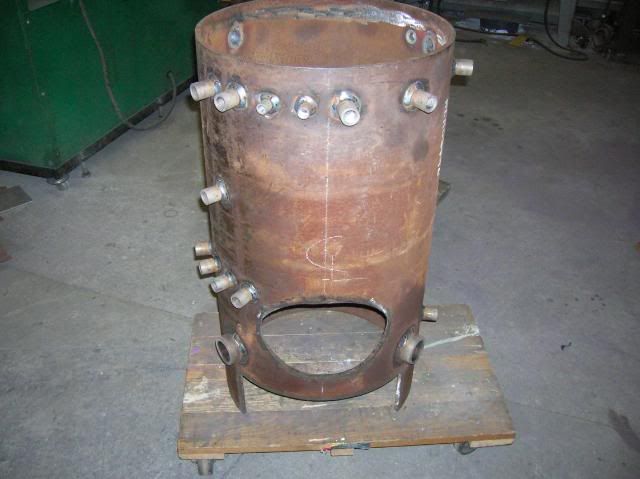
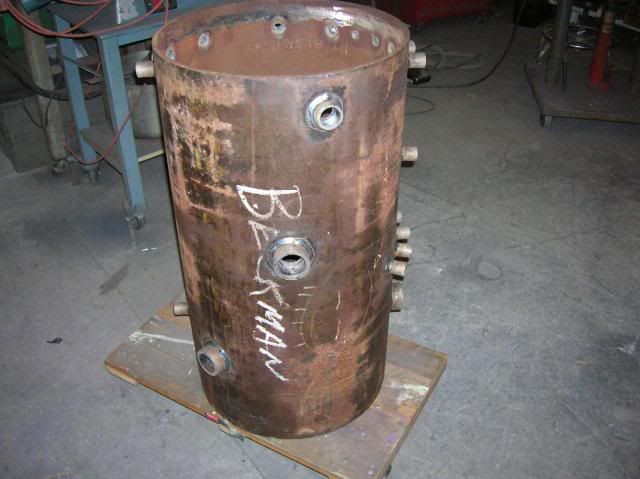
So, here is the inside assembly, and the outside assembly...

Time to join them...
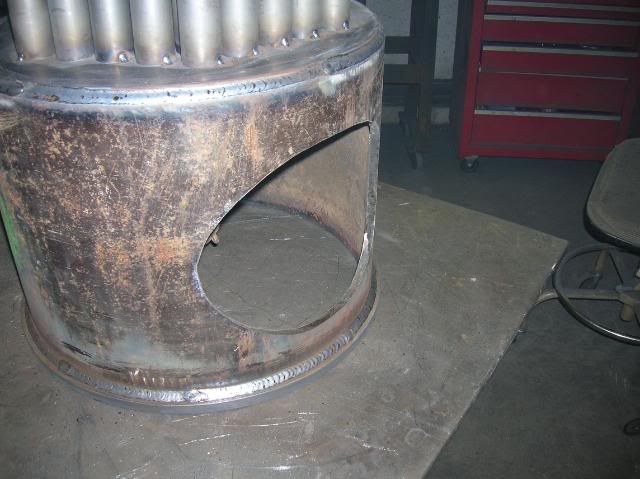
Slide it down inside, until the door cutouts line up...then tack in the door coaming...
to be continued...
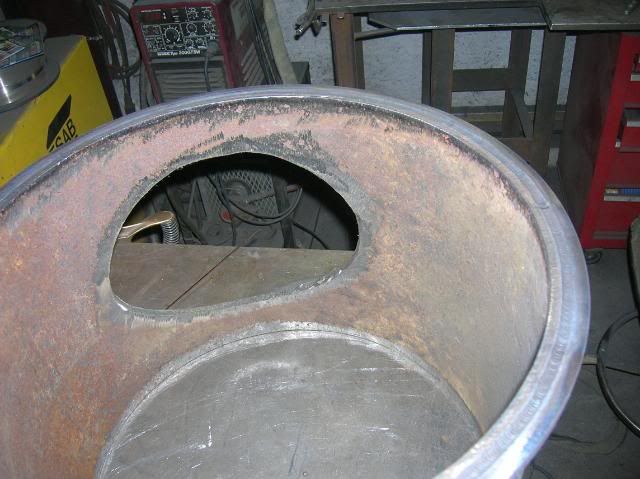
Reply:Welding the door coaming to the firebox tube is pretty challenging, just because...
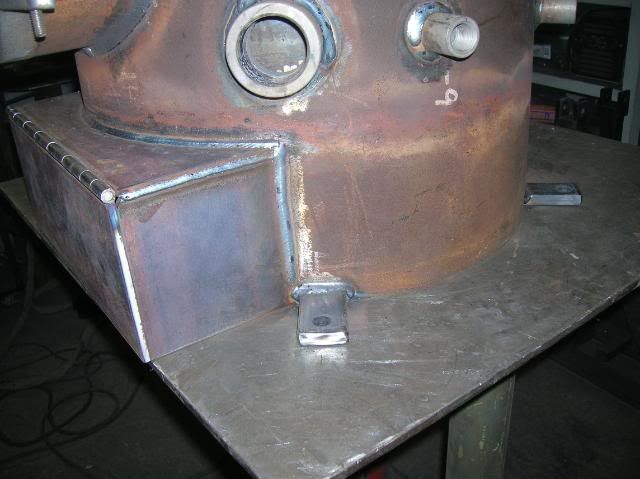
The 1/2" square bar filler gets welded to the inside of the outer tube...
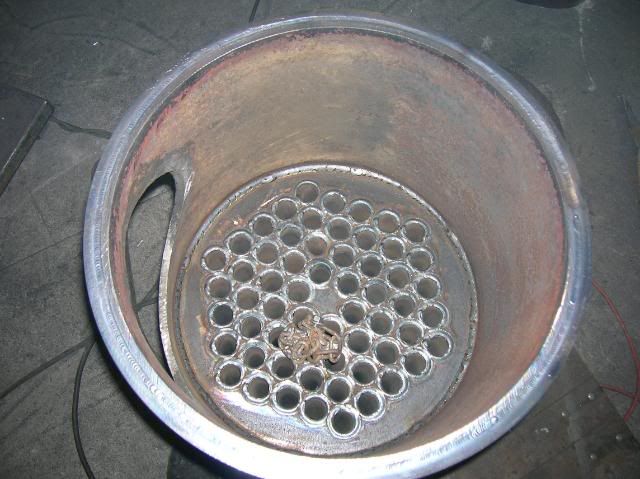
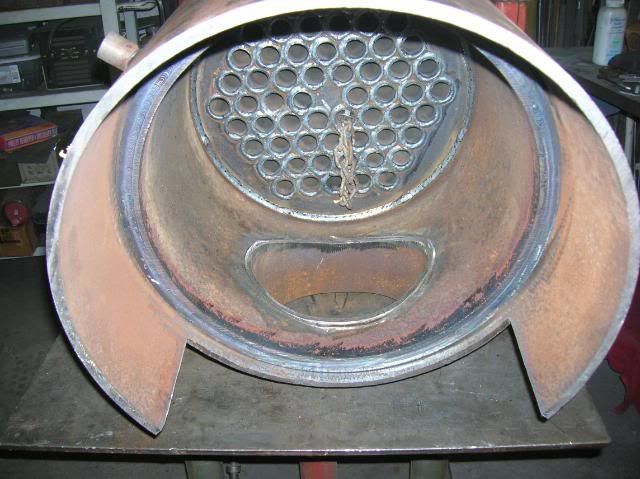
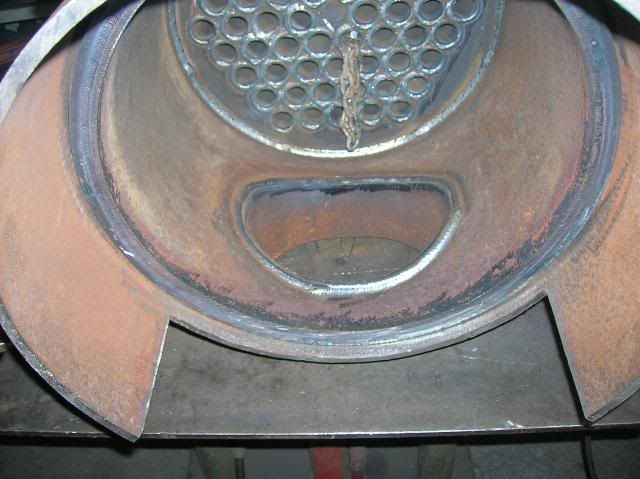
Tabs that support the grate get welded in...

to be continued...
Reply:Really looking good did you weld the tubes or roll them? JohnSent from my XT1254 using Tapatalk
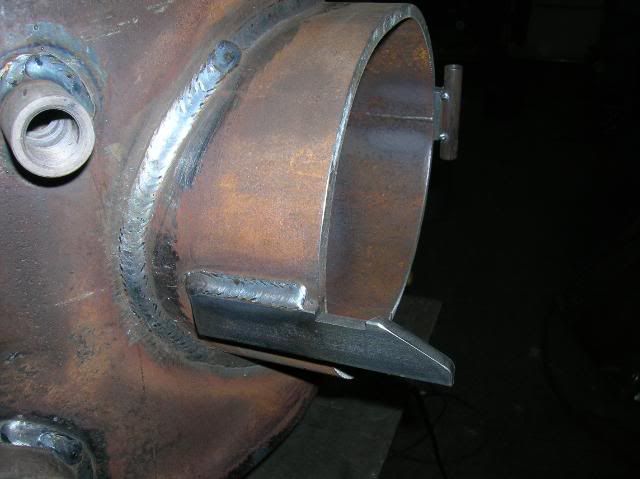
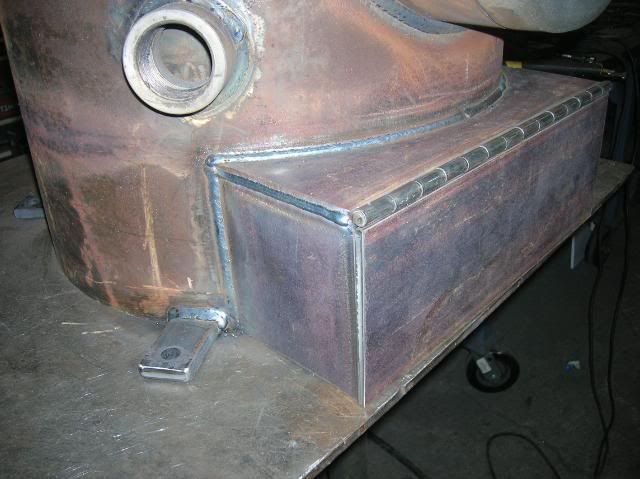
Reply:The door coaming gets welded to the outer tube...
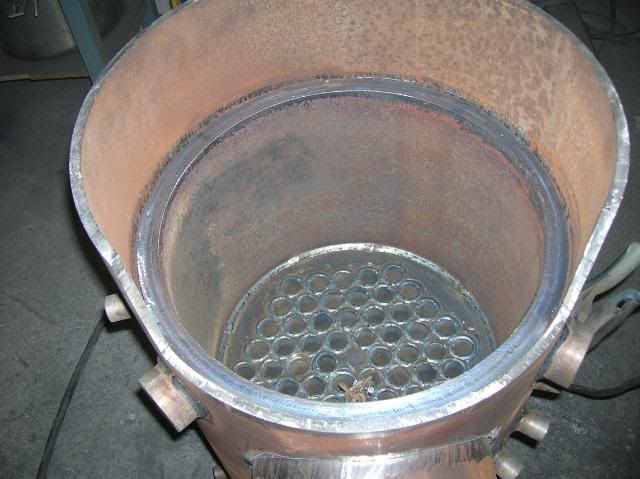
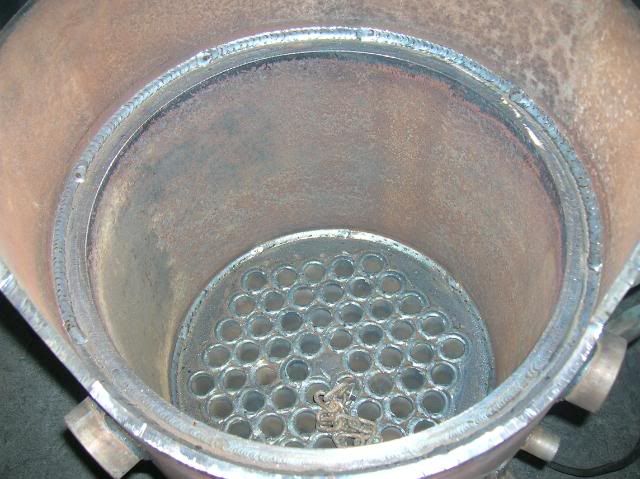
Here's a pic of 1 of the 2 pieces of grating inside the firebox. Wood is burned to make the heat to create the steam...
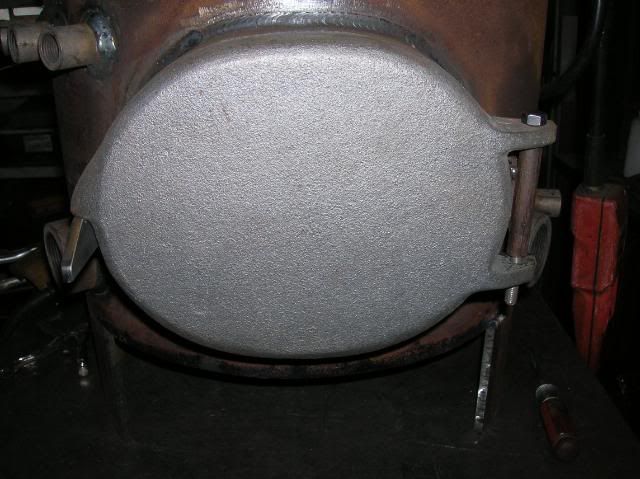
Prepping the door, to hang it...
The door cradle...
to be continued...
Reply:The hinge components...
Components, welded on...
The door is hung...
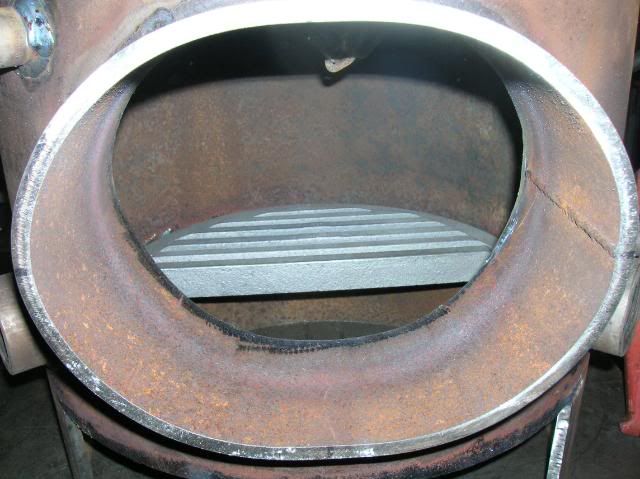
Ashpit door, ready to weld on...
to be continued...
Reply:More ashpit door...
to be continued...
Reply:Finishing it up...


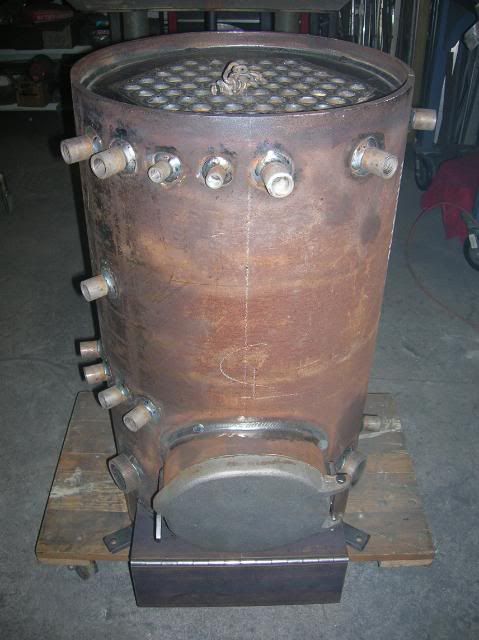
The boiler is done!! As far as my part goes....to be continued...
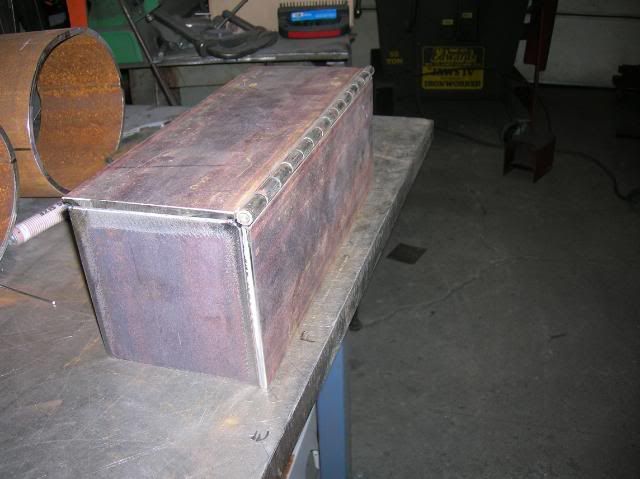
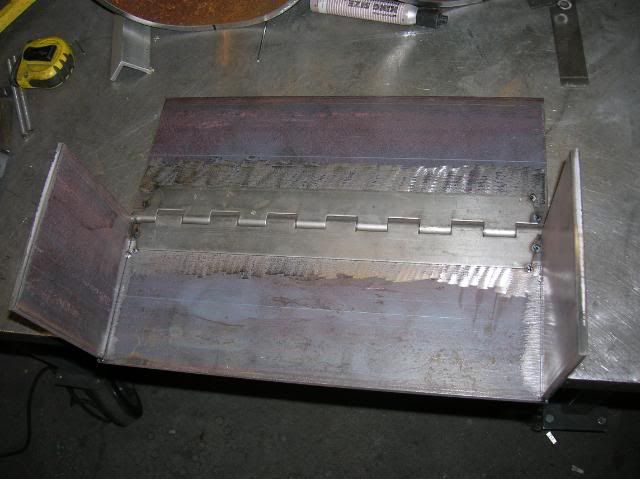
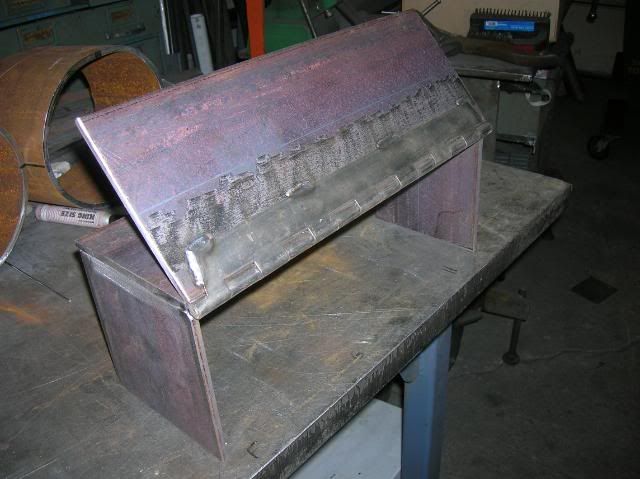
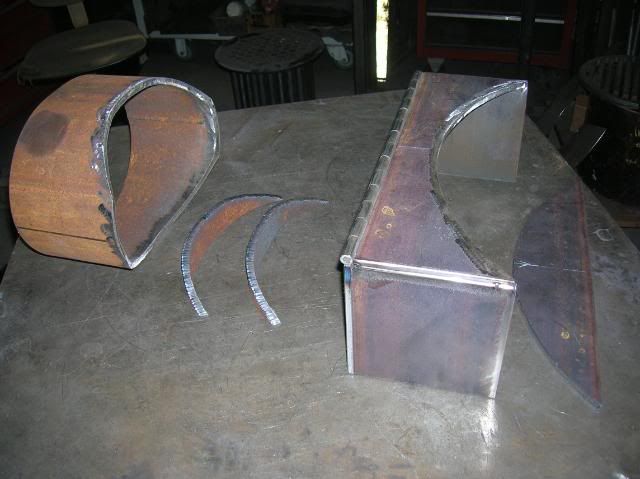
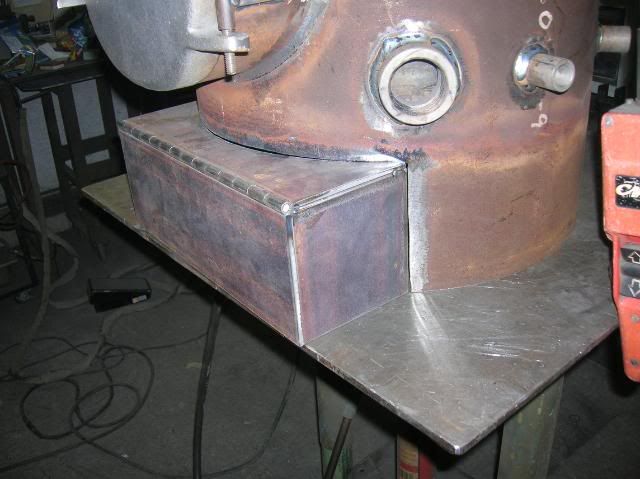
Reply:Shearing the hood's bottom lip piece...

These are the pieces that will become the hood...

Here's the cone part, tacked together...

Rolling up the bottom lip..

...and the top rim...

to be continued...
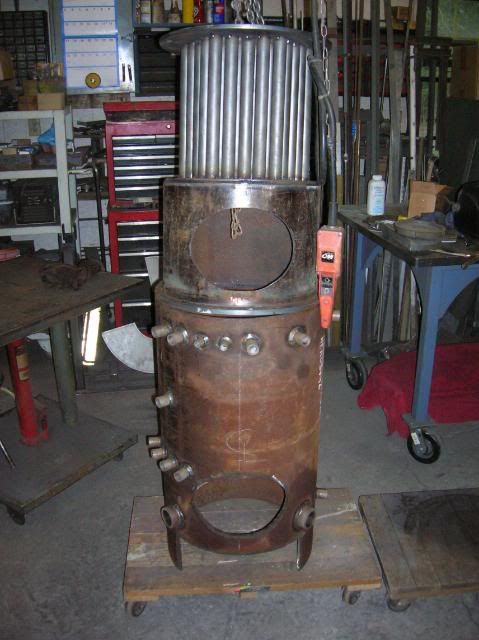
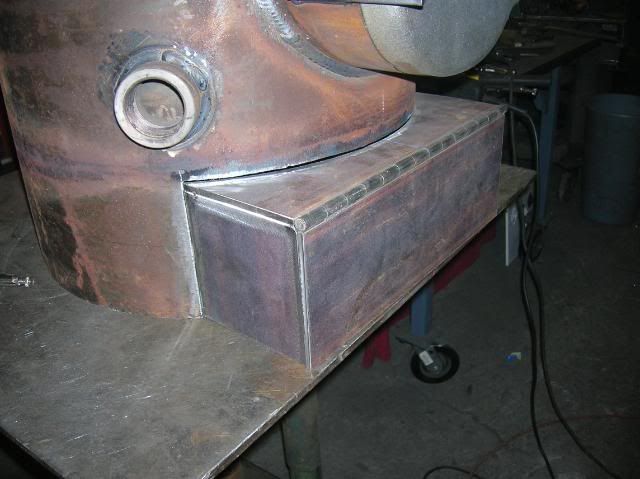
Reply:Here's the hood, tacked together...

...and, welded up...

...on the boiler. Later, a 3' tall stack will be attached, by the customer.

Setting up my home made circle cutting attachment for my plasma cutter, to start cutting the baseplate...

The base plate...

to be continued...
Reply:Here we go!


Rolled up the bottom lip. These pieces make up the base.

to be continued...
Reply:Tacked up...


And, finished.


The EndRich
Reply:Man Rich that is one impressive build! Can tell that's not your first one to build! Roughly how much time do you have in it? Thanks for sharing!

Reply:

Originally Posted by johnrbauer

Really looking good did you weld the tubes or roll them? JohnSent from my XT1254 using Tapatalk
Reply:
Originally Posted by kuzineddie
Man Rich that is one impressive build! Can tell that's not your first one to build! Roughly how much time do you have in it? Thanks for sharing!
Reply:Yes I answered my own question you welded them in. They weren't rolled like a lot of big boilers. JohnSent from my XT1254 using Tapatalk
Reply:I'm greatly impressed with your fab skills!

I'm interested in the design....Looks like the firebox is surrounded by a pipe-in-pipe water jacket with about an inch spacing between them, so that should add efficiency.Being a vertical single pass firetube design, do they intend to operate with the waterline below the upper tube sheet, or with tube nest flooded and waterline maintained in separate steam drum above boiler?I'm also trying to identify the purpose of many of those 'connectors' or nozzles welded around the upper shell above the water leg surrounding the firebox.On the lower water jacket/water leg, those two larger nozzles must be one for feed water and the other blow down? Or if with separate steam drum, are those two large nozzles intended for downcomer tubes with feed being supplied to drum?Also, where did you obtain the design calculations and materials specs, or were those provided by the owners?Last question: What is the intended max operating pressure?Tanks for the GREAT thread!!!
Reply:Great job! I've always been fond of steam engines and always wondered if people still made boilers for them.My "collection":Homemade Stick WelderVictor O/A TorchAC 225Ideal Arc 250HF 90 Amp Flux CoreHF Mig 170Solar 2020 Plasma CutterPower i-Mig 140EHarris O/A torchHF Dual Mig 131140STAlpha Tig 200x
Reply:You totally rock Rich!Expert Garage Hack....https://www.facebook.com/steven.webber.948
Reply:
Originally Posted by wornoutoldwelder
I'm greatly impressed with your fab skills!
I'm interested in the design....Looks like the firebox is surrounded by a pipe-in-pipe water jacket with about an inch spacing between them, so that should add efficiency.Being a vertical single pass firetube design, do they intend to operate with the waterline below the upper tube sheet, or with tube nest flooded and waterline maintained in separate steam drum above boiler? I believe that the water is only between the tube sheetsI'm also trying to identify the purpose of many of those 'connectors' or nozzles welded around the upper shell above the water leg surrounding the firebox. I only know what a few of the fittings are for...On the lower water jacket/water leg, those two larger nozzles must be one for feed water and the other blow down? Or if with separate steam drum, are those two large nozzles intended for downcomer tubes with feed being supplied to drum?Also, where did you obtain the design calculations and materials specs, or were those provided by the owners?Last question: What is the intended max operating pressure?Tanks for the GREAT thread!!!Sorry for all the questions, but one of my favorite movies is "African Queen" with Bogart and Hepburn, but my favorite star in the movie is the boiler used to power that old scow.I'm always interested in old style boilers, or simplified boiler designs.Once again, great work! and thanks for posting it.
Reply:Amazing work! I've been looking on here the last two days for ideas for a cart for oxy-acet tanks, and just keep getting sidetracked. All of you on here make me think how happy I'll be if I can just look like I'm not on my first book of tickets anymore. To quote the Senior Chief, " Tanks for the GREAT thread!!!"Flat-belt driven is beautiful
Reply:This thread illustrates how much more welding is not just welding. Being a good metal craftsman is a better part of it. Thanks for the interesting build contribution. Always wondered how those were built.Miller Bobcat 250Syncrowave 200Millermatic 252Spoolmatic 30ASpectrum 625 X-TremeMaxstar 150SVictor O/A torchesDewalt angle grindersWelded on/off for over 40 years.
Reply:
Originally Posted by Gobysky
Always wondered how those were built.
Reply:words can't express how impressed i am with your boiler build but i do have to call bs on one point. your welds. there's nothing wrong with the way they look. are you using co2 mig? one other point; what is the technique you use for testing the boiler. not air i hope? could you show some pics of that? thanks!Last edited by docwelder; 10-11-2015 at 09:56 AM.i.u.o.e. # 15queens, ny and sunny fla
Reply:I did work on the African Queen, back in the '80's. It was bought by a lawyer in Florida, and used as a charter boat. That means that it has to pass Coast Guard inspection.The hull is steel, and had some "punky" areas in it, which I had to remove, and weld in hull patches. The CG was there overseeing the job.This was done at the customer's shop that I build the boilers for, because he is a licensed steam boat guy, and this work had to be done in such a shop.His shop is in the middle of nowhere, but all the local news stations stopped by to do a news story about this. So, at the time, I recorded (on VHS) a news story that had me working in the background, and recorded that at the end of another tape that had The African Queen movie on it.Then, in 2012, the AQ got totally restored, again. Big promo this time, with Stephen Bogart (Humphrey's son) being a guest of honor.A new steam boiler was part of that restoration. It was built by another RI company (through my customer), and I had to build a new hood for it.I have lots of pictures of this, and could actually post another thread just on this.Here are a few shots of the old AQ hood...this is NOT the original AQ hood! That one has been replaced.


RichLast edited by steelsurgeon; 10-11-2015 at 10:03 AM.
Reply:
Originally Posted by docwelder
words can't express how impressed i am with your boiler build but i do have to call bs on one point. your welds. there's nothing wrong with the way they look. are you using co2 mig? one other point; what is the technique you use for testing the boiler. not air i hope? could you show some pics of that? thanks!
Reply:If you want to navigate through this website, perhaps a lot of your questions can get answered. This is the customer that I did all this work for...http://www.steamboating.net/Here's some of The African Queen stuff...http://www.steamboating.net/page31.htmlRichLast edited by steelsurgeon; 10-11-2015 at 10:12 AM.
Reply:
Originally Posted by steelsurgeon
I did work on the African Queen, back in the '80's. It was bought by a lawyer in Florida, and used as a charter boat. That means that it has to pass Coast Guard inspection.The hull is steel, and had some "punky" areas in it, which I had to remove, and weld in hull patches. The CG was there overseeing the job.This was done at the customer's shop that I build the boilers for, because he is a licensed steam boat guy, and this work had to be done in such a shop.His shop is in the middle of nowhere, but all the local news stations stopped by to do a news story about this. So, at the time, I recorded (on VHS) a news story that had me working in the background, and recorded that at the end of another tape that had The African Queen movie on it.Then, in 2012, the AQ got totally restored, again. Big promo this time, with Stephen Bogart (Humphrey's son) being a guest of honor.A new steam boiler was part of that restoration. It was built by another RI company (through my customer), and I had to build a new hood for it.I have lots of pictures of this, and could actually post another thread just on this.Here are a few shots of the old AQ hood...this is NOT the original AQ hood! That one has been replaced.
Rich
Reply:
Originally Posted by steelsurgeon
If you want to navigate through this website, perhaps a lot of your questions can get answered. This is the customer that I did all this work for...http://www.steamboating.net/Here's some of The African Queen stuff...http://www.steamboating.net/page31.htmlRich
Reply:
Originally Posted by docwelder
words can't express how impressed i am with your boiler build but i do have to call bs on one point. your welds. there's nothing wrong with the way they look. are you using co2 mig?
Reply:Awww shucks....'taint nuthin'....

Rich
Reply:Having worked with a few marine boilers I can't recommend welding the tubes. Even high pressure boilers at 950 psi use swaged tubes. Tube replacement can be done with simple hand tools. Only the superheater tubes get welded. Also your tube sheets are a bit thin for 250 psi. I would expect at least 1" for that pressure and.diameter. At 950 psi with a curved tube sheet the thickness was 5 inches. The wrapper sheet was 3.
Reply:
Originally Posted by 76GMC1500
Having worked with a few marine boilers I can't recommend welding the tubes. Even high pressure boilers at 950 psi use swaged tubes. Tube replacement can be done with simple hand tools. Only the superheater tubes get welded. Also your tube sheets are a bit thin for 250 psi. I would expect at least 1" for that pressure and.diameter. At 950 psi with a curved tube sheet the thickness was 5 inches. The wrapper sheet was 3.
Reply:These boilers are tested @ 250 PSI, which is way above their operating pressure. I must add here: I only built boilers for personal use. These are NOT "Code" boilers.The Code boilers are built by another shop which are certified to provide an "S" stamp. I finish the Code boilers, though. That means that I can install the fill door, the ashpit cleanout, the base, and the hood. All components that are outside of the water jacket (pressure) area.Code boilers are mandated for boats used for charters, public use, etc. In the 20 years that I built these boilers, I've never heard of any of them failing...and believe me...I would have!Rich
Reply:I'm trying to understand how the floorless ashpit mates up to the baseplate. The ashpit has tabs that look like it will be bolted onto something, but I can't see how it fits.Forney C3 180A Buzzbox
Reply:
Originally Posted by Cedar Eater
I'm trying to understand how the floorless ashpit mates up to the baseplate. The ashpit has tabs that look like it will be bolted onto something, but I can't see how it fits.
Reply:Rich you are an awesome craftsman!Arcon Workhorse 300MSPowcon 400SMTPowcon SM400 x 2Powcon SM3001968 SA200 Redface1978 SA250 DieselMiller Super 32P FeederPre 1927 American 14" High Duty LatheK&T Milwaukee 2H Horizontal Mill

Bryan
Reply:Thanks....I appreciate the kind words. Rich
Reply:Dude, you are insanely good. I love everything you have posted thus far.Miller Maxstar 200 SDPiperliner #10 Gold
Reply:
Originally Posted by steelsurgeon
The boiler will get placed onto the base (on the deck of the boat). Then, holes are drilled through the tabs, the base, and through the deck.Everything is sandwiched together with long bolts.So...the base becomes the "floor" of the ashpit.Rich
Reply:You get all the fun jobs.......zap!

I am not completely insane..Some parts are missing

Professional Driver on a closed course....Do not attempt.Just because I'm a dumbass don't mean that you can be too.So DON'T try any of this **** l do at home.
Reply:Also, I don't see how the combustion air gets into the firebox. Typically, some sort of manual damper is used to control the combustion rate based on a steam pressure guage. No air, no fire, no pressure.Forney C3 180A Buzzbox
Reply:
Originally Posted by Cedar Eater
Ah, so the "pointy end" of the base plate is where the ash removal occurs? The door opens toward the point? There are no handles on the firebox or ashpit doors. Is that something that your buyer puts on?
Reply:
Originally Posted by zapster
You get all the fun jobs.......zap! |
|


 发表于 2022-5-19 11:02:50