|
|
Hi.I've been a lurker here mostly for a few years, but I thought I'd post here about my Chris Craft Roamer 46 project. She's an aluminum hull from 1969 that we've gutted and are bringing back to life. The most recent blog article covers some welding I did with my Miller TB 280NT and Spoolmatic 30A to fix a problem created by the professional fabricator who built my aft deck enclosure.Well...professional fabricator was what his business card said, anyway.

Anyway, here's the link to the welding job I did last weekend: 1969 Chris Craft Roamer 46 Refit: De-SMIB-ifying the Helm Door OpeningAnd here's the link to the start of the whole blog: http://1969chriscraftroamer46.wordpress.com/about/Cheers,Q
Reply:Thanks for the update Q. Glad the TB is getting the job done for you again.Can't really tell from most of the photos but it almost looks like your welding in short circuit mode rather than spray as it should be with aluminum. In other words - need more power Scotty! Should sound like a hissing noise instead of frying bacon. Probably something in the realm of +/- 26volts and lots of WFS (Wire Feed Speed).Keep the updates coming!.MM200 w/Spoolmatic 1Syncrowave 180SDBobcat 225G Plus - LP/NGMUTT Suitcase WirefeederWC-1S/Spoolmatic 1HF-251D-1PakMaster 100XL '68 Red Face Code #6633 projectStar Jet 21-110

Save Second Base!
Reply:Damn, that's a hell of a project! Have you been keeping up with zeyang's aluminum boat build?I've got a 1967 Renken 15'-er that I'm trying to get lake-worthy again. Bought the boat and trailer last year for $300. Going to have do a little aluminum welding myself on that project - lower unit casting has a 2.5" x 1" hole in it (I have the chunk that fits in there). No nasty refrigerators or anything in it, but it did have lots of leaves, beer cans, and even a steak knife in it (previous owner had her sitting for years with no cover). I've got her stripped down to the point where the engine and steering/throttle are pretty much the only things left on there, but will take those off when I refinish the hull. For now, she's sitting in the driveway on the trailer with a PVC-pipe skeleton supporting a Classic Accessories boat cover. I also discovered that an empty boat makes a great place to store extra junk (I'm a hoarder of materials and mechanical things and extra space is always evading me).

First two pics are how she was sitting in the seller's back yard.

Attached Images


Reply:"Have you been keeping up with zeyang's aluminum boat build?"I just saw that recently. That's one big project.Duane, I first learned to weld steel in high school, back when they didn't assume everybody was going to college. I've had a Millermatic 35 in my garage since the early 1990s. My welds were never professional grade, but after an hour of practice or so I could lay a pretty good bead. I also owned a body shop back in the 1980s, and even though I mostly managed the business side of the shop I spent plenty of time recreating spot welds on unibody chassis, door skins etc. But that was all in steel.I got the TB280 because there's no 220VAC in the boatyard, and it was cheaper to buy a used one with a spoolgun than to have a mobile welder come out and do little spot jobs. I made that decision after a welder where the boat is now told me it would be $1,000 to fix a crack in a weld around a patch in the deck where there used to be a hole for the shorepower connection. The patch was a round plate 4" in diameter, and the crack in the weld went 75% around the perimeter. The guy who welded up the aft enclosure the first time also did the patch that ended up cracking. But $100/inch for somebody else to come in and fix the crack seemed pretty rich to me.I understand there are insurance costs, reasonable labor rates and help for fire watch, but $1000?Anyway, having never welded aluminum or used spray transfer before (though I read a lot about both here), I'm not really sure what to look or listen for. I've heard about the hiss, and I definitely heard a bunch of different sounds as I played with the settings on the TB280 and tried pushing, pulling, forward 2-back 1, steady and straight, C-shaped and every other technique I've ever used (on steel). I still don't know if I did any of them right.I spent hours searching online for pictures of short circuit aluminum welds vs spray transfer but didn't find anything. Maybe if I post a picture or two, you could tell me what you see.For example, three different people welded here. Did anybody do it right?
Oh, and for what it's worth, I finally got an auto-darkening welding helmet. That thing is the bees knees! But I'm so trained to lift my helmet after each weld and snap my head to close it before starting the next one, I pretty much failed to take advantage of the auto-darkening feature. I suppose this is similar to somebody in the olden days who's used to horses and buggies and suddenly has to figure out how to make a car go. Snappin' the reins don't work!

Cheers,Q
Reply:The latest blog article on my 1969 Chris Craft Roamer 46 Refit involves Prepping the Aft Enclosure for Primer. Check it out!1969 Chris Craft Roamer 46 Refit: Prepping the Aluminum Aft Enclosure for Primer.Q
Reply:I gotta go back for an update.The first time I saw your blog, I spent over an hour looking thru it.Man, you have far more patience than I. The whole debacle with the title papers would have drove me insane.

You got a great boat. I dunno if yours was built here in MIchigan, but they had several factories here, one of which we would drive by on the way to Lake Michigan when I was a kid.Expert Garage Hack....https://www.facebook.com/steven.webber.948
Reply:

Originally Posted by q240z

Anyway, having never welded aluminum or used spray transfer before (though I read a lot about both here), I'm not really sure what to look or listen for. I've heard about the hiss, and I definitely heard a bunch of different sounds as I played with the settings on the TB280 and tried pushing, pulling, forward 2-back 1, steady and straight, C-shaped and every other technique I've ever used (on steel). I still don't know if I did any of them right.
Reply:Here are some great arc shots of what aluminum spray transfer should look like:If I remember correctly this one shows the good and bad - lots of information on setting up:http://www.youtube.com/watch?feature...&v=8AT4cEHtMn8Dave J.Dave J.Beware of false knowledge; it is more dangerous than ignorance. ~George Bernard Shaw~ Syncro 350Invertec v250-sThermal Arc 161 and 300MM210DialarcTried being normal once, didn't take....I think it was a Tuesday.
Reply:
Originally Posted by 7A749
I gotta go back for an update.The first time I saw your blog, I spent over an hour looking thru it.Man, you have far more patience than I. The whole debacle with the title papers would have drove me insane.
You got a great boat. I dunno if yours was built here in MIchigan, but they had several factories here, one of which we would drive by on the way to Lake Michigan when I was a kid.
Reply:
Originally Posted by duaneb55
Once you see the Miller video I think you'll agree that actually none of the examples in the photo are "right" although it looks as if the green and red samples approach correct in spots.
Reply:Just turn up your wire speed until it starts stubbing into the metal - now you are doing it wrong
You will be in short-circuit mode and the weld will not look right

Dave J.Dave J.Beware of false knowledge; it is more dangerous than ignorance. ~George Bernard Shaw~ Syncro 350Invertec v250-sThermal Arc 161 and 300MM210DialarcTried being normal once, didn't take....I think it was a Tuesday.
Reply:HA! I think I tried that. It did, in fact, look wrong.When I went the other way, I ended up cleaning tips quite a bit.My latest blog article is on priming the decks. For only working on this on weekends, we're making great progress.1969 Chris Craft Roamer 46 Refit: Priming the Decks Q

Last edited by q240z; 05-14-2013 at 10:35 AM.
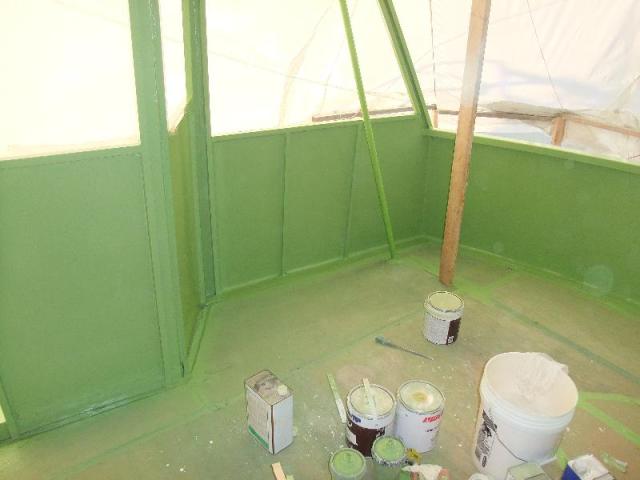
Reply:My latest blog is a big one...1969 Chris Craft Roamer 46 Refit: Prepping and Priming the Aft EnclosureThat Awl Grip Max Cor aluminum primer is one funky color...and the smell!But with the aft deck primed, we're very close to doing the final prime coat. Then it's seven "paint days" to do the shiny AwlCraft 2000 from the top to the boot stripe.CheersQ
Reply:It's an awesome project. Cool to hear yours was made in Holland.We would hit the beach almost every Sunday over the summer (before I went to vegas) & often go to Ottawa Beach in Holland. We would drive right by the Chris Craft plant on the way there.Have to go back & look at your latest progress.

Expert Garage Hack....https://www.facebook.com/steven.webber.948
Reply:Interesting. Years ago, my wife and I had a Roamer. We had keel leaking issues it. It had to be pumped constantly or it would scuttle itself. Nice boat but then boats are like any toy. "A hole to pour money into". My present take on any boat is....."Better if someone else owns it" and I'm a guest. Much better investments out there that actually pay dividends instead of costing dividends.Have fun.
Reply:SidecarFlip, let me guess--yours was steel? I say that because it seems the steel ones had more issues with rotting from the inside out.Boats are certainly not an investment in the conventional sense. Then again, I know people who spend far more on gadgets of the month, new cars every few years, watching sporting events and health care than I do on my boats. To each his own, I guess. For me, there are few places that can match the solitude of a boatyard in winter or the satisfaction I get from doing restorations on old Chris Crafts. Hell, in shrink bills alone I save bazzillions! ;-)My latest blog covers work from last weekend -- fillets & final touches on the aft deck enclosure.Cheers,Q
Reply:T'was steel.... Being used to a snot hull and then a steel hull was an interesting change. Glass deadens the noise. Steel amplifies it.We went to a 43 foot Bertram with twin diesels and then got out of boats entirely. My boating days now are limited to my friend's Cigarette with triple 500 Mercrusiers. I chip in for gas and keep an eye on the throttles. No 'against the dash' stuff with me. His Cigarette will do an honest 100 mph firewalled. Issue is, it's an expensive 100 per. Most recreational hobbies are expensive (like my hunting trips). Thats the way it is. You gotta pay to play.I custom built the stainless drive showers for the outdrives last year and new remotes (fuel sending bulkheads) for the tanks.Boats are fun when you don't own them.
Reply:
Originally Posted by SidecarFlip
T'was steel.... Being used to a snot hull and then a steel hull was an interesting change. Glass deadens the noise. Steel amplifies it.
Reply:I went from boats to long range precision shooting. Interestingly, like boats, synthetic stocks are referred to as snot stocks. Just as expensive a hobby btw.I think if I got back into the nautical hobby, it would be a Thistle Class wind boat with a diesel auxillary. Don't believe I could ever tack out of the marina.
Reply:We've got the cabin top and dashboard primed in Awl Grip 545...the final prime coats before spraying the shiny. Check it out!1969 Chris Craft Roamer 46 Refit: Final Priming with Awl Grip 545!Cheers,Q
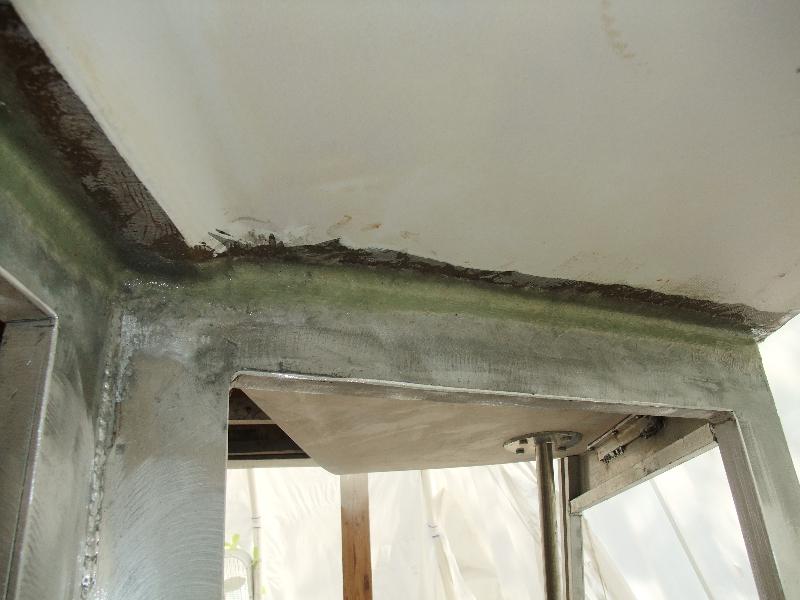
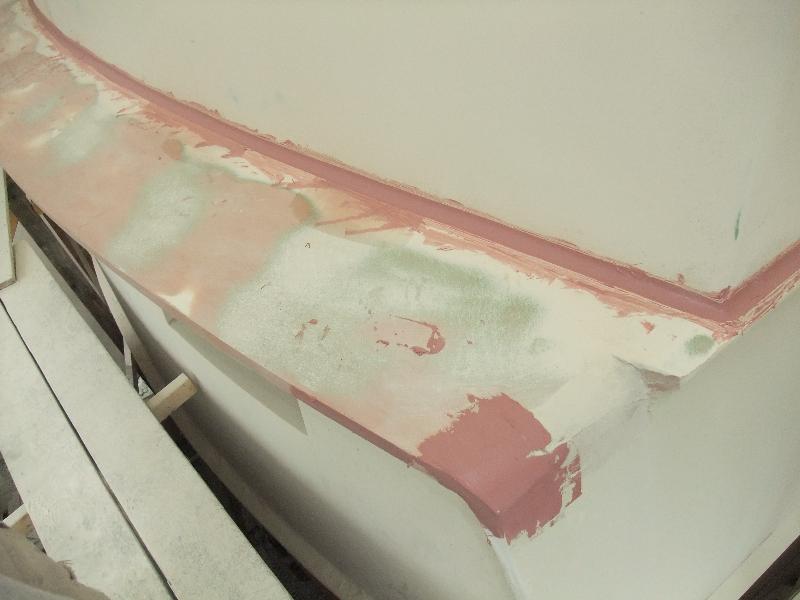
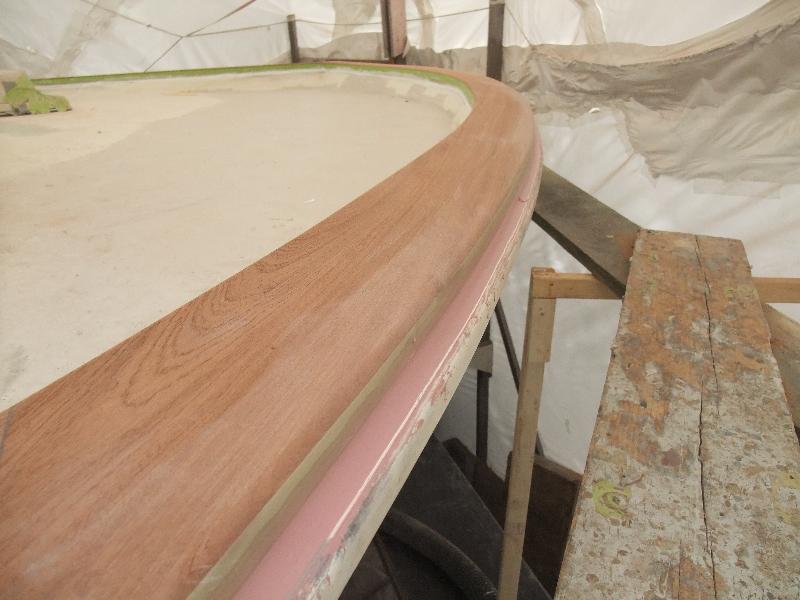
Reply:Been out of the country for a couple of weeks, so the refit ground to a brief halt. Last weekend I'd shaken off enough of the jet-lag hangover to get to the boatyard and get some work/play done.Anyway, the African Mahogany toe rail is installed now and it's got fillets all around. Next up is shiny clear coat, then a teensy bit of primer on the fillets...then, painting the topsides! Unless something unexpected happens, we should start the final painting in two weekends.Check out the full story at 1969 Chris Craft Roamer 46 Refit: Installing the Mahogany Toe RailCheers,Q
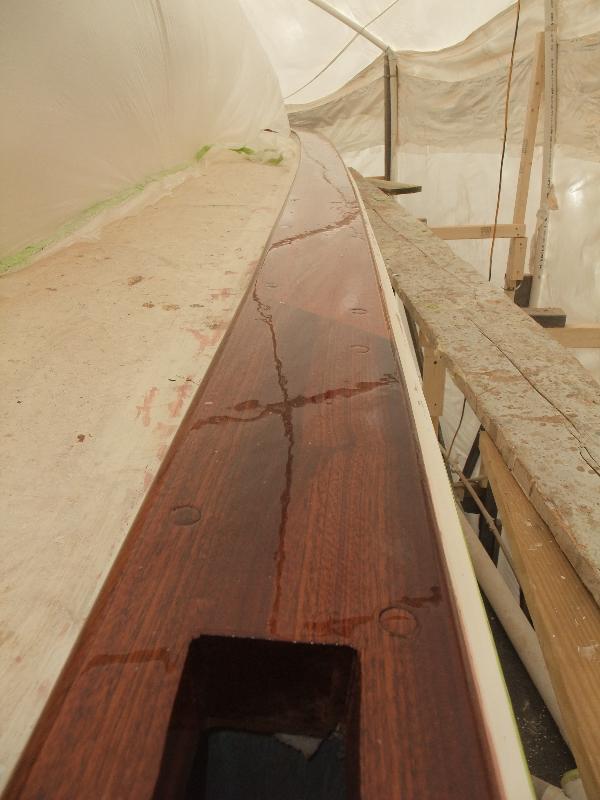
Reply:After a brief delay, we got shiny Imron MS1 on the toe/cap rail!1969 Chris Craft Roamer 46 Refit: Shiny on the Toe RailI'm all giddy!Cheers,Q
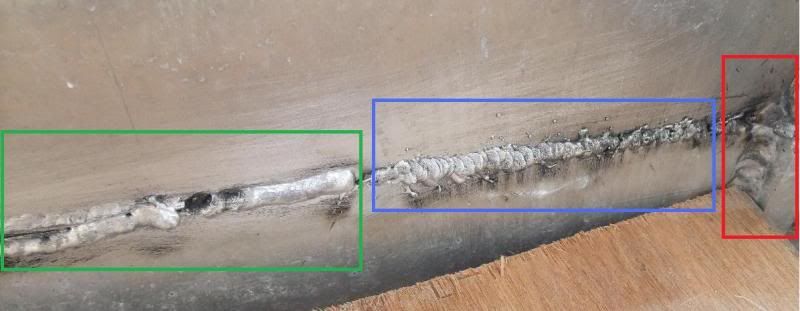
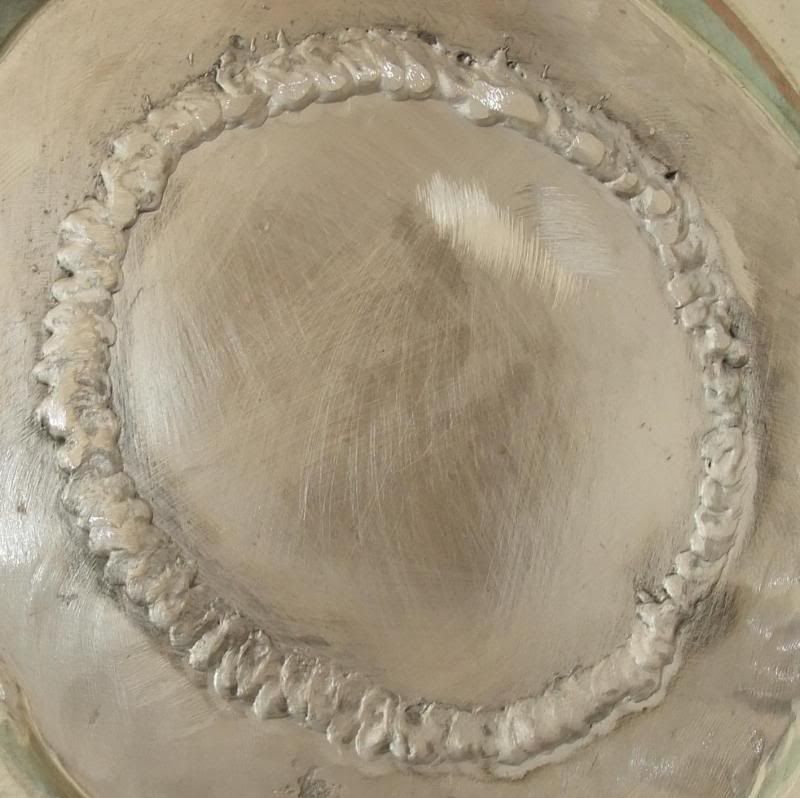
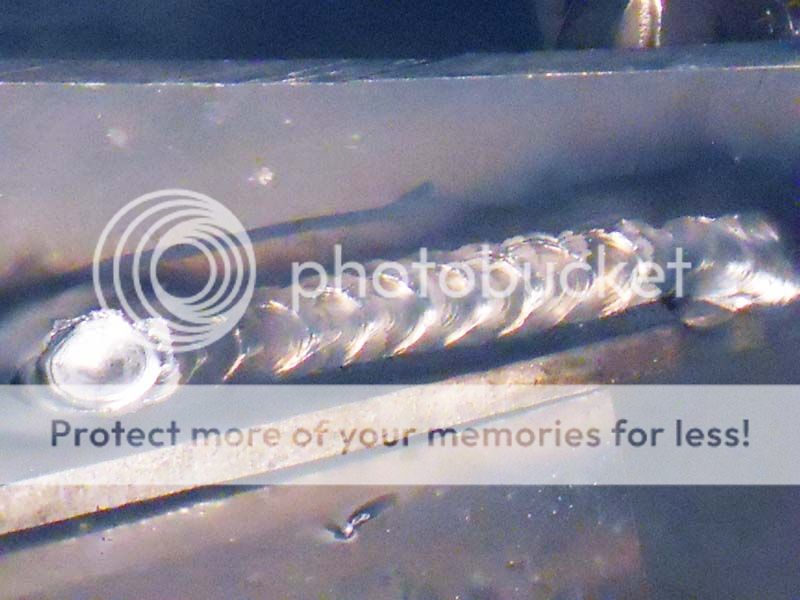
Reply:I was also wondering if I could get some expert opinions about the weld quality below. These new plates are blocking the hole where the exhaust used to exit the boat; we're relocating the exhaust to midships. The fellow who's doing the work is a marine mechanic who does reasonably nice TIG welds with the Snap-On machine in his shop. The welds here are the same guy using my Miller TB280 and Spoolmatic 30A. I know it's hard to diagnose from pix, but I'd appreciate learned opinions on what you can see here.Cheers,Q
Last edited by q240z; 07-01-2013 at 05:00 PM.
Reply:Yuck!
Reply:HA! Concise! I like it! lolCould you elaborate a bit, though? I think I see a crack along the top and it appears he was doing spot welds for most of the trip around. If they are unattractive but otherwise solid, I could maybe live with that. If unattractive = prone to failure, that's another issue.Cheers,Qq240z, this 'weld' has problems. to much wire feed rate for the amount of weld power (voltage in this case) shown by the overly bulged and not fused toe and top of weld. @ 5:00 to 6:00 there is one stretch of 'acceptable' -not decent or good, but acceptable weld that is the toe and top are showing fusion of the puddle to the parent metal (there could be some undercutting?) not clear- but the puddle to puddle definition shows continuity of fusion. There is another stretch from 3:20 to nearly 4:00 where a few puddles are correctly formed, although apparently by accident not intent, where the only correctly formed weld is placed. However, even this set of four or five semi-acceptable puddles are marred by cold start and crater cracked ends with some porosity to boot. Almost all the rest of the weld shows puddle to puddle (the weld was 'buttered' poorly) cold fusion or 'cold lapping'. Almost all the starts and stops are cold lapped and not done correctly by the 'welder' (not even Jr. High shop student skill level).The voids are not really porosity they are actually places where the clean up /contamination of the parent metal gassed off so long the molten edge of the parent metal actually was prevented from flowing into the filler. Porosity is likely to be present if this weld were cut off the surface skin, not sanded or ground, but cut; there will be uniform Swiss cheese like consistency due the lack of joint fit, joint prep, joint design, clean up and welding technique which is totally unsuited for job.Now a 30A is the worst torch to try to weld this as the wt is high and therefore the agility of the torch is lowered, but this weld should been done with TIG. However if a MIG torch was the only choice it should have been done with full back up bars, and allowing a single pass down into teh parent metal to fully fuse to the consumable back up. Instead the weld is 'buttered' onto the filler and deck and built up cold with little fusion.This weld is an example of a poor welder because a good welder will decline to weld if he cannot do a good job. If you can't do good work: don't do any work. I know we all need to learn but that should be done on the bench not someone's boat. a more reliable weld to discuss below.
some things to look for in this uncleaned MIG weld. There is a boundary of clean zone at the toe and top of weld, that shows the argon was cleaning the entire weld zone -no gas flow problems. 5356 Wire soots as the magnesium alloy component vaporizes outside the argon envelope. The top and toe of the weld 'flow into' the parent metal, they don't ball up- and the flow lines disappear into the parent metal without a big ridge or undercut. So this weld was balanced in terms of weld wattage- to melt the wire at this rate combine with the rate that arc melted wire filler was added to the melted parent in the molten metal. The weld you show above was not adjusted correctly.Also the puddle to puddle ridges are present but only ridges not overlapping 'scales' of cold lapped metal, so the puddle movement of the arc/wire filler happened while the puddle was molten; not cold lapping.The start was done on a small 'run on strip' to take up the cold part of the beginning more or less an aluminum MIG technique. And the stop was 'doubled back' on itself so the crater (normal to aluminum MIG stops) is only on top of a previous weld puddle already frozen and that is mostly cut out with carbide cutters to leave room to initiate the next or 'tie-in' weld.
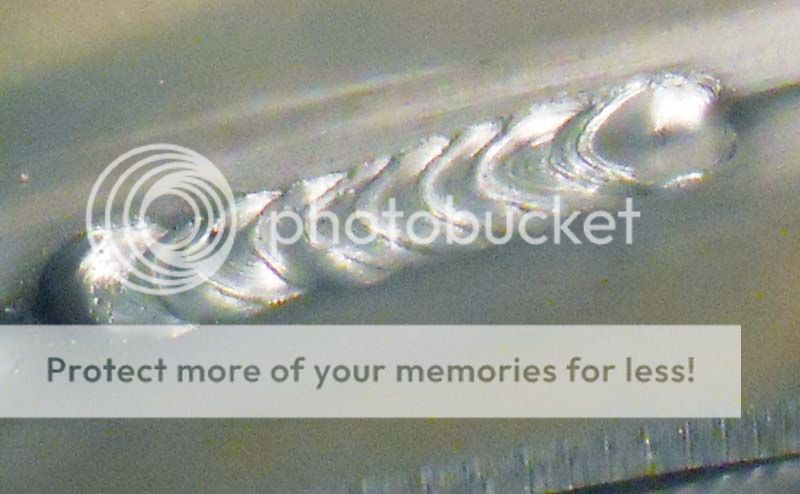
This weld is just a bit 'too cold' that is; the voltage is slightly too low. Why? first the ridges aren't flowing into one another- they're just a bit too pronounced- indicating a small amount of edge cold lapping. In other words with this weld setting movement of the gas cup/wire arc is moving over semi-chilled metal not just providing a movement within the molten puddle. Second; the toe and top fusion is just curling back not much- but enough to indicate that we should either; slow the wire; or crank the voltage; or pull up the cup a fraction, all of which will add the adjustment to get a more fused weld. The bottom edge is much better at this than the top so it may have been a matter of torch angle into the joint, where more arc should have been aimed to the upper leg?

This is the best way to do hull and deck patch repairs. The back up material would be fully consumed in a weld were the root face would be fused into the bottom or back up material. I realize that not all repairs get this level of attention but it is the right way to do the work.The edges would be cleaned back inches inside and out, any old weld cut cleanly out back into parent material not just ground off or sanded smooth and the repair weld would go ahead on 'new' parent material not like the weld shown where likely some of the old weld porosity bubbled into the new 'weld'. This works well for 3/16" and thinner repairs but should have top edges beveled back for any materiel thicker than that.Not sure if you wanted this blunt a statement about that weld (?) but if you've gone to the effort to do the nicely done sheer clamp in pretty pieces of dead tropical plants; it seems a shame to allow the other trades to be at lower standards?cheers,Kevin MorinKenai, AK
Reply:Thanks, Kevin. I appreciate your informative and blunt reply. I've been concerned for a while that the main reason my repower is nine months behind schedule is because this fellow just doesn't have the experience his mouth thinks he's got. I have a day job and don't have time to become as proficient with certain technical skills as I think are necessary. It's one thing to fire up the Millermatic 35 and do sheetmetal work on an old car, and quite another to weld aluminum in mission critical spots. That's why I call in the pros when things need to get done and done right.I think I'm at the point of telling this fellow he's off the job.Know any aluminum welders in Maryland? My Trailblazer runs fine, and it will power a TIG if the Spoolmatic's the wrong tool for the job. I have no problem saying I don't have the skills to do it.It's always something...ThxQ
Reply:Yikes.....fired and money refunded for that job.Wow.Dave J.Dave J.Beware of false knowledge; it is more dangerous than ignorance. ~George Bernard Shaw~ Syncro 350Invertec v250-sThermal Arc 161 and 300MM210DialarcTried being normal once, didn't take....I think it was a Tuesday.
Reply:Dave, the last job he did ended with him complaining about the Miller equipment being junk and pointing to one part of the job he'd done (that looked kind of like the 5-6 o'clock area in the pic I just posted) and calling it a "stack of dimes" weld.I'd never welded aluminum before but have had a Millermatic 35 for a few decades. I'll tell you what, my aluminum welds after an hour of practice with the same TB280 and Spoolmatic looked far better than his "stack of dimes." I didn't say it at the time, but I felt like telling him dimes don't look like that where I'm from... but used toilet paper does.I'm getting tired of firing highly paid American craftsmen for junk work. gadQ
Reply:You have expensive, critical welds to make - consider giving them a couple of test pieces to weld.Many welders have to test on the job - you being the employer is no different in my opinion.One job I asked for scrap of the aluminum they wanted welded and gave them sample welds the next day for inspection. If I'm willing to offer to make sample welds to get a job, you should feel comfortable requiring them on your equipment with your material.Dave J.Dave J.Beware of false knowledge; it is more dangerous than ignorance. ~George Bernard Shaw~ Syncro 350Invertec v250-sThermal Arc 161 and 300MM210DialarcTried being normal once, didn't take....I think it was a Tuesday.
Reply:q240z, glad I wasn't considered rude, and glad you're considering another welder.I'd say we need a touch of perspective here, we have on here (just one of many sites) lots of welders of extraordinary skill whose knowledge allows good work for their clients. I'd say perhaps you may want to tighten up your contractor hiring procedures just a bit? First, if the welder doesn't have their own equipment then that alone should say something about their qualifications to join your project? It does to me, that welder is not committed enough to the trade to provide his own machine- fine with me; but I'm not hiring someone with that attitude/practice/policy/work ethic to come work on my boat!Next, a work sample/weld test/break bend test run with your own equipment, if that is the only tool for this particular job, is not out of line. So if they can't weld up, down, left, right, butt, outside fillet, inside fillet: why would you consider them an "American craftsman"? Let's call them what that group is, wanna-bee's who can't weld- yet. (hopefully) They may develop into fine craftsman but if you can't have an onsite demo - you're being too generous with your terminology and not stringent enough with your hiring standards.This guy must not be sought after enough to have fulltime MIG gig for a local aluminum shop? Otherwise why is he lose to work for you?If they can't make a decent bend break test in plate, you sure as shootin' don't want them on your boat! I don't care for the 30A, I prefer the push pull MK guns- but I can weld with the Miller "club"- if required. (perhaps being threatened with a beating using that particular MIG gun would induce me to pick one up... but not if I could avoid it.) I'm not saying the 30A won't weld, but I am saying the gun is huge for any kind of close quarters, out of position, or small size circular or rolled welds that require high degree of welder motion to make the weld.But the measure of the man, in my opinion, was to take on your work, knowing the welds to be done and the equipment to do it... that is #1 dishonest or #2 so lacking in experience that they should not have been considered or #3 so unaware of good work the welded didn't know any better?I often tell young aluminum MIG welders " if you aren't between the lines you don't keep driving your car do you?" So if you're clearly in the 'ditch' beside the road instead of on the road, why do you keep putting down a bead: that is worse than driving in the ditch????It's not going to get better: stop. Something is wrong so you need to figure that out on scrap before you go ahead.Your man needs to be let go, you need to hire more carefully and remember all welders claim to be able to weld " Anything but the Crack of Dawn and a Broken Heart". "Why!! if you can jump a stallion over that gap at a full gallop; I can weld that sum'b**ch!" So "Trust but Verify" and that's what a weld test is. You need to test any future welder to make sure he/she can do what you need done. If you don't then you're making your own problems. If the work is done wrong (done once) you'll have to take it out (done twice) and then do it again (done three times) so it can be said its three times faster to the job right: once.Cheers,Kevin Morin
Reply:Dave and Kevin, I really do appreciate the responses.The deal is, this guy is a Naval Academy-trained marine engineer. Or maybe I should say allegedly, since I haven't seen the actual sheepskin. He's got a very well equipped shop, with a 5" capacity shaft lathe, milling machine, Snap On MIG and TIG machines etc. I've seen both stainless and aluminum work come out of his shop and it's all looked pretty good. I'd say he's a marine mechanic/machinist with good welding machines in the shop as opposed to him being a "welder." I hope that makes sense.I got the TB280 and Spoolmatic because it's a big aluminum boat project and I've always been a DIY type. Also, there's lousy power supply out in the boatyard, so it made sense to get a welding power supply that can also output 240vac. I wouldn't think twice about firing it up to weld a non-critical bracket, but we're talking cutlass bearing housings and the hull near the waterline. That's the point where I want a pro to do it right.Anyway, I sent him an email with "All stop" in the subject line. He called back and we had words...tried to keep it short and professional. He said there was "good penetration" and that the welds would "grind down nice and flat." I was tempted to quote some observations that were made here, but decided not to. I know he'll talk smack about me no matter what (it's kind of a small town), but I don't want to hurt the guy's feelings any more than necessary. It'll be interesting to see the final bill...I've been on the phone to a few local welders and have already nixed two from the possible pool.You know...what I need is one of those things from the movie The Matrix where you plug something into your head and next thing you know, you're a kung fu master. I need that, but with advanced MIG/TIG training! lolQLast edited by q240z; 07-02-2013 at 03:13 PM.
Reply:In the shop is different than spool gun at the dock.Make them show you they can dial it in perfect. On site test required.If they say they need an hour to experiment with your machine before showing you welds, I'd say let them.Dave J.Dave J.Beware of false knowledge; it is more dangerous than ignorance. ~George Bernard Shaw~ Syncro 350Invertec v250-sThermal Arc 161 and 300MM210DialarcTried being normal once, didn't take....I think it was a Tuesday.
Reply:I was looking at his settings on my TB280 today. 3/16" plate and the amps were dialed down to 80. Seems kinda low to me. He also cranked the wire tension thumbscrew inside the gun so tight that the tensioner couldn't be pushed "home." This is with .35" wire. Last time he welded with it, he had it cranked up to 210 and was burning up tips like crazy (and blaming the machine). I set it at 140 and played with the wire feed until it seemed to be welding better. You guys would have had good cause to rip into my welds, too, but they looked better than his!Oh, and I just got the final bill. It includes the hour or so he spent playing with the machine to learn how it works and 4 hours to weld in the plate in the exhaust hole in that pic I posted.
Reply:[QUOTE=q240z;2826941You know...what I need is one of those things from the movie The Matrix where you plug something into your head and next thing you know, you're a kung fu master. I need that, but with advanced MIG/TIG training! lolQ[/QUOTE]Then you wouldn't need a boat- just plug in and " experience" it all

Good luck with finding a competent weldor.Enjoyed the blogEd Conleyhttp://www.screamingbroccoli.com/MM252MM211 (Sold)Passport Plus & Spool gunLincoln SP135 Plus- (Gone to a good home)Klutch 120v Plasma cutterSO 2020 benderBeer in the fridge
Reply:Thanks, Ed!What I want is the instantaneous training program outside of the Matrix, not the "blue pill." ;-)Q
Reply:"Naval Academy-trained marine engineer" is not a welder, more like a philosopher of floating objects.
Reply:I suppose, wade23454, but I remember what I learned in Material Science back when I thought I wanted to be a civil engineer, and I could see how understanding metal at the molecular level might help make an even better welder. But apparently not this one...I interviewed three potential welders yesterday. Two of the three guessed who the guy was after I described him as a mechanic who said he could weld but the final product shows he couldn't. He had great references from customers I spoke with, but the local pros know his work and gave it a thumbs-down.
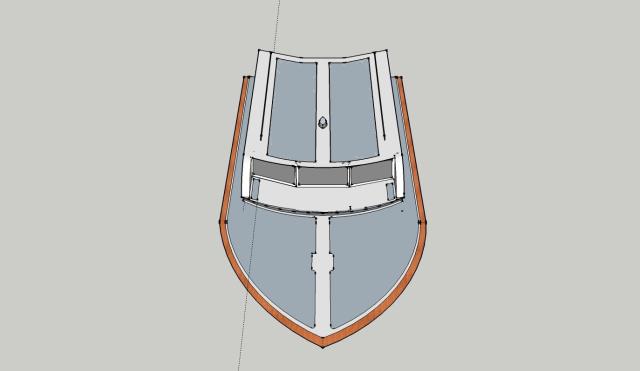
Reply:With the previous mechanic/welder off the scene, I've begun to question some of his ideas for the engine install. For example, the boat has 1/4" 5086 plating on the hull and I'm relocating the exhaust outlet from the transom to just in front of the aft engine room bulkhead. This will avoid station-wagon effect and keep diesel exhaust fumes out of the boat, as well as drastically reducing back pressure and giving an additional foot of width to the aft cabin.I thought it might be reasonable to make an exhaust outlet from 6" and 8" aluminum tubing and weld it directly to the hull. The mechanic/welder didn't like that idea because he felt it would not be possible to get clean welds from 45 year-old aluminum. He suggested making the outlet from fiberglass, and bolting it to the hull with 3M 5200. Any thoughts on which would be preferred? Stainless bolts present potential dissimilar metal problems for the FRP approach, but then dissimilar alloy is what I'm looking at going with the welded version.Here's what I had in mind for the outlet:


In other news, today's article is on priming the deck for the last time. I also threw in some CAD sketches of the non-skid.1969 Chris Craft Roamer 46 Refit: Final Sanding and Primer on the decksCheers,Q

Reply:The outlets should be welded to the hull by a pro. You should leave room for proper mufflers and use flexible connections so engine vibration isn't transferred to the hull.
Reply:q240z, I'm glad to hear you're getting more control of the personnel and therefore work on your project. I think the idea that someone took more than an hour to put in the patch you showed above to fit, tack, & weld -seems excessive -but I don't know its location or the logistics of your work space either. I will remark that you've paying for education and therefore what may seem a high bill was just an expensive lesson- and you got what you paid for; not necessarily in work done but in education of the real level of effort it takes to do your project correctly.Regarding the spool gun adjustments, this is probably widely known but here is how to adjust the wire. First loosen the wire drive compression roll tension spring/screw until the wire will not feed. These tests are all done with a gloved hand on the left, and the MIG torch in your right hand. Hold the gun and pull the trigger with the gas off, and no 'ground' near you or your MIG gun. The loosened drive roll set, (powered roller and tension/compression roller) should not feed wire, the resistance of coiling the wire into your gloved hand should be too much so the wire stays still and the driven roll turns/"spins out".Now tighten the tension screw and repeat. Continue until the drive roll will feed with wire into a tightly coiled 'bird's nest' into the palm of the gloved hand and then release 1/4 turn and see if will still feed?The goal is to have the tension 'just' above the spin out, low tension pressure and the 'too tight' place where the gun will STALL the drive roll when you stop the wire.Not sure if that made sense when read (? hope so) but this is the first balance of MIG gun wire drive tension adjustment for a 1lb. gun. Next the tips, the bore is critical to aluminum a little more critical than steel wire. 0.035" wire tips MAY be, don't know your tip brand/supplier/labels, marked with WIRE SIZE? Some others tips may be labeled with BORE size. This is super-important because the wire to copper tip gap is critical to smooth wire feed.The SIZE of the bore of the MIG contact tip for 0.035" wire should be from 0.040" up to 0.053" actual size depending on high your welding range. (at the upper end it may be time to switch up to 0.045" wire.) So the tips may be labeled 0.040", 0.044", 0.053" OR they may be labeled; 0.035". One set of markings is for the diameter of original bore or the tip and the other is for 'this size wire' and the latter marking may be on any of the three sizes above!!! I have seen this 'unknown factor' absolutely frustrate welders who didn't choose the right tip bore because of the labeling.Further confusing is: if the tips are labeled by WIRE size then a tip labeled 0.045" may be confused for a TIP BORE of 0.045" when it is bored to 0.055" or 0.060" for use with 0.045" WIRE.So, if a 'too large' bore tip is used, (or too small) the there will be 'tip arc' inside the tip and that will stick the wire to tip causing excessive burn back. Many welders with too little experience will diagnosis this as loose drive rolls since the general symptoms are similar: burn back and tip fusion for failure to feed wire.However the wire feed is not always the culprit, tip bore and a CLEAN bore is the key to most of these problems once the wire feed drive roll tension is set correctly.Last but not least in regard tip burn back in aluminum, many welders don't pay adequate attention to the ground connection tot he work where they have a high resistance connection that only 'grounds' -just after- the initiation of the weld sequence. So, the open circuit voltage used to 'light ' the wire is consumed in an unseen arc because the ground clamp is one used for steel and has not been correctly sanded and clamped.Open circuit surges of 70 or 80 volts are common for a part of a second in most MIG power supplies but it should be at the tip of the now feeding wire- not between the rough, pitted, loosely fitted "steel" ground clamp. That arc must be at the tip of the wire, so if the wire won't feed OR if the wire surges unlit- then bounces off the parent metal, the lifting of the contact tip will result in a weld surge and the tip may burn back-....Hope this helps with some of your weld gun questions?I'd remark more about your exhaust fittings if I could understand if this is a wet overboard? The flange component will not allow you to get the gun into the inboard side to back weld as it is designed. (that includes even experienced and skilled welders- there's just not room for the gas cup to get close enough.)I'd use a double layer flange if it will be welded outside the hull only? That is the idea from my previous hull patch example where a weld joint backup plate is provided to fuse the root of the "outboard only" weld.I would avoid the vertical 'cut off' of the flange and make it oval to spread the heat, and make the patch's area of contraction uniform instead of 'notched'.If this is a wet mixture of exhaust and seawater, I'd design this thru-hull differently if it were mine.Also, I'd turn off the 'sketchy' line type so that the images are more machine and less art drawings. There are details of the joints and shapes that would be more easily understood without that line less cluttered type. Last, I think I'd put a translucent 'hull topsides' pane and a translucent bulkhead in their relationship to the through hull into the images. Then mock up the MIG gun and show yourself how it could be back welded? Looks tight to me?cheers,Kevin MorinKenai AK
Reply:Kevin, thank you so much for the detailed post.The patch in the pic is about 5' off the ground, with open space all around, and it's inside a shrink wrap tent/scaffolding structure that surrounds the entire boat...basically, it's in a shop-like environment but with a compacted gravel floor.I used to own a six-man collision repair shop. Finding good help was always a problem. Everybody talks up their skills, but sometimes the finished product doesn't support the talk. Word has it, virtually every employer in the skilled trades faces the same sort of issues. I admit, though, that my BS detector has been on the fritz lately...either that, or the marine trades have a larger percentage of guys who are full of 5h1t than the automotive sector.

On the contact tips, the mechanic/welder wanted to use .35 wire, so I bought the FASTIP tips, PN 206187 (.312" OD .035-0.40" AL WIRE 25 PER PKG). I had no idea they were sold with either bore or wire size specs.On the exhaust component, this is a wet exhaust application. I'll be using waterlift mufflers with 6" inlets and outlets, and hose connections to isolate vibration. You mentioned you'd do it differently if it was a wet exhaust. If you have time and are so inclined, I'd be very interested to hear what you have in mind. One thing to keep in mind is that the interior hull is coated with 1969-era bitumastic, a hard, tar-like material that's painted over but melts when heated or in the presence of petroleum (including mist from engines). Where the exhaust would go, the bitumastic is in good shape and is very difficult to remove entirely.The oval approach for the flange makes sense, but I actually envisioned just cutting a hole in the hull so the exhaust pipe would just fit through, then weld up the gaps around inside and out. The mechanic/welder felt the exterior baffle was unnecessary, but then I'm no longer paying attention to his opinions even with several grains of salt.The only other option that's come to mind is to just make the exhaust outlet in FRP and bolt the flange to the hull with 3M 4200 or Sikkaflex to seal the connection. I'd cut the hole, wax the hull, push the FRP pipe through and then make the flange in place so it conforms to the hull. After the epoxy resin cured, I'd remove the component then refit it and drill the mounting holes...probably use delrin spacers and oversized holes to isolate the stainless bolts from the aluminum.In other news, I came up with a few alternate designs for the non-skid based on comments I've received. Check them out and vote for your favorite at 1969 Chris Craft Roamer 46 Refit: Cast Your Vote for the Non-skid LayoutCheers,Q
Reply:q240z,I agree hiring really top skills are a limit to doing quality work if you're a contractor. And if you create a skill building program in your business; it can end up creating skilled competition if it's not organized in a very clear way from the beginning- not all that easy to do.First, hull coating in general then in specific. In general if the inside of a hull will be finished it's good practice to use a coal tar epoxy or other paint system to keep the moisture from the bare metal. And sprayed tars are a good way to do this simply; once the fab is done and you're ready to add the systems on top of the metal.But, if you want to repair, replace or modify it's somewhat like automobile undercoating- its a pain in the stern. But it can be removed in a fairly controlled way if you do some planning.If you don't plan to remove the inner liner coating: don't plan to weld on the hull. Only plan to weld if you plan to take the time and effort to clean (really Capital C- clean) the hull, inside, and out where your welds will be.To remove the tar, (you can) get a set of rags of the diameter of the cutout (round?) plus about 4" so for a four inch hole you'd have round rags 12" in diameter. Wet, but not dripping, with a solvent (Stoddard if its still sold?) or kerosene or white gas, and then lay the rags (two or three layers) over the area to be cleaned.Tape a plastic bag over the area too, sealing in the rags even on the vertical. This keeps the volatiles from evaporating into your hull and means the VOC's will work their solvent magic to soften the cooled and dried tar coating. Wait till it's good and soft, then use a putty knife with a wide blade to scrape it off into a bucket or bag.Once the worst is gone, then you can use a gloved hand and rags to keep cleaning until you're to what appears to be 'bare' metal. Now you can clean the hull, but I'd make the weld cut out first, and then clean once the cutting lube and saw work is done.The remarks I was making about the wet exhaust riser is that exhaust is pretty acidic and mixed with salt water is tough on aluminum pipe. I'd make it of sched. 80 or even 160 to avoid having to do this work more than once- it will pit and corrode inside.The question of a spray shield is not as critical with a water lift muffle its mainly to keep the swell from flooding the riser with direct force instead of just level flooding. An opening on the side or stern can be forced pretty hard when the right swell comes along so a covering is not unwise to keep from having any back pressure surges. With the riser the shroud is not critical but it won't hurt, you've shown it as though it were from cut down forged 90 which in 6" is going to cost a house payment. I'd use a scallop of straight pipe section and call it good; I'd skip the compound form as unneeded.My idea for this fit is to make sure you (can) clean the hull on both sides adequately to bare metal or don't bother welding. The same goes for gun position and 'reach" meaning; can the gas cup get to within a reasonable distance of the weld zone?Last, the turn tight of pipe or tube to the hull is a potential design problem, you need the inboard space clear- but the close area to the hull makes working welding and re-coating a major pain in the stern. I'd usually use a sea chest, a box-like structure, to convey fluids overboard tight to the hull with out welding more than an opening, and it may be a good idea to consider a flanged repair point too? That way the riser/sea chest is a 'bench built' part you can replace without more than wrenches."sketchy" lines setting still seems to put overlap or 'hogs' at the ends of the arc segments in the sheer clamp in the bow too view you show of the decking. I'd sure be worried about side to side visibility with those "blinders" on the forward sides of the trunk windscreen, I guess the helm must be up another level? Cheers,Kevin Morin
Reply:Thanks for the info, Kevin.I think I'm leaning toward a fiberglass exhaust outlet.On the windows, the helm station is, indeed, up one level. The fwd windows you see are for the galley/salon. The boat will look something like this when she's all assembled:

Cheers,Q
Reply:The latest article on my Roamer 46 refit is a bit of a rant about the way one contractor (the mechanic/pseudo-welder) falling off schedule early on can have ripple effects that go on (for what feels like) forever, significantly adding to both the completion time and the cost of a big project like this. The article ends, though, with pix of the decks primed in Awl Grip 545 -- the final prime coat before we start painting the topsides!1969 Chris Craft Roamer 46 Refit: The Butterfly EffectCheers,Q

Reply:OK, after interviewing ten guys, I've settled on somebody I have confidence in. He's got lots of marine experience, including DoD work. He's coming out this week to look at what needs to be done. AND, he says he can align the engines. Now I just need to find a machine shop that will do shafts they didn't sell.In other news, the weather gods really do need to just stop kickin' me in the nether regions. Then again, I suppose I can't blame the weather gods for a clown mechanic who threw the whole schedule off...Anyway, we've got the cabin top final sanded and ready for the shiny Awl Craft 2000. Just two more days of prep work and we'll spray early one morning before it gets too steamy.1969 Chris Craft Roamer 46 Refit: Final sanding the cabin topCheers,Q
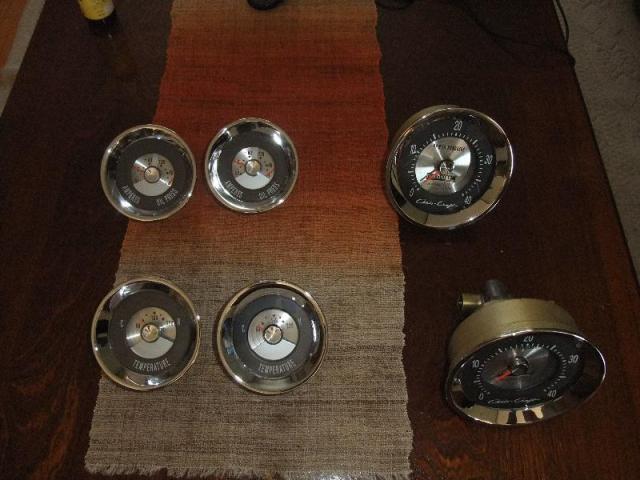
Reply:It's like Christmas in July!A box arrived from Kocian Instruments and a bunch of sparkly stuff was inside.1969 Chris Craft Roamer 46 Refit: Shiny GaugesBack to the boatyard...Q
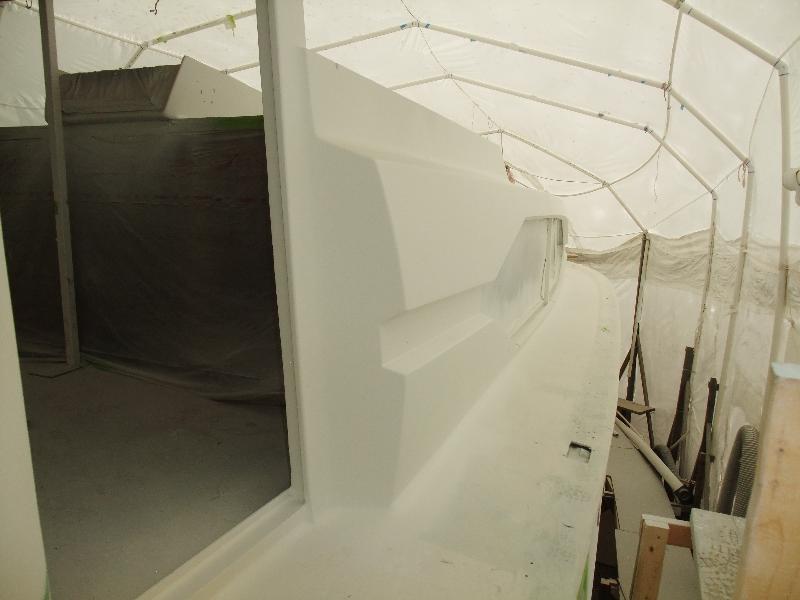
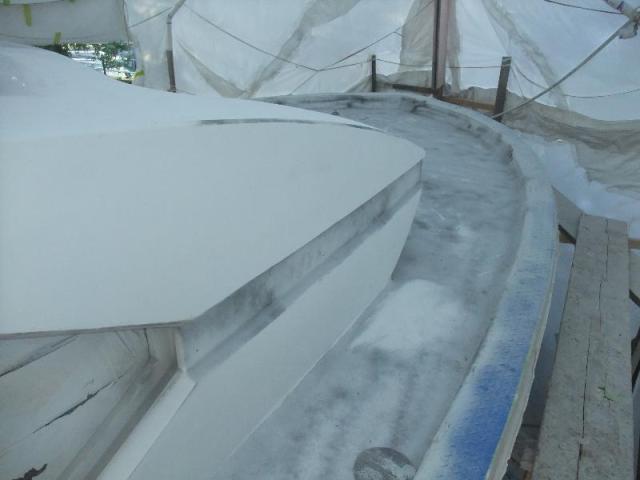
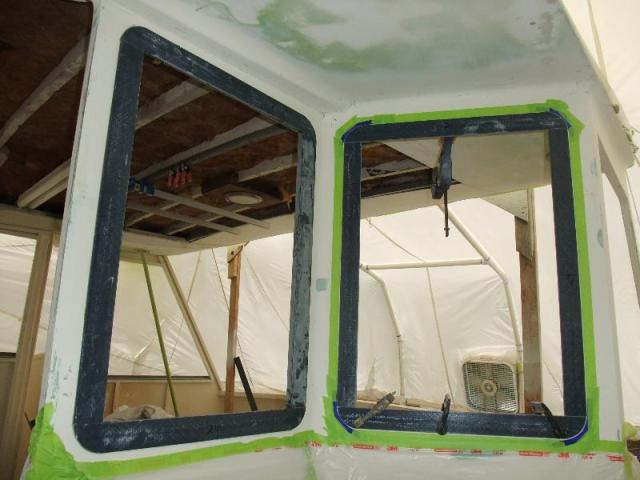
Reply:I took a week off to get the topsides all painted only to get sidelined by yet another SMIB-ification. The Southern Maryland "fabricator" who created my aft enclosure (a different guy than the last mechanic/welder) welded it all together with twist in three of the six window frames. gak

Anyway, my latest article covers my solution to the window problem he created. 1969 Chris Craft Roamer 46 Refit: Aft enclosure windowsCheers,Q
Reply:Thanks, 7A749!I've been trying to figure out if I've just got the worst luck with contractors or what. But it seems that the more people I talk to who have work done by "marine tradesmen," the more it seems I'm not alone by a long stretch.Anyway, thanks for the kudos.Q
Reply:
Originally Posted by q240z
Thanks, 7A749!I've been trying to figure out if I've just got the worst luck with contractors or what. But it seems that the more people I talk to who have work done by "marine tradesmen," the more it seems I'm not alone by a long stretch.Anyway, thanks for the kudos.Q |
|


 发表于 2021-9-1 23:16:10