|
|
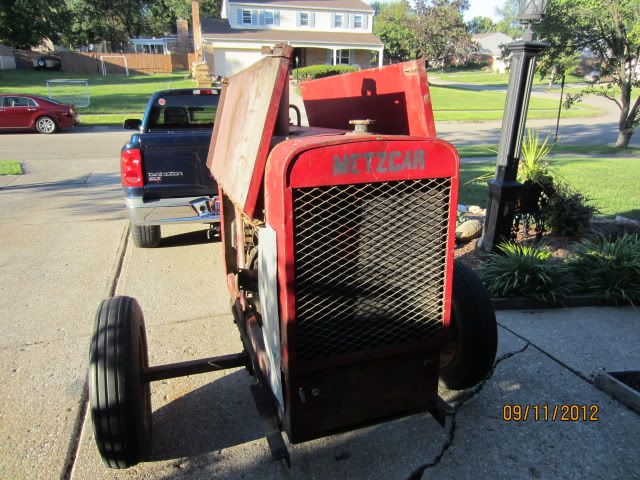
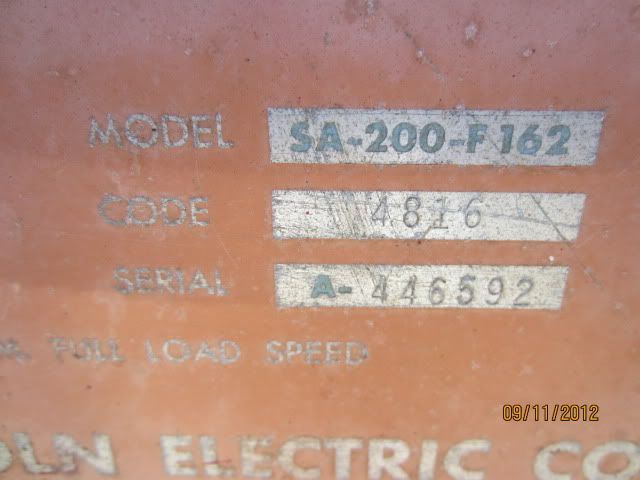
I was checking out the local CL yesterday and ran across a just posted redface for sale for 300.00. I called about it, and arranged to meet the owner after work. It runs, idles up and down, and I was able to burn a couple rods with it. So, it followed me home.I would like to go through it, check everything, replace the sheet metal covers, put the gauges and controls on the front, and possibly upgrade the generator to an alternator. Looking for advice on sourcing parts, and a good plan of attack. I did check the serial no. and it's a 1962 model. It seems to run well, with no smoke and no bad sounds.Thanks for any help.Tim
Reply:One other thing- my machine is missing the air cleaner assembly. I think the original was an oil bath assembly. Does anyone know of if there's a kit available to retro-fit with a standard air cleaner? The seller said he would look around for the original, but he wasn't sure he could finf it.
Reply:Post a photo of the machine showing the area where the air cleaner mounts.Lincoln SA200's... at least 15 - 20. They come and go. Growing partial to the "Short Hoods" in my old age. Last count on Short Hoods was 13 in possession.
Reply:These are the only photos I have right now.
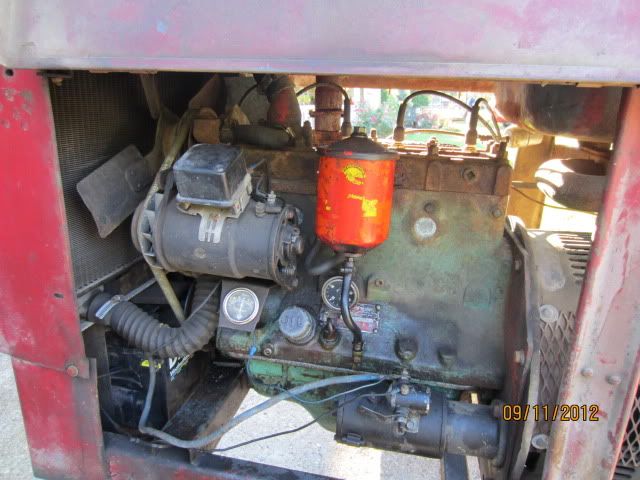
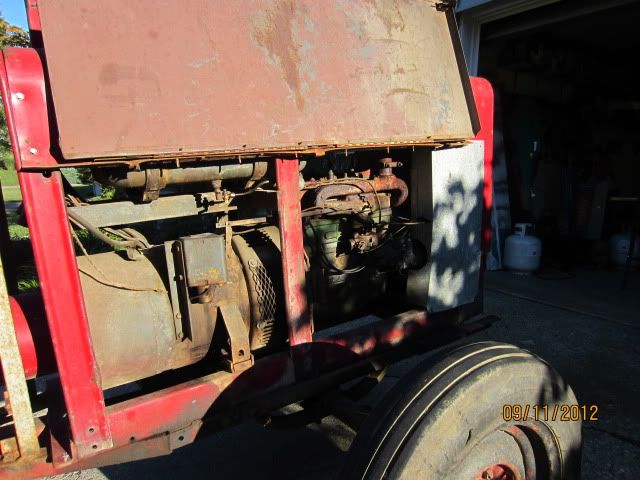

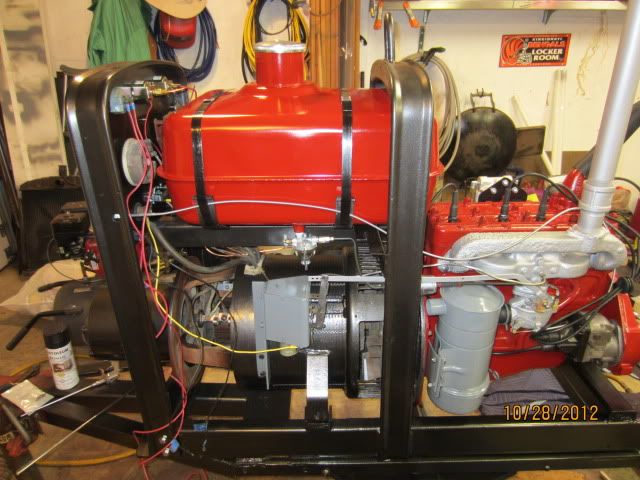
Reply:Here are a couple photos of the air cleaner used on that model machine. The "Red Face" with the blue highlights on the faceplate is a good machine.A few things I noticed:Missing the shroud around the radiator.At some point the machine was improperly disassembled by cutting the grill around the flywheel.Bolts removed from the lower control panel at the main frame.You made an excellent purchase. My biggest word of caution is to go through the machine and replace missing bolts and "tighten up" everything. Even if your going to replace the sheet metal, install temporary bolts and fasteners in the mean time.I'd drain the oil before running it any more. Check for condensation in the oil pan after the machine has sat overnight.Inspect the fuel tank for condensation / rust. Change or install an inline fuel filter with a metal housing.What is the condition of the rain cap on the exhaust pipe?Remove the brush covers and blow out all the trash and debris.At that point you can inspect the brushes.Above all...... take care of the parts. With proper care this machine will out live you.Again...... an excellent find.Thanks,Hobo

Attached Images


Lincoln SA200's... at least 15 - 20. They come and go. Growing partial to the "Short Hoods" in my old age. Last count on Short Hoods was 13 in possession.
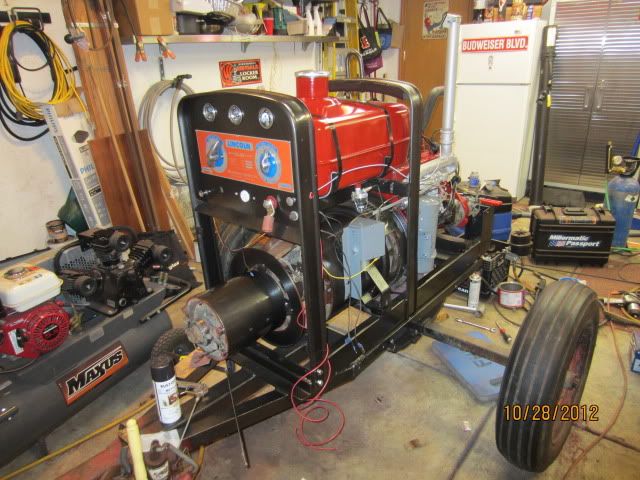
Reply:Hobo,Thanks very much for the reply. Do you mean the shroud that covers the radiator cap?Do you know of a source for the air cleaner assembly?The oil and filter were just changed by the seller. He worked for a crane company, and when he retired, they gave him the welder. He said it was used in their maintenance facility, and not used in the field.I wondered if that expanded metal had been added by somebody.By the way, I've seen some of your work on youtube-very impressive! I'm really leaning toward a full clean-up and repaint, with gasket replacement on this machine. I'll remove and clean and seal the gas tank, and run new fuel line and replace the filter. I'll get into it good over the weekend, and begin disassembly, assessment and clean-up. Thanks again for the advice.Tim
Reply:The shroud encloses the fan near the radiator to direct the airflow through the radiator. It improves the cooling system.Photos of shrouds --------------------------------Replacement oil bath air cleaners are difficult to locate. A few show up on Ebay and those in good condition usually sell for $80 - $100. With these old parts, it's supply and demand at the time you need it. You could always check with Bill's Welder Repair or Stumpts to see if they have a used take off they will sell.http://billswelderrepair.com/http://stumpfweldingsupplies.com/------------------------------------The biggest enemy of the SA 200 is moisture. In a perfect world ..... daily the machine could be started, brought up to temperature and burn one welding rod..... It would out live the owner.We look forward to seeing your work.Thanks,Hobo
Attached Images


Lincoln SA200's... at least 15 - 20. They come and go. Growing partial to the "Short Hoods" in my old age. Last count on Short Hoods was 13 in possession.
Reply:Look at this one from Hybriweld.com. It's a dry element replacement, for 158 dollars.http://hybriweld.com/products/air-cl..._store=default,I have the old oil bath filters I will sell also if you want to stay original1960 Redface SA-200 F 1621973 Black face SA-200 F 163 with 5" chop2013 Miller Trailblazer 2752013 GMC 3500 welding car
Reply:Hello Im new here but can you tell me why the welder with the blue high lights are better?
Reply:

Originally Posted by jay2008

Hello Im new here but can you tell me why the welder with the blue high lights are better?
Reply:Well, I ordered new seals and gaskets, radiator hoses, and carb rebuild kit for Marvel carb from Stumpfs. They also had an oil bath air cleaner, and I ordered a new fan shroud. I gunked and pressure washed the engine after removing the sheet metal and cleaned everything up. The brushes all look to be in very good shape. I' ll continue to update with picks later today.Last edited by tpierce; 09-17-2012 at 09:05 AM.Reason: add info
Reply:
Originally Posted by jay2008
Hello Im new here but can you tell me why the welder with the blue high lights are better?
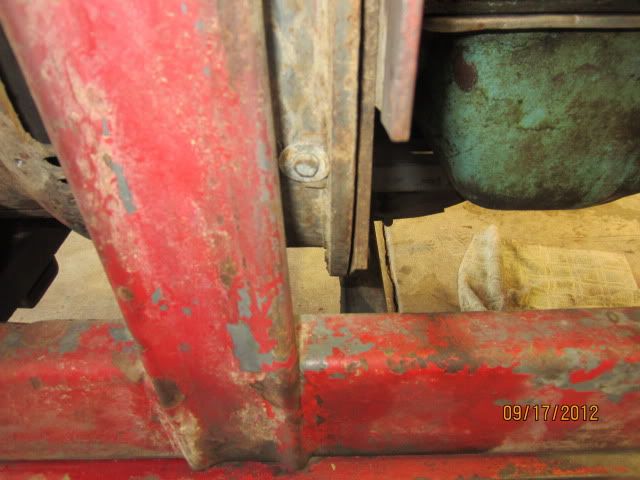
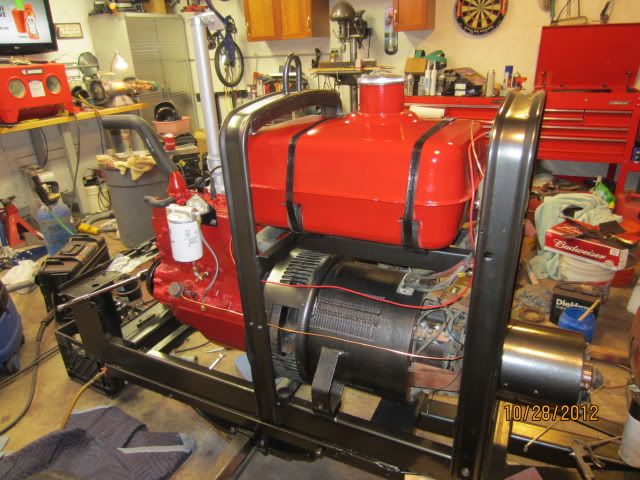
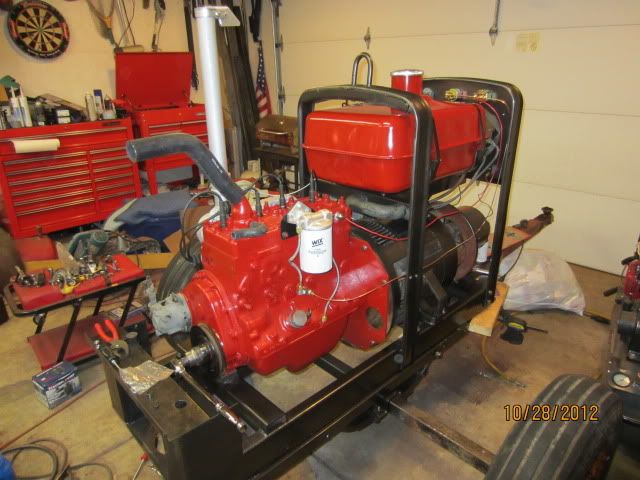
Reply:Well, I found time over the weekend to de-grease and pressure wash the machine. Before doing so, I removed all sheet metal, and removed the latches from the doors, as I'll re-use them with the new sheet metal I'm buying. I found a few things that don't look right to me. I'll comment on the photos, and would like input from others.
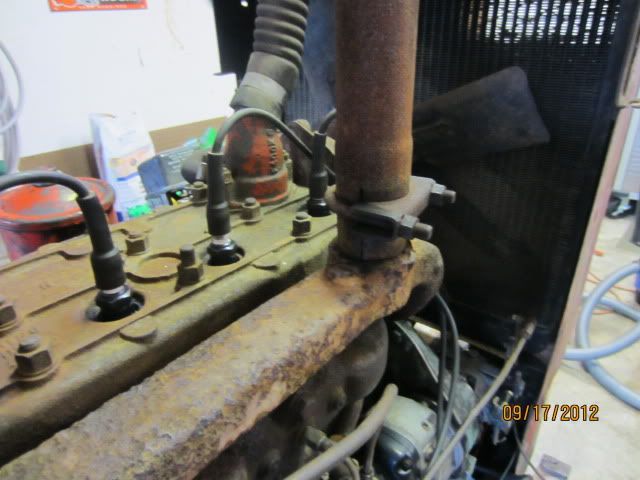
In this photo, you can see the exhaust pipe has been slit, and is attached with a clamp. I'll probably wind up buying a new manifold.
The fuel line is routed wrong. It goes uphill from the tank. This could be why I would start it, then it would run out of gas and stop. I did blow out the valve and put a new filter in place. It seems the fuel line should be routed under the top frame member to assist gravity.
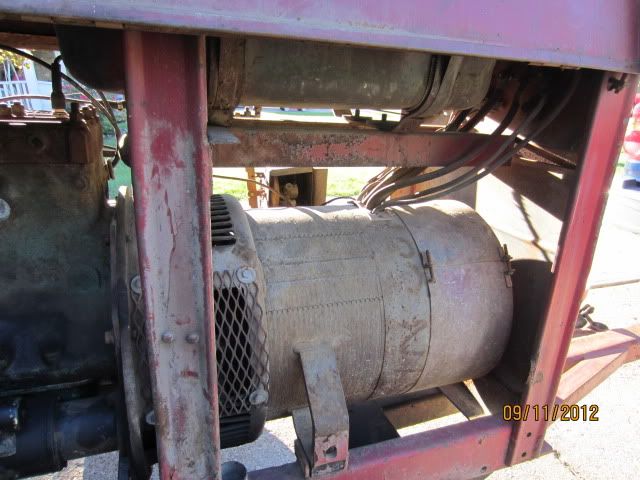
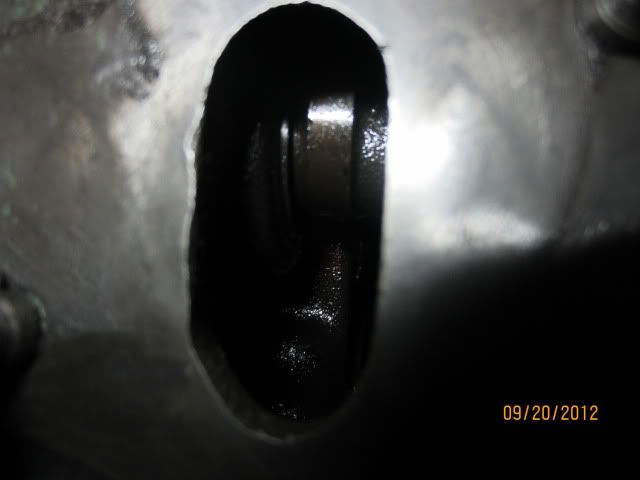
The generator section looked good. I removed the cover and checked the brushes and commutator and all looked good. No ridges or obvious wear. I also removed the expanded metal where someone had cut out the original fins.
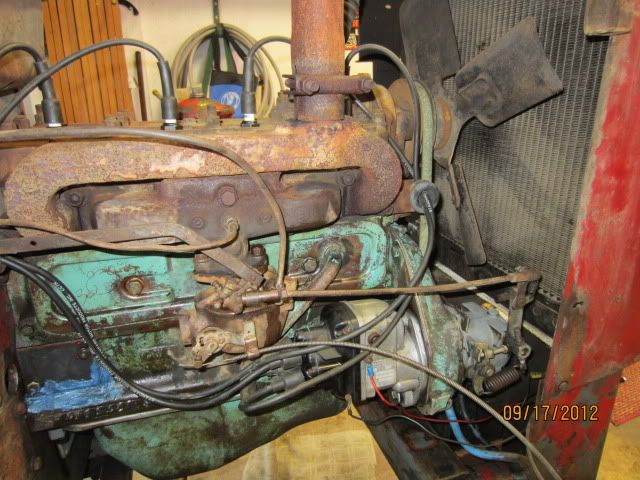
That paint color looks suspiciously like Jasper engine paint. I wonder if it was rebuild replacement? Could explain the missing front engine mount bolt, and fuel line routing, guard fins being cut out?
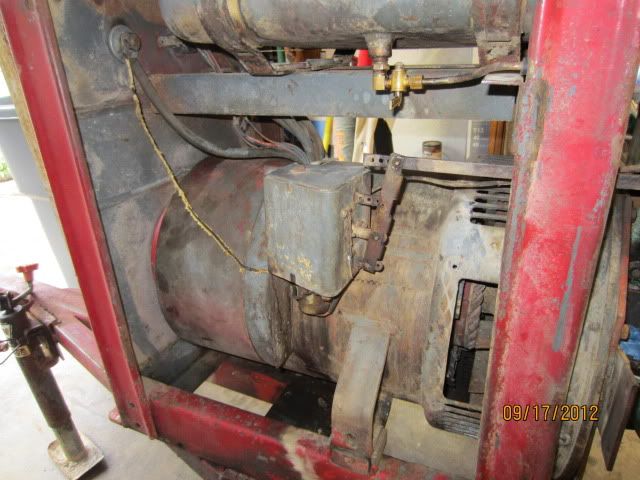
Just a shot of the tank & selector switches. Nothing amiss here. Tank is in great shape.
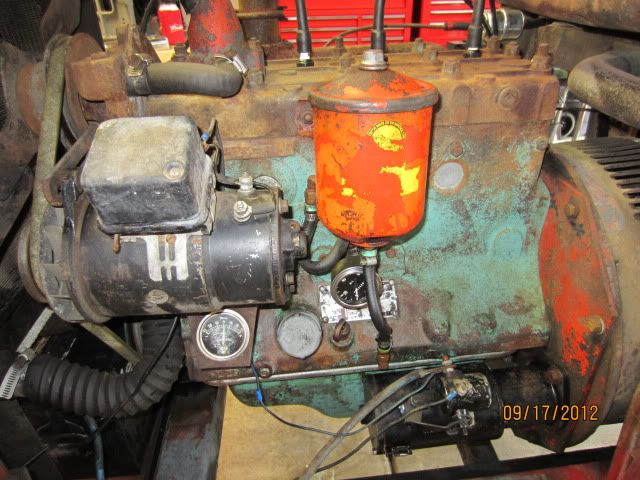
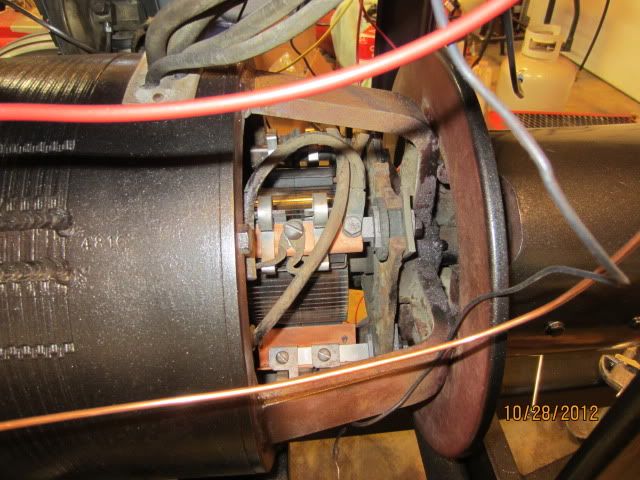
Generator side shot of engine.Engine has oil leaks at the front. I'll replace all seals and gaskets.
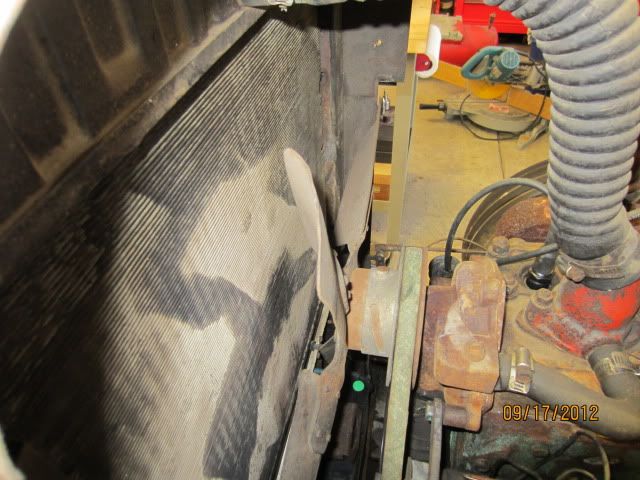
I believe the fan is mounted backwards. It blows through the radiator back. The water pump will be rebuilt or replaced, as there is play in fan. It doesn't leak yet though.
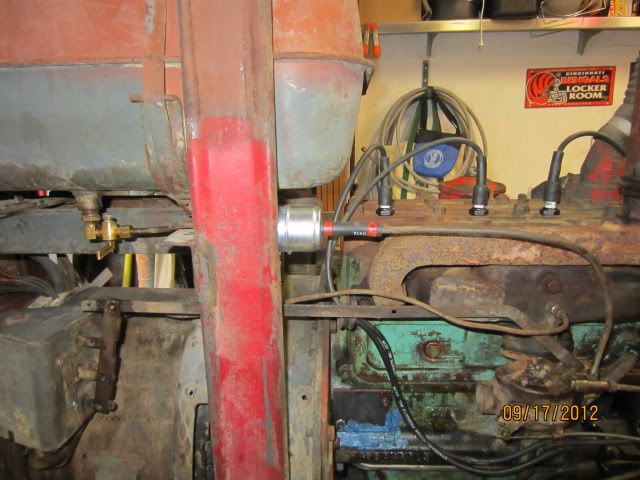
There is a small gap +/- 1/8" at the bottom interface between the engine and generator. The bolts are all tight. This worries me a little. I may have to remove the engine to correct.I also removed the magneto covers to inspect and noticed no gaskets, so I'll be replacing them along with points.All comments, advice are welcome and appreciated.
Reply:You have a good eye for detail.I'll just cover a few things.The "gap" between the engine adapter plate and the generator housing is easily corrected. It is high on the list of priorities since this gap is allowing your brushes to run outside of their optimum area on the armature. It is also allowing your rear armature bearing to not be totally seated in it's housing. There is a machined groove that must be mated together so the gap will disappear. You will need to support both the generator and engine near the location of the gap. Loosen the bolts around the engine adapter plate about 1/4". Pry the gap apart until you can see through the gap.... just slightly. At this point you will need to "work" the generator up or down and perhaps sideways. If you are lucky and the machine groove was not damaged, the housing should mate back up tightly on the adapter plate. It may take some work to make this happen. I would take an inspection mirror and flashlight and verify that there were no foreign objects trapped between the plate and housing (especially under the bottom).The split exhaust pipe and clamp are a fairly common setup. Issues there are usually rust forming between the pipe and manifold and expanding. I take a 1 - 1/2" NPT tap and clean out the threads. If I have a piece of stainless pipe, I'll install that. Caution on replacement manifolds. The biggest issue has been an undersize hole where the carb mounts. This results in the butterfly not opening 100%.I usually run both a "sediment bowl" as well as an inline filter for the fuel system. I see that the sediment bowl was remobed on your machine.The majority of the SA 200's have the ""pusher" type tan that exhaust heat out through the radiator while drawing cooling air from under the side doors.While your working in the water pump area, it would be wise to replace the thermostat. You will need to order a new gasket for the goose-neck when you replace it.In looking at the small wiring .... It would be wise to remove the main brush cover and trace out the small wires that go to the exciter brushes. They lay in a small channel and usually need some attention on the insulation.Also, look closely at the lower radiator hose where the fan belt runs close to it. If the hose is a bit short or the fan belt a bit long there is an interference issue.It looks like a solid old machine that should out live you.Thanks,HoboLincoln SA200's... at least 15 - 20. They come and go. Growing partial to the "Short Hoods" in my old age. Last count on Short Hoods was 13 in possession.
Reply:Hobo,Thanks for your reply and advice. I appreciate it. I was planning to replace the sediment bowl assembly, as well as the thermostat while I was in there. Thanks for heads-up on the brush wires, I'll give them special attention. After I drain the coolant, I'll remove the radiator and correct that gap using your information. I'll remove all accessories, inspect them and clean them up and repaint them as required. I think I'll leave the magneto and governor unpainted. I'm also going to wire brush and polish the linkages, and replace the fuel line with new. I'm considering changing the oil filter out to a spin type. Is there a source for that kit to convert?I also want to move the gauges and start controls to the front panel as many others have done. I tell you I'm getting stoked now! After welding with it for a short time, I understand why these machines are so desirable. What a sweet arc!Thanks again,Tim
Reply:Would it be a good idea to use silicone sealant on both sides of all the gaskets when I replace them?
Reply:Yes I would....1950 SA-200 Shorthood1961 SA-200 Red Face X2
Reply:What I use is Permatex Aircraft Sealant.1950 SA-200 Shorthood1961 SA-200 Red Face X2
Reply:
Originally Posted by tpierce
Would it be a good idea to use silicone sealant on both sides of all the gaskets when I replace them?
Reply:I've taken all accessories off the engine, drained the tank, drained coolant and removed the radiator. I'll remove the head and clean all mating surfaces and begin replacing all gaskets and seals. I did find a Jasper label behind the oil filter, so at some the original engine was replaced with a rebuilt. Should I go ahead and adjust the valves while I have it apart? What is the procedure? I couldn't find anything online.Thanks,Tim
Reply:Is there any trick to removing the cam gear so I can remove the plate on the front of the block?I don't see any marks that line up on the crank gear and cam gear.
Reply:Never mind, I got it. Getting ready to put it back together.
Reply:Well when you do, make sure to support the cam to prevent driving the welch plug out of the back of the block when tapping the gear back on or you'll have a massive oil leak when you next start it up.Proper method per the Continental manual:

MM200 w/Spoolmatic 1Syncrowave 180SDBobcat 225G Plus - LP/NGMUTT Suitcase WirefeederWC-1S/Spoolmatic 1HF-251D-1PakMaster 100XL '68 Red Face Code #6633 projectStar Jet 21-110

Save Second Base!
Reply:
Originally Posted by tpierce
I've taken all accessories off the engine, drained the tank, drained coolant and removed the radiator. I'll remove the head and clean all mating surfaces and begin replacing all gaskets and seals. I did find a Jasper label behind the oil filter, so at some the original engine was replaced with a rebuilt. Should I go ahead and adjust the valves while I have it apart? What is the procedure? I couldn't find anything online.Thanks,Tim
Reply:OK guys. I didn't see Duane's post on the cam gear before I installed the gear. It went on fairly easily. I used a plastic dead blow hammer to knock it on. I removed the block-off plate at rear of the block, and the cam does not appear to have moved. Would the rear engine plate prevent the welch plug from being driven out? Now, I might have to remove the engine to be sure. What do you think?Here is a picture of the cam position.
Reply:Any updates on ur build.
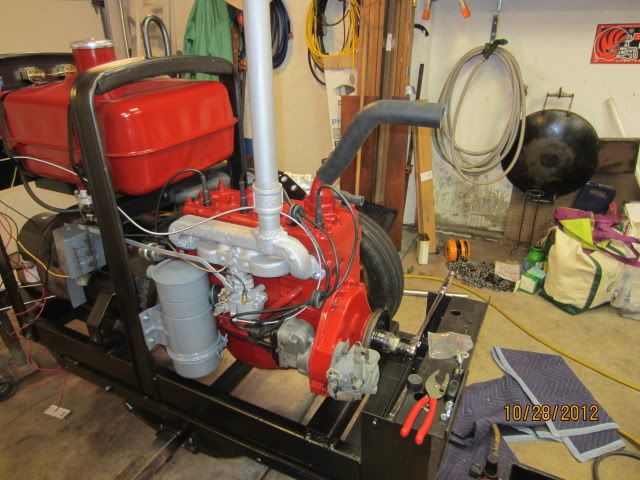
Reply:Yeah, I've been busy lately with family obligations, yard work etc. Thanks to Duane, I have the engine mated back up to the generator. As you may recall, I had a cracked coupling disk and support plate, which made a rattling noise when running. I am SO glad I decided to take apart to check. That disk was just moments away from a catastrophic failure, which would have reduced the machine to a parts unit.I got all the gaskets changed on engine, painted it, and rebuilt the carb. Got the manifold and carb mounted. I'm now checking the mag, and governor. Should get them installed this week. That brings me to another subject- I removed the flywheel from the engine to clean up, and paint the back of the engine. I wire brushed that flywheel and cleaned it, but for the life of me, I cannot find a timing mark on it! So now, I'm wondering if I'm in for some challenges as far as re-installing the mag and getting it properly timed.I'll be moving on to the generator end and cleaning the brush holders and checking all the wiring after I get the accessories back on the engine. I'll be posting more pics as I get a little further along.
Reply:Cool tpierce how did u end up adjusting ur valves i recently got a 62 red/blue face and want to check mine. Want to adjust em and check everything's good it was sitting for a while too. I want to get a kit for my mag too. Post some pics, here's a pic of mine i plan on restoring her too

Attached Images

Reply:UPDATE!I've begun reassembly of all the parts and pieces. I should have my water pump back from Titan Re-builders this week. I'm real happy with the way my machine is coming along.

The R-57 cleaned up beautifully.
I removed all the brush holders and bead blasted them and inspected the brushes. Due to the size of the brushes, I don't think this machine was used heavily, OR someone had recently replaced the brushes.

My welder didn't come with an air filter, so I bought one from Stumpfs. I also ran a new fuel line, and added the sediment bowl.
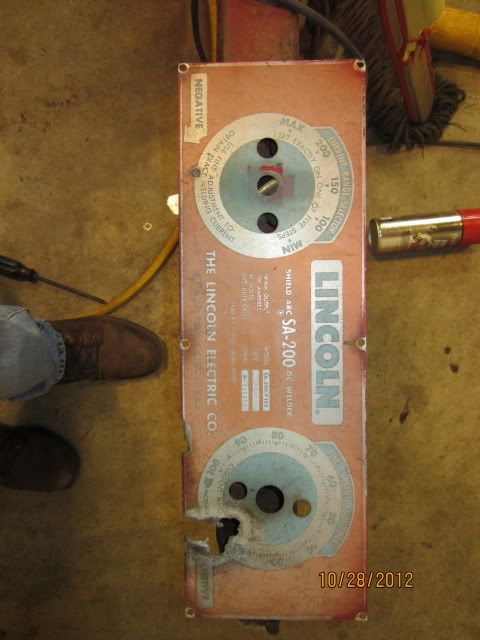
The original faceplate. The new one is stamped with my machine info, and is an exact replica. Thanks to Stumpfs.
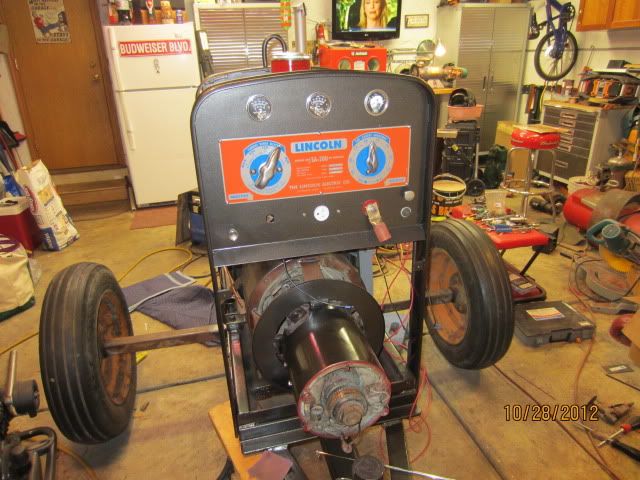
The front panel cleaned up real well. I had to weld in a patch where it looked like someone walked up to the panel to adjust the current, and they burned a hole out of the bottom lip. I also moved all controls and gauges to the front, using Murphy switches. All control wiring will be new 12 gauge.
I also replaced the old canister oil filter with a new spin on conversion.Last edited by tpierce; 10-29-2012 at 08:51 AM.Reason: add word
Reply:Sweet Man what paint r u using on ur engine and panels I plan on painting mine soon. Ordered my face too $40 cant beat that from stumpfs.
Reply:Nice looking machine!"I also moved all controls and gauges to the front, using Murphy switches"What are Murphy switches?
Reply:Nato, I'm using Duplicolor engine paint, and Rustoleum spray paint.Murphy switches will ground the magneto, shutting down the engine if it overheats, or loses oil pressure.Thanks for the comments!
Reply:Yeah u definitely need em Murphy gauges for engine protection. Ill order some this week where did u get urs tpierce? How did u wire em to ur Magneto? Im planning on doing a rebuild on my Magneto and water pump soon is it difficult to redo the Magneto and pump man?
Reply:I bought my gauges from Stumpfs. There is one wire on the back of each gauge. You tie together to the ignition on/off switch, that is wired to the mag. I didn't rebuild the mag on this machine as it wasn't required, but I have rebuilt the one on my boat generator. It's not difficult to do.I sent my pump to Titan Rebuilders. They rebuilt and shipped it back for $60.00.If you check the SA 200 sticky at the top of page, you'll find a great deal of info. Also, check Bill's Welding Repair Service for parts breakdown, and schematics.
Reply:You are gonna love that one....I had a 61.Worked across from 300s,350s,other newer 200s nothin would touch it.drive like no other!
Reply:Tpierce Did you only use high heat on the engine?
Reply:I'll check the can when I get home tonight. I think it was just the Duplicolor engine paint. It's held up well. I've run the machine quite a lot under load when welding.
Reply:What about the grey was it engine paint too? Did you use engine paint on everything or just what's red
Reply:I was wondering if you could help I need to figure out what is missing because I’m leaking fuel from bolt that’s facing straight down


Reply:
Originally Posted by Jayman325
I was wondering if you could help I need to figure out what is missing because I’m leaking fuel from bolt that’s facing straight down
|
|


 发表于 2022-11-22 15:51:10