|
|
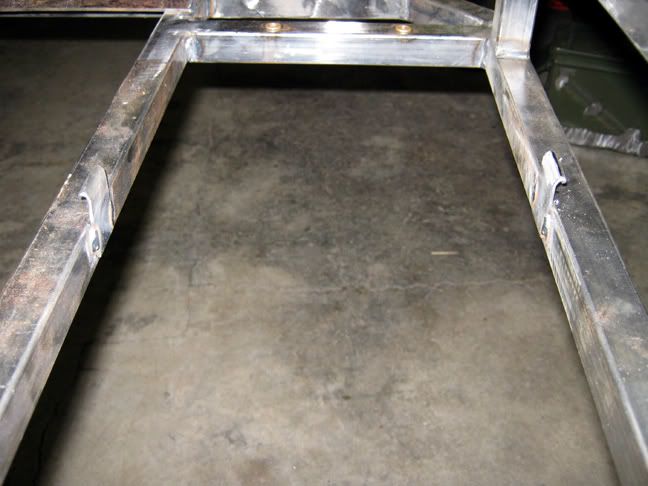
I thought I would post up one of my projects I have done. I built this for my Hummer H2, as I was not satisfied with the available racks, and did not really like the $2500 they wanted for one this size.I thought about many different options, and chose to go with square tubing instead of round. I think it suits the Hummer better, since the Hummer is a very square, angular design. It took about 6 months of working mornings before work and weekends.Main tools were Hobart Handler 140 MIG and JET band saw.I built a quick jig for assembling the corners. It worked well, as the frame came out dead on square.

Here is the corner jig in action:
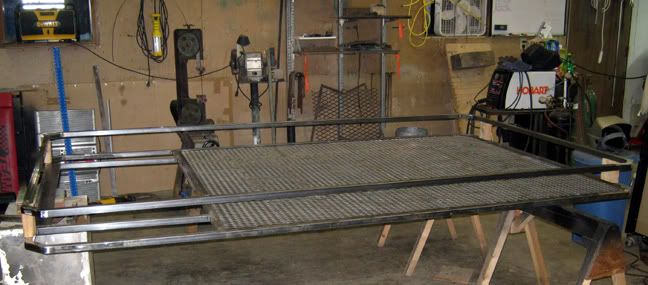
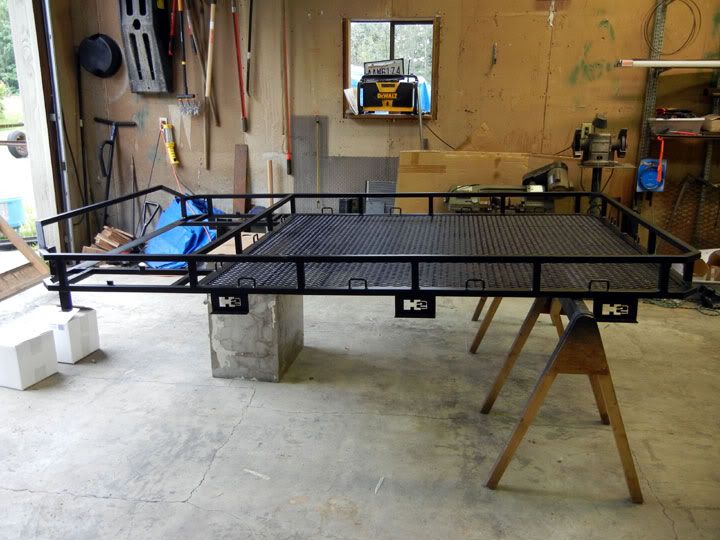
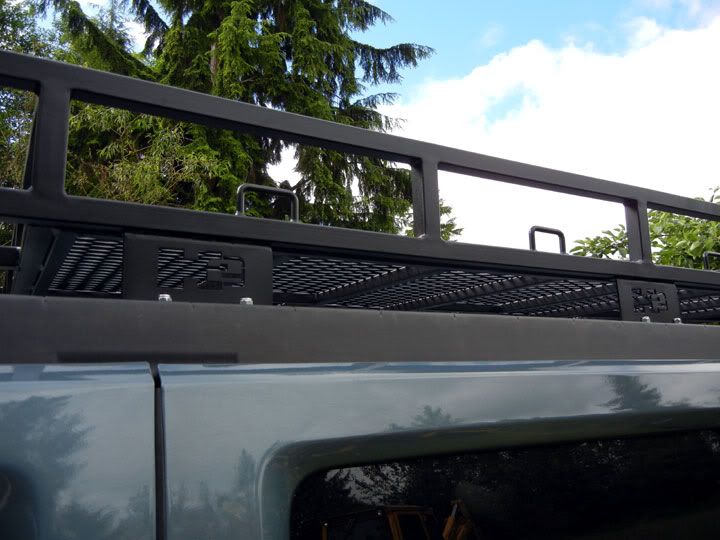
I used 3/4" tubing to go all around the cargo area. This will add more strength to the frame, and also makes a shelf for the gratting to sit on. Then I put in the cross pieces and added bracing in between them. Here it is with the 3/4" in around the cargo area and the cross bars:
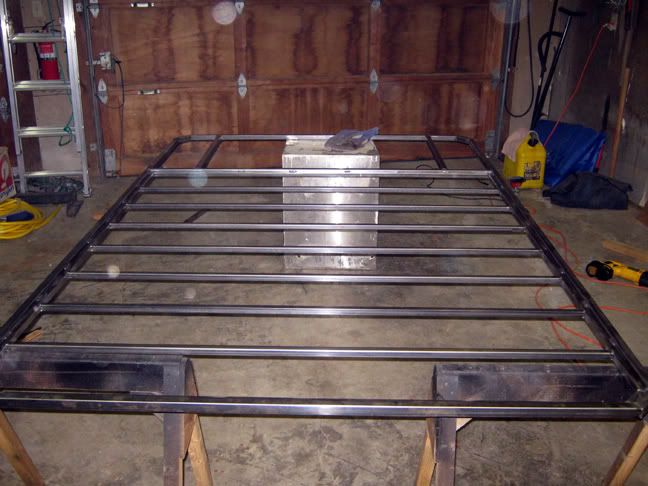
Here it is with the other bracing added:

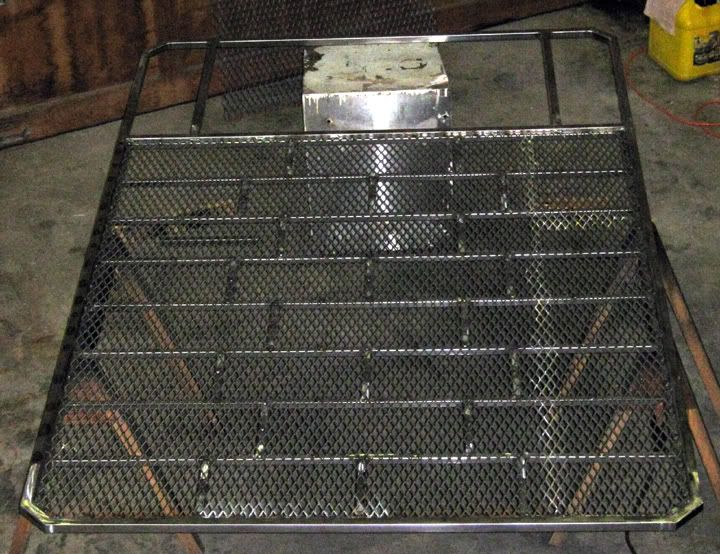
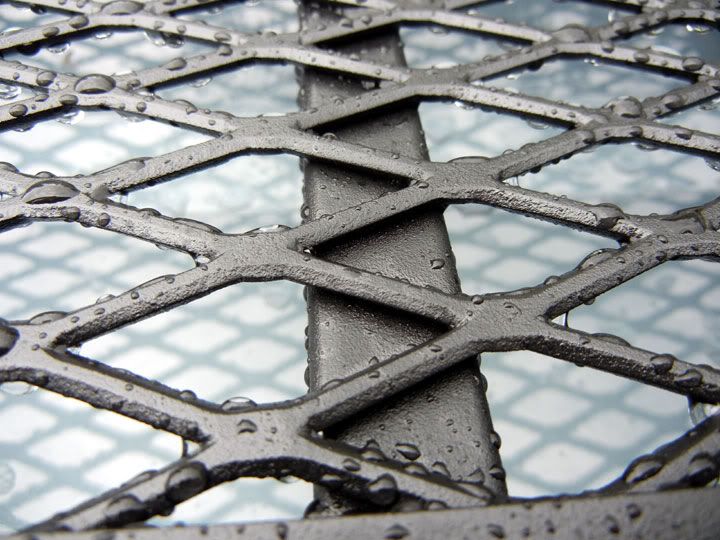
Ok, here is a pic with the grating welded in.
Last edited by Justme; 03-24-2012 at 03:57 PM.
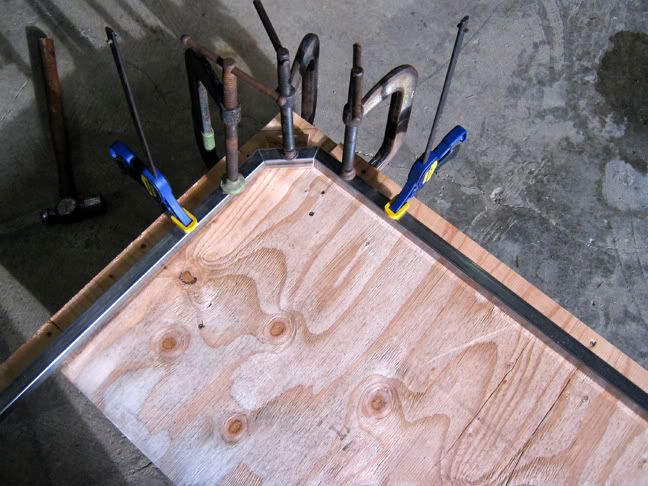
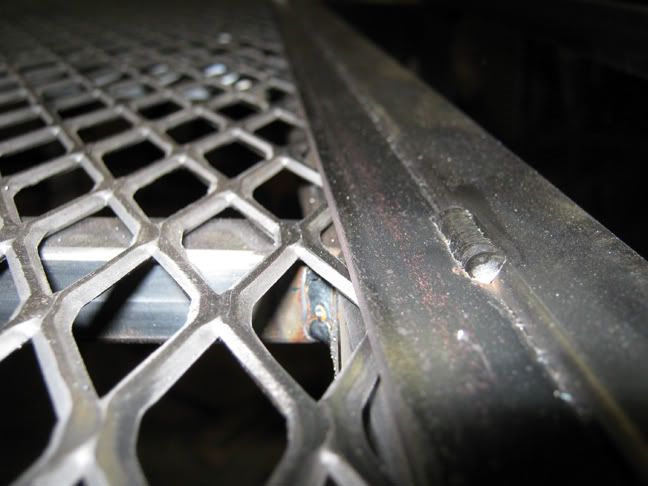
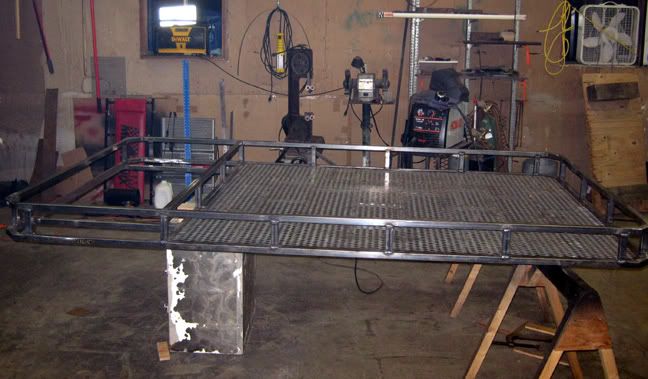
Reply:Here are a couple shots of the strapping around the edge to show how it went together:
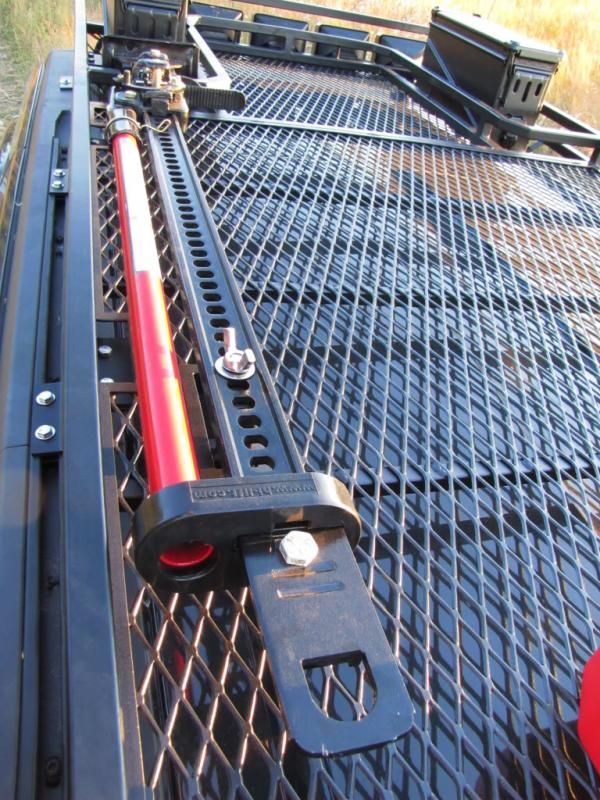
The rail on it.
I eventually changed the front of the rail. I cut it and angled it up for more space for lights.Last edited by Justme; 03-24-2012 at 03:31 PM.
Reply:Oops!Last edited by Justme; 03-24-2012 at 03:34 PM.Reason: Doubled up
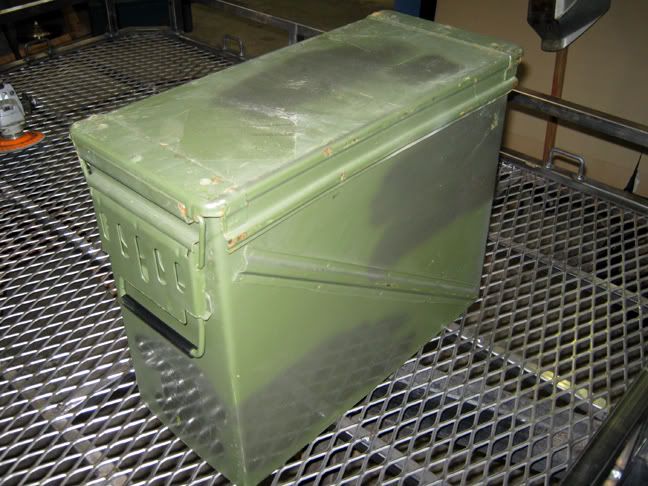
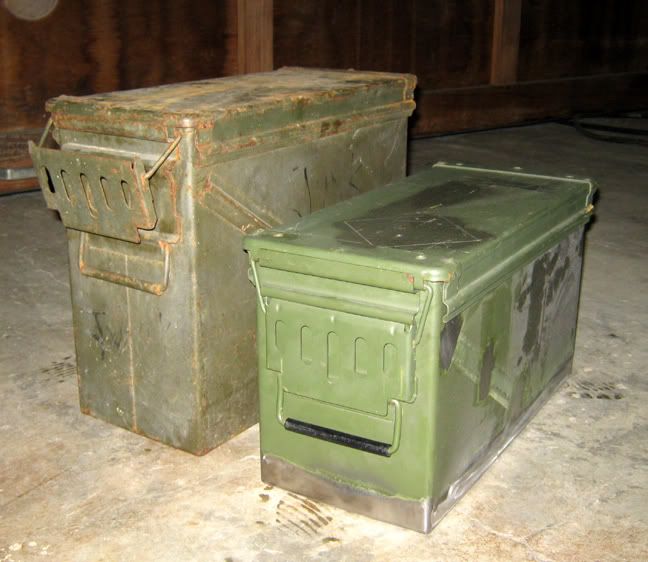
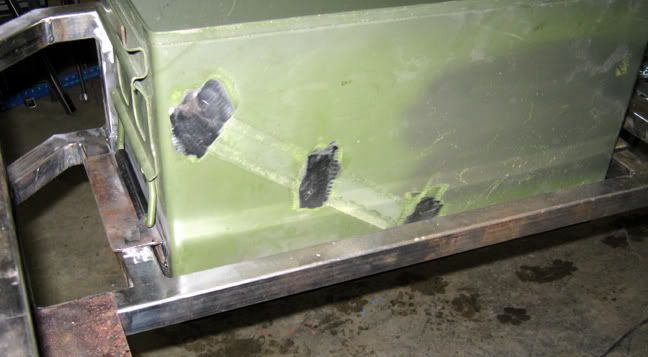
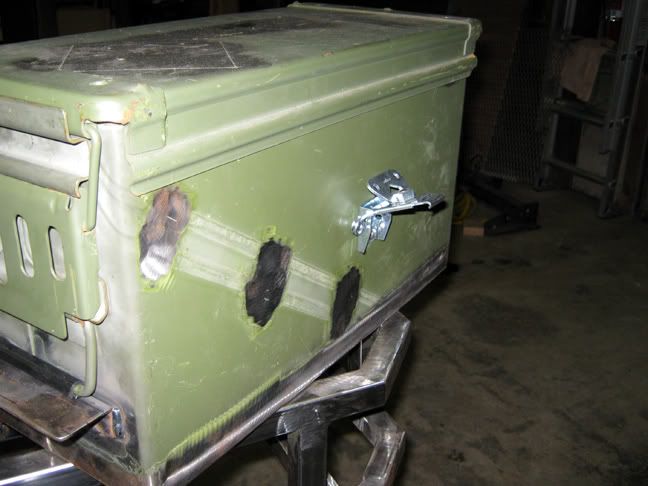
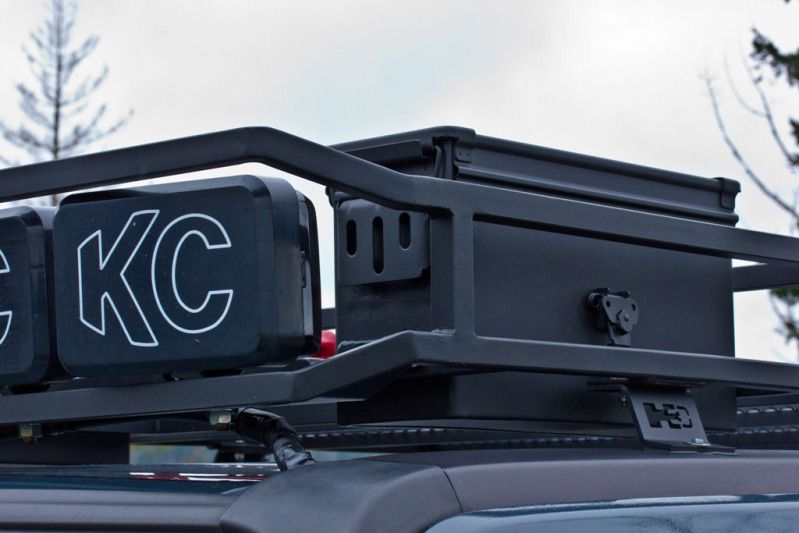
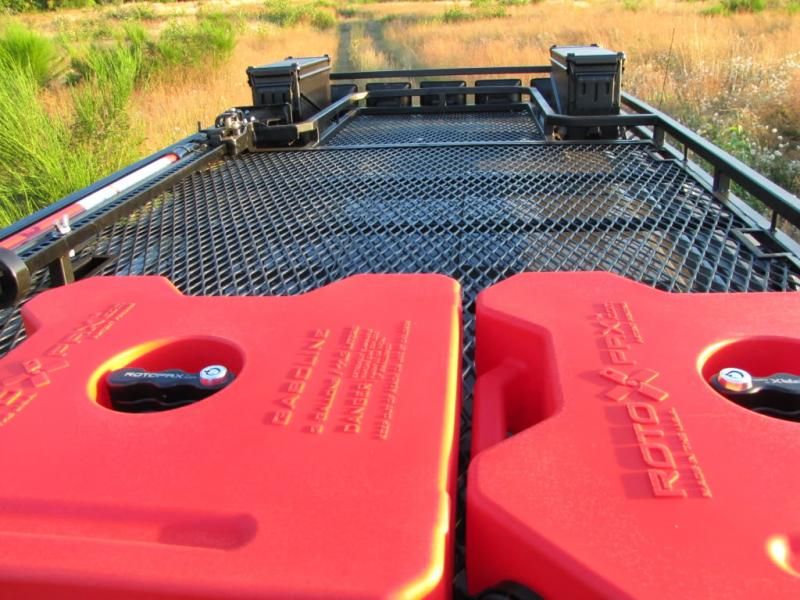
Reply:I decided to go with storage boxes in the front corners, but thought for a long time on how or what to make them with. I wanted them water tight. Then I looked around in my shop and came up with great idea. I had an old 20MM ammo can. They have rubber seals in the lid and are water tight. It was the perfect width and length, but too tall. I went and picked up two new ones in good shape. I cut the stiffeners off the side and cut the bottoms off. Then I cut about 5" off the sides, and welded the bottoms back on. I also made and installed tie-down points around the edge of the cargo area. They are made from 5/16" round stock, but in keeping with the design theme, I made them square.The pre-mod can:
Stiffener removed:
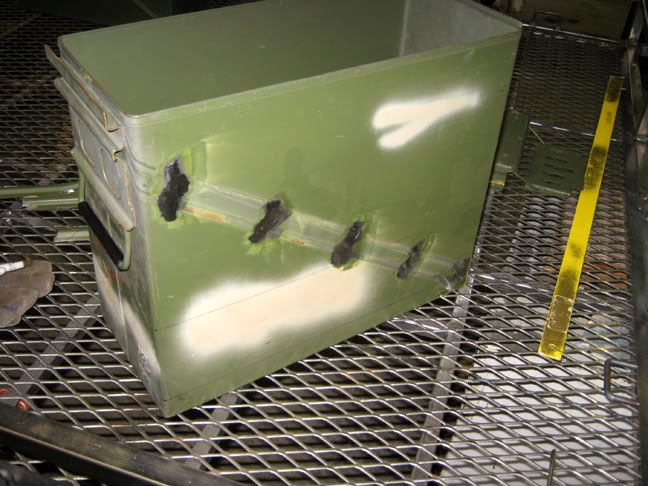
Bottom cut off:
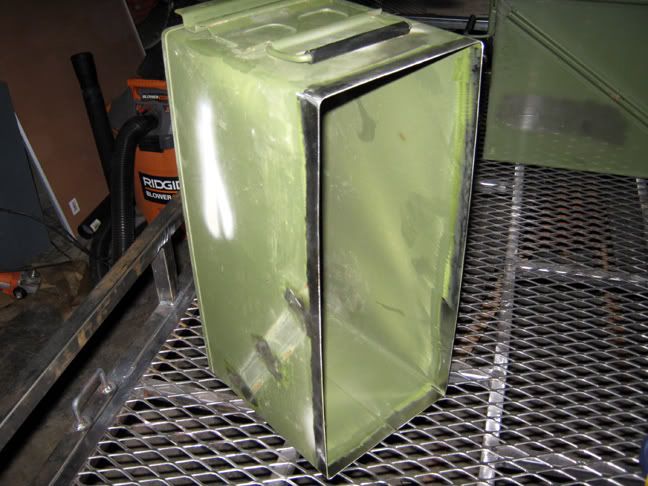
Welded back together:
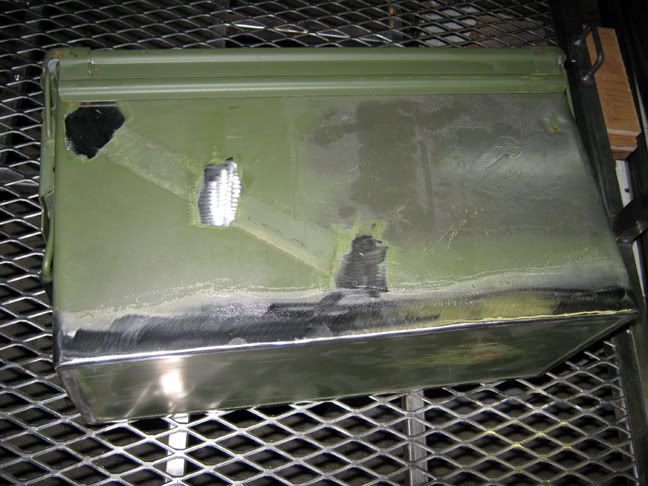
Modded can next to the old cruddy one that inspired the idea:
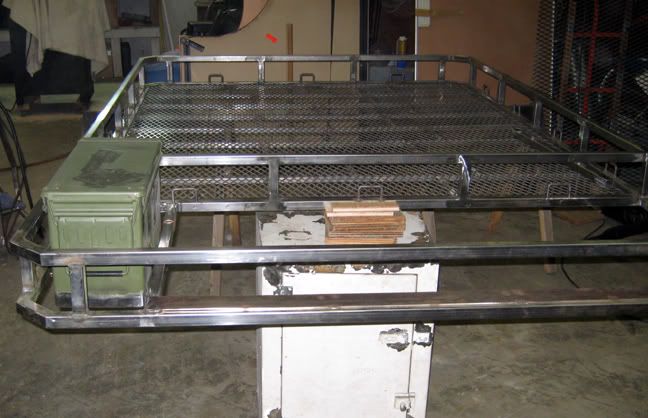
Here is how they will sit. This one is just suspended with wire at the moment for looks:
Last edited by Justme; 03-24-2012 at 03:36 PM.
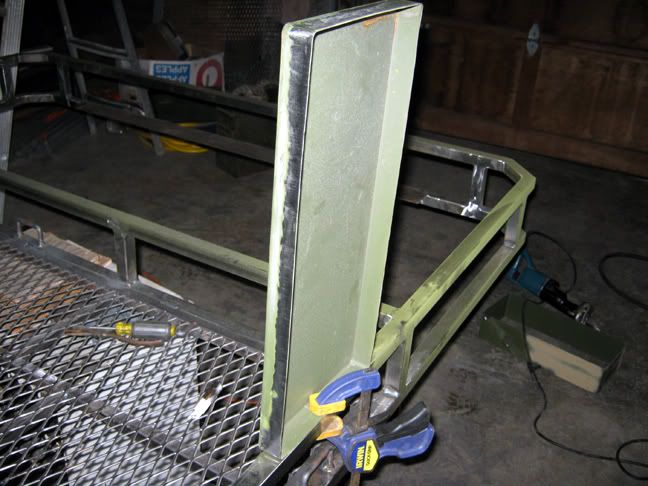
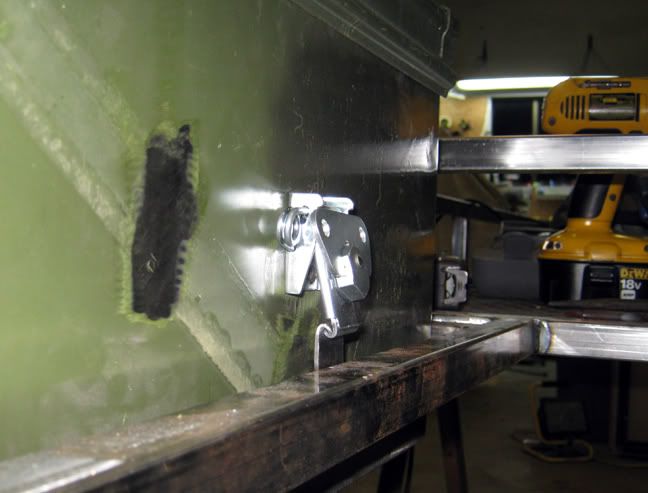
Reply:The tie-down points:
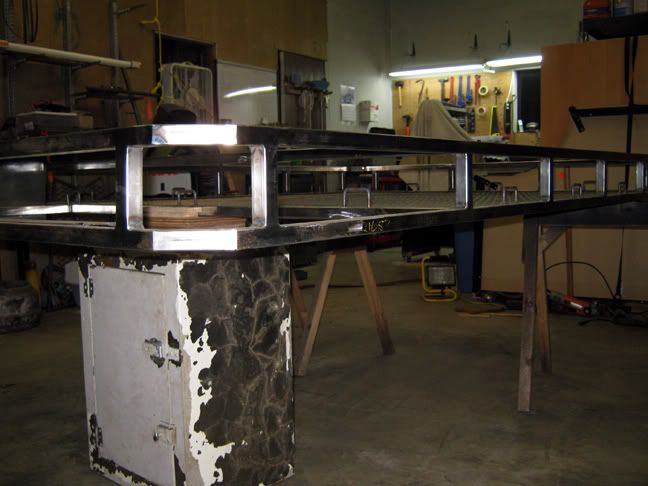
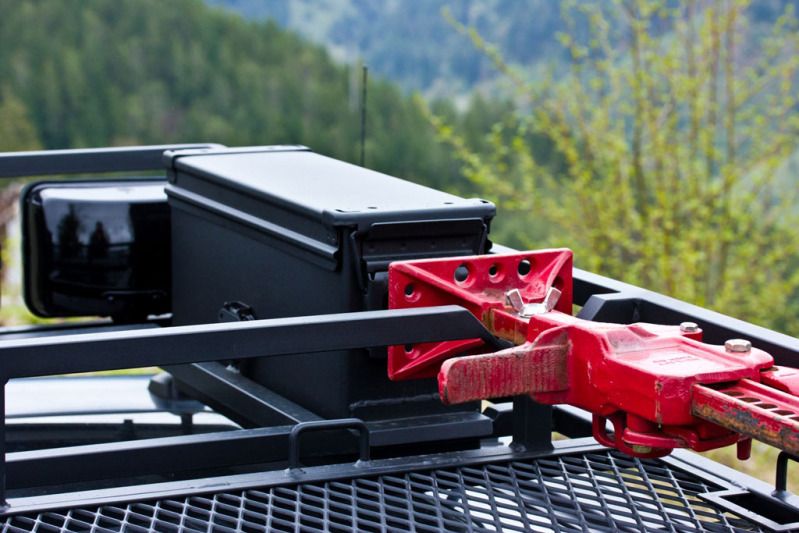
After much thinking and rethinking, I came up with what I think is a pretty good way to secure the boxes and yet easily remove them if needed. I welded an angle bracket on each end of the box, drilled two holes in each one, and made little alignment pins from 1/4" round stock and welded them into the holes.
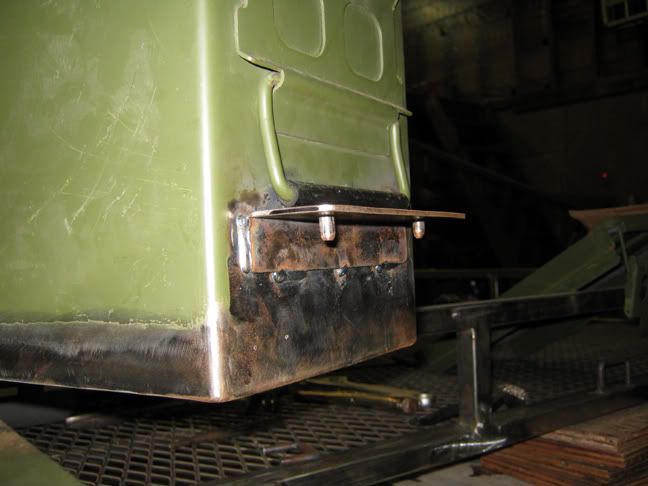
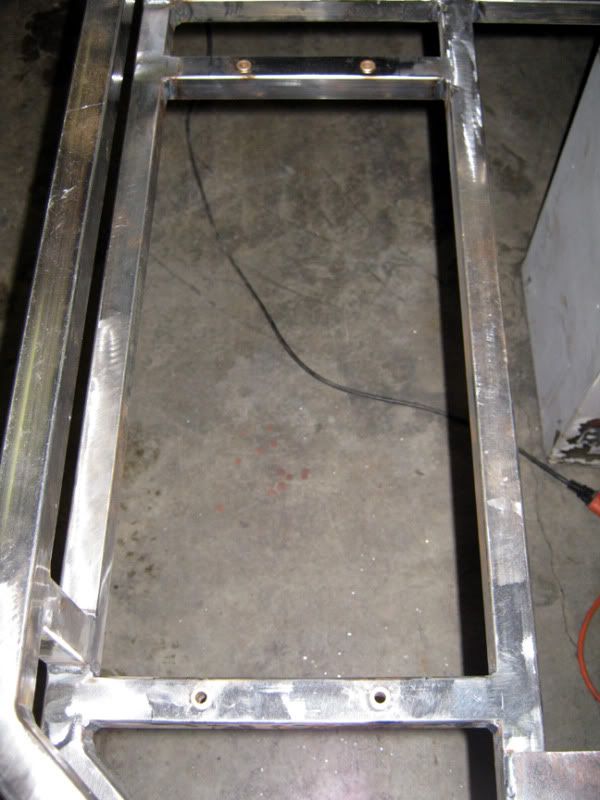
I drilled two 1/2" holes in the cross bars that the angles sit on that line up with the alignment pins. I cut a length of 1/2" OD 3/8" ID tubing and welded them into the holes. Now the square tubing is still sealed up. Plus, with the holes going all the way through, they will never get plugged up with ice, dirt, etc.
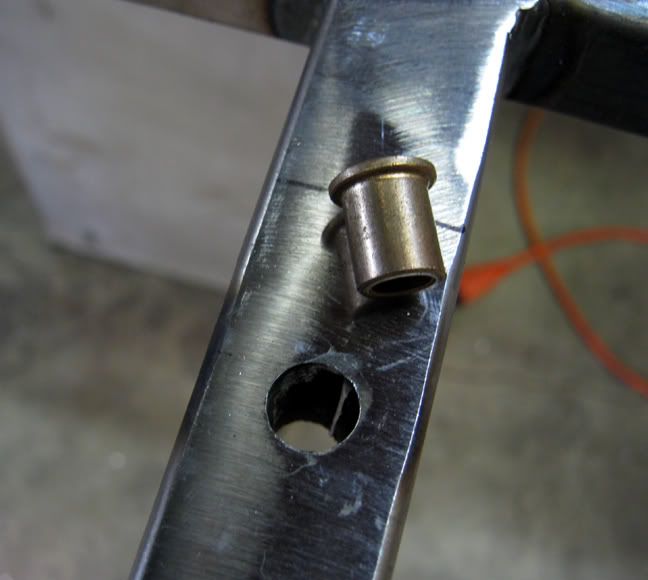
I got some bronze bushings that were 3/8" OD and 1/4" ID, and put them in the holes in the cross bars:
The box now sits with the pins inside the bushings:
After much searching, I was able to find a place to order some rotary draw latches. I mounted them to the sides of the box:
I made keepers for the latches and welded them to the frame:
Last edited by Justme; 03-24-2012 at 03:42 PM.
Reply:And now the box sets down on the frame into the alignment holes. Then you just give the latches a half turn and it is cinched down tight. The box feels like it is welded on it is so solid when it's latched down. But it can be removed in about 5-10 seconds.
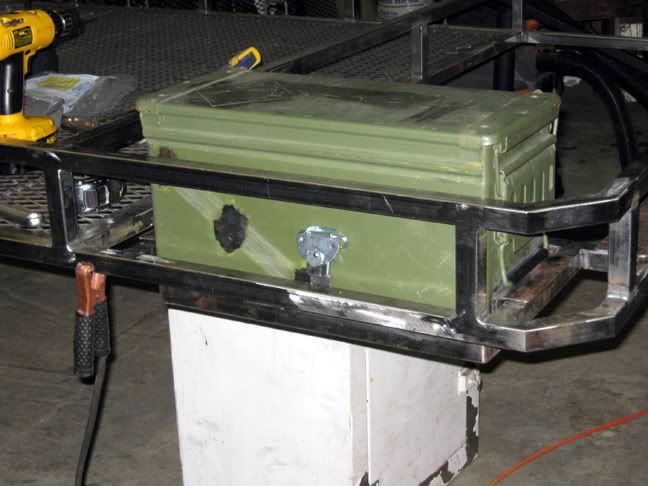
This was the first time I had the boxes in with it up on the truck. I thought it was going to look ok with them on, it looks better than I imagined. I think once it is all finished in black it is going to be awesome and very custom looking. They only take about a minute each to put on or off.
Last edited by Justme; 03-24-2012 at 03:42 PM.
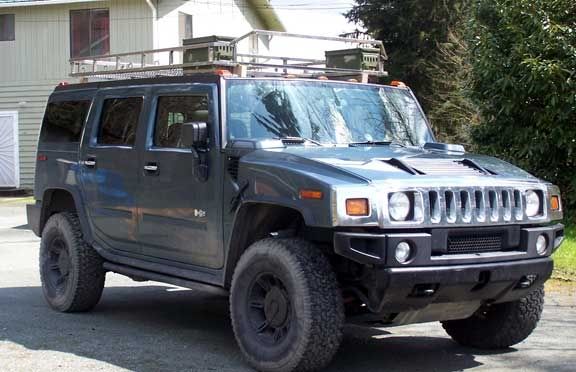
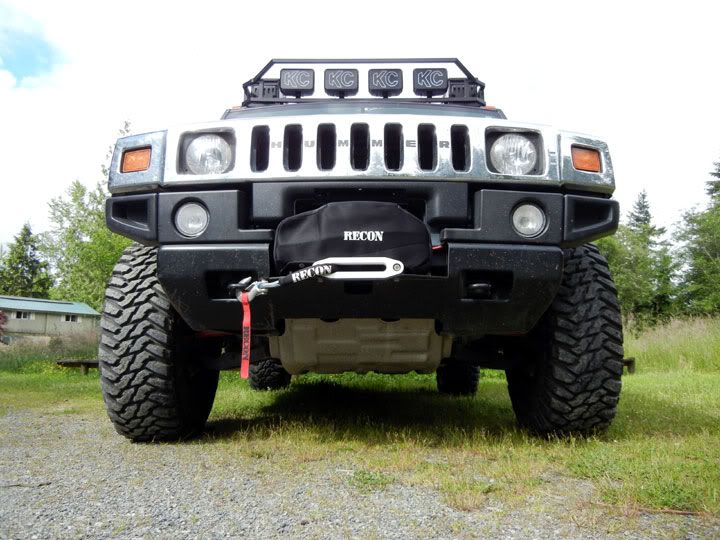
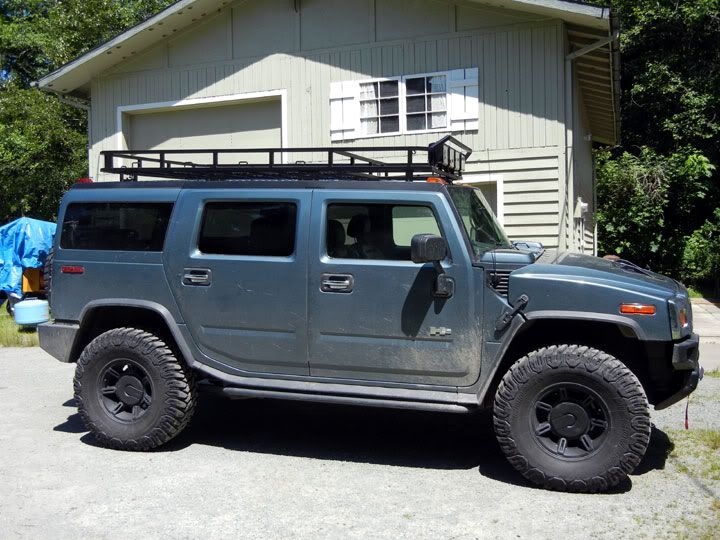
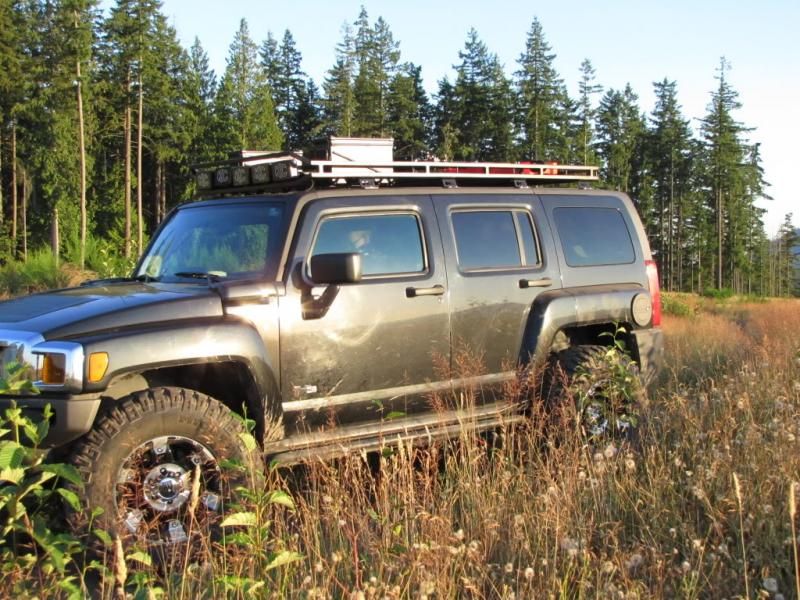
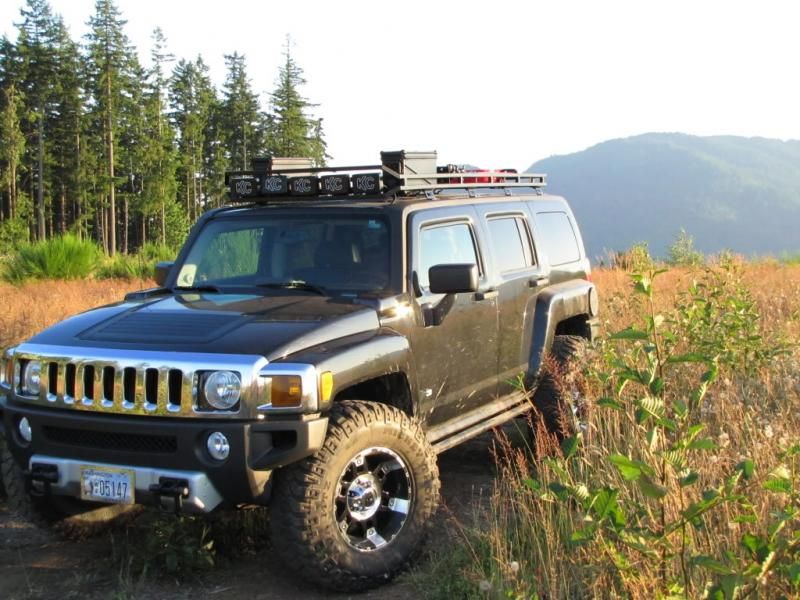
Reply:And now, the final product. You will also note that I had the chrome fuel door blasted and powder coated black as well! Here it is unloaded from the trailer.
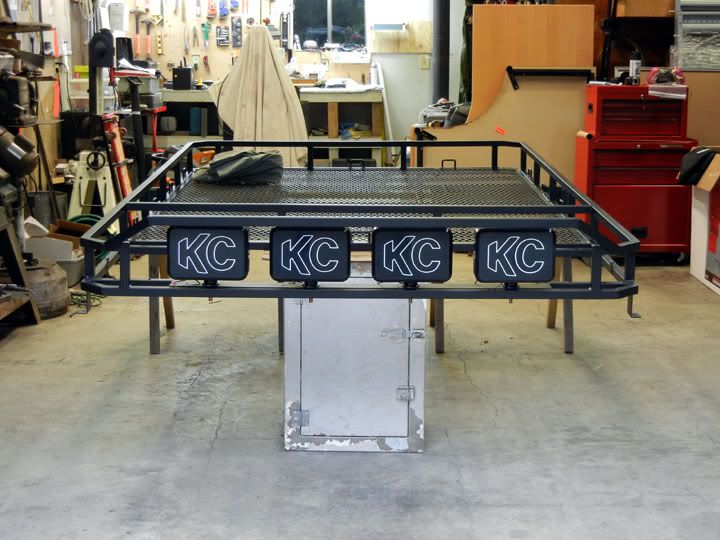
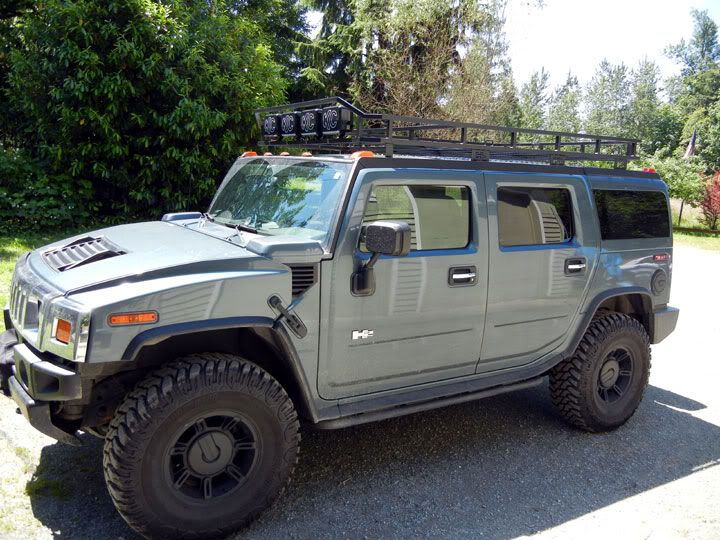
Lights mounted:
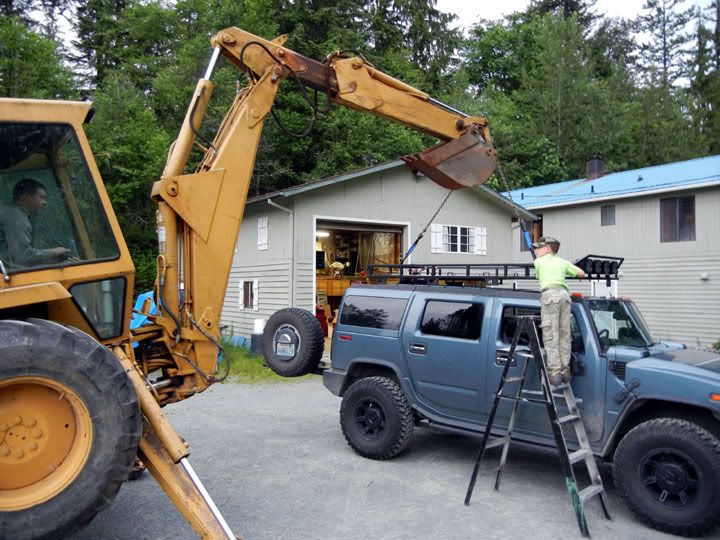
Setting it in place with my professional crew:
And done! Here you can see the fuel door:
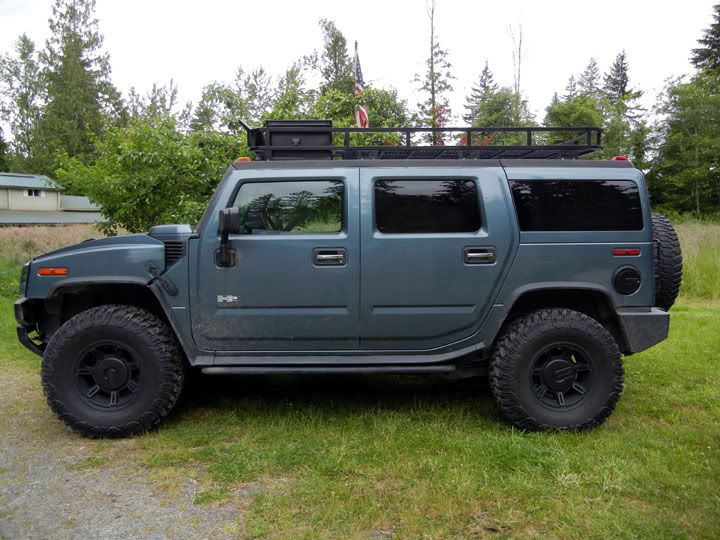
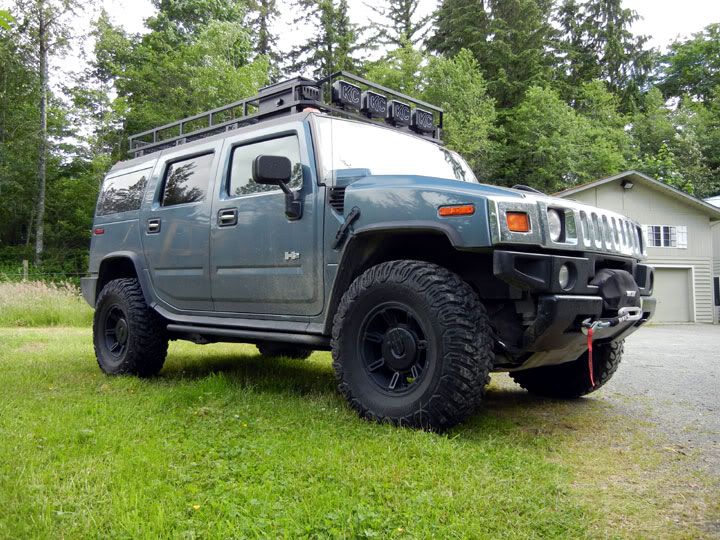
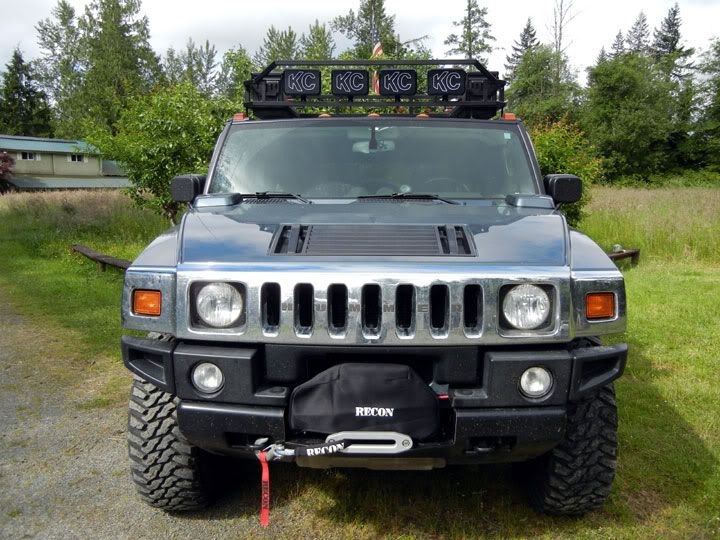
Prius' will tremble and wet themselves!
Here is a closer shot of the bracket. I think it gives a very subtle custom feel to it. They don't stand out really loud, they are a very subtle touch. I like it a lot!
I already have a few things I would do different, but that will be for the next one! Maybe it will be aluminum! Last edited by Justme; 03-24-2012 at 03:44 PM.
Reply:Nice work. Good patience too sticking to it over six months. I'm not normally a fan of H2's, but yours looks good.edit:// I started posting before you had finished posting all the pictures. Looking at the final shots, it came out great!!! Ammo box modifications and mounting system is awesome. Lots of little details you worked in there that add up to something very cool.Last edited by el bob; 03-24-2012 at 03:21 PM.
Reply:Here is another picture. This is the sophisticated load testing process. This is a highly scientific and technical proprietary test done with the strictest standards. You are all very privileged to be allowed a peek into this behind the scenes test.

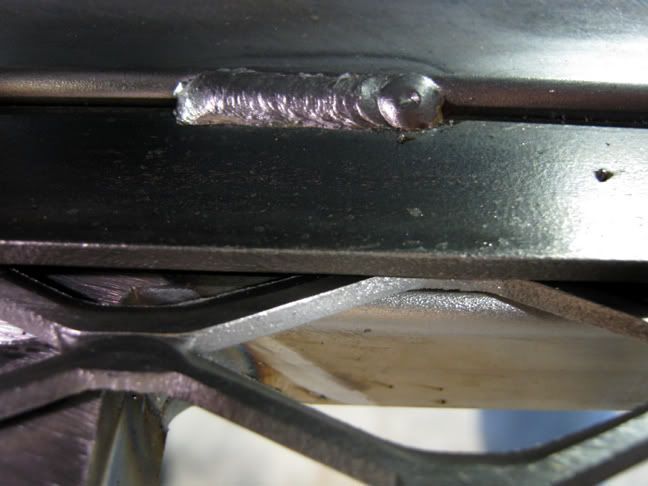
In all seriousness, this is just over 500 pounds, and there was no noticeable flex in the floor. I had a buddy look at it while I walked around on it, and he said it did not bow at all, even when I was right in the middle. I think I actually over built it a little. I stood up there and rocked it side to side as hard as I could, and there was no flexing in the brackets under lateral load at all either.Here are a couple close ups to show the texture. It is almost an exact match to the finish on the factory sliders.
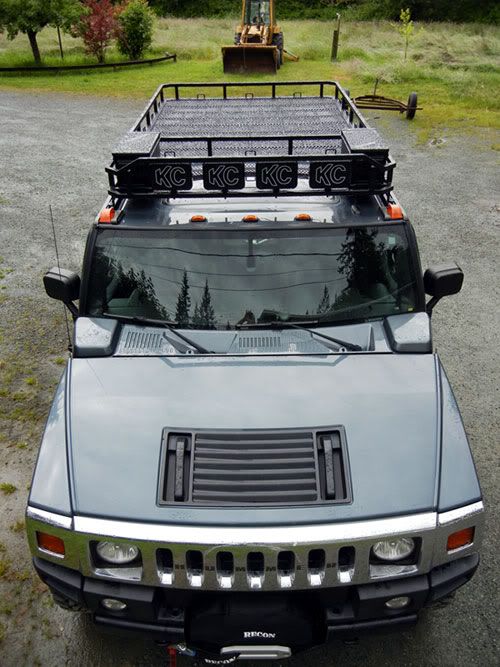
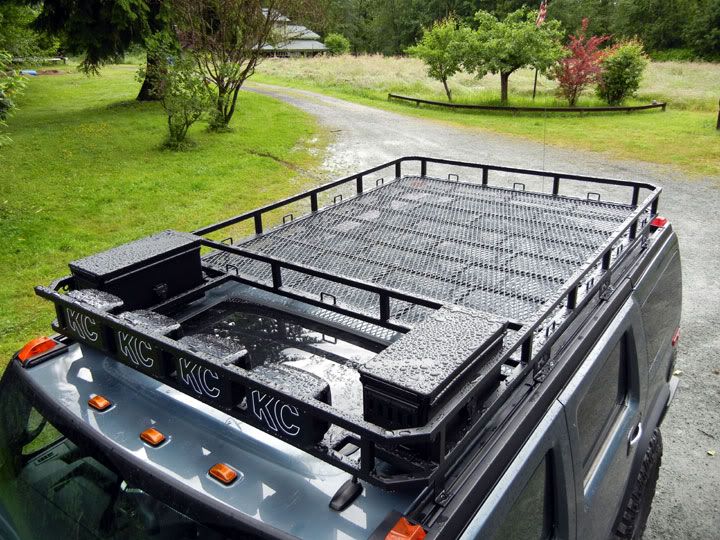
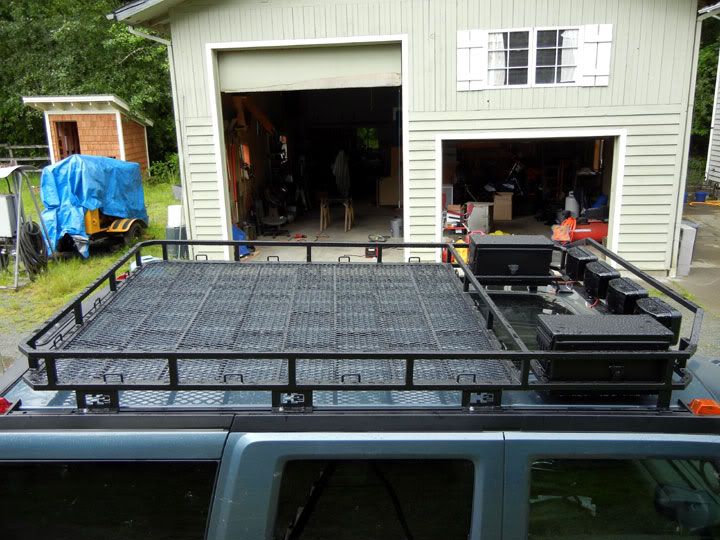
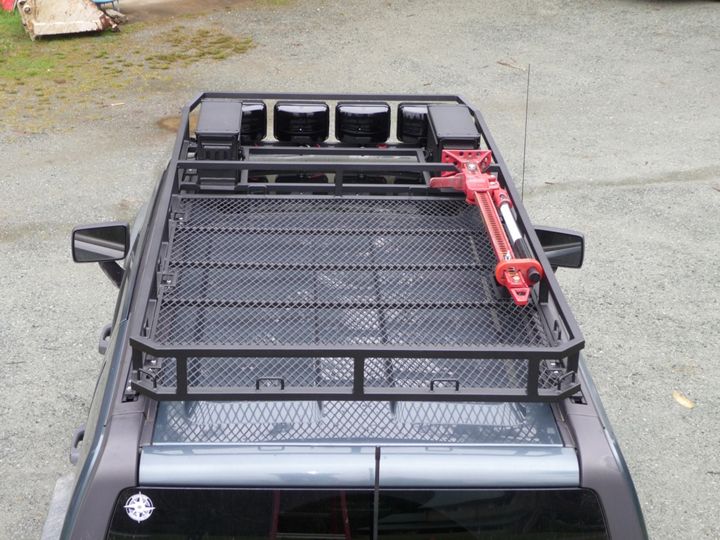
Here are some views from above so you can see the cargo area.

Here are a few shots with the boxes removed.
In the boxes I was able to fit the following:Driver's side:1 x 20'x1 1/4" nylon recovery rope1 x 10' chain1 x roll toilet paper :moon: 1 x wired winch remote1 x SOG folding saw1 x snatch blockPassenger side:1 x 20' tow strap1 x 10' tree saver strap2 x heavy shackles1 x pair leather gloves1 x tire plug kit1 x pair coveralls1 x heavy vinyl shower curtain (for laying on the ground)
Reply:

Originally Posted by el bob

Nice work. Good patience too sticking to it over six months. I'm not normally a fan of H2's, but yours looks good.edit:// I started posting before you had finished posting all the pictures. Looking at the final shots, it came out great!!! Ammo box modifications and mounting system is awesome. Lots of little details you worked in there that add up to something very cool.
Reply:Looks good, now to build a custom front brush guard to complete the look. Then paint the whole truck OD green or desert tan and look like some special operations group going down the road or trail. You might want to mount an extra light or two on the back in case you need to back up on the trail at night. You got more than enough on the front, none to the rear, seperate switches to operate. Some time you may find yourself on a small narrow trail at night that you need to back out of, that's when those rear lights will shine(pun intended)

Reply:Great job man, you took that on like a pro. That hummer looks tough!When in doubt, carry two guns instead of one.

Reply:Great job!Lincoln Powermig 255Hypertherm Powermax 45Thermal Arc 161SOxweld 24R OA TorchStill Looking for an Old Round Top Idealarc 250
Reply:Very well thought out and executed job , looks great.
Reply:I will be putting lights on the back. Probably in the bumper. The next addition will be a brush guard. I will be doing that this summer sometime. All I need is money!
Sent from my Casio Commando using Tapatalk
Reply:Great job! You built that to last. How does it compare to the $2500 one? I bet it's built much better and stronger.How did you get the whole base flat and square?TA Arcmaster 300CM3XMT 304S22P12 suitcase feederX-Treme 12VSOptima pulserTA161SMaxstar 150STLHypertherm PM45OP setupStihl 020AVP, 039, 066 Magnum
Reply:WOW !!!! excellent build..one minor question or concern, the latches that hold down the ammo boxes, do you think they have any chance of rattling open? and having those boxes fly off, would it be possible instead of those pins and bushings to put in a threaded sleeve and wing nut to hold the boxes in?..along with the latch as a double saftey. and again a fantastic looking build, only problem is now your gonna be busy making one for everyone else..LOLOf all the things I lost I miss my mind the most...I know just enough about everything to be dangerous......You cant cure stupid..only kill it...
Reply:love it!!
Reply:
Originally Posted by Drf255
Great job! You built that to last. How does it compare to the $2500 one? I bet it's built much better and stronger.How did you get the whole base flat and square?
Reply:
Originally Posted by Justme
I tacked the whole thing together first, and then welded it up, jumping around to avoid getting too hot anywhere. It came out pretty close, and I was able to get it right on with a little strategic heating with the torch.It is MUCH stouter than the $2500 one, and is finished much nicer. Like the other one just has the grating welded to the top of round tubing all exposed. Looks "unfinished" to me.No, there really is no chance of that. When you turn the buckles they pull tight and then cam over center. They pull tight and are SOLID. It requires concerted force to open them. I am 100% confident they will never rattle loose or undo. I considered a threaded system as well, but decided to go with the latches to avoid any loose parts to drop or lose on a trail.Like I said, I just finished one for an H3, and have an order for another H3 already, with two more maybes waiting in the wings.
Reply:I'd like to know the cost of the build, and how much your charging to build them. I'll be making a rack for my Trailblazer EXT eventually. and sticking with square tubing as well. I'd bet you could have gotten away without all the cross bracing under the rack, would have saved a little on weight, and cost. Is it powder coated or just texture painted?The mounting brackets are nice and make it look factory. I like it. Care to share more on the dimentions?There are no problems. There are only solutions. It's your duty to determine the right one.Hobart Handler 210Airco 225 Amp MSM Stinger
Reply:I like it! picked up a few ideas for the rack im going to do for my 'ol blazer
Reply:
Originally Posted by ThorsHammer
I'd like to know the cost of the build, and how much your charging to build them. I'll be making a rack for my Trailblazer EXT eventually. and sticking with square tubing as well. I'd bet you could have gotten away without all the cross bracing under the rack, would have saved a little on weight, and cost. Is it powder coated or just texture painted?The mounting brackets are nice and make it look factory. I like it. Care to share more on the dimentions?
Reply:a fully powdercoated heavy duty rack like that should command a premium.There are no problems. There are only solutions. It's your duty to determine the right one.Hobart Handler 210Airco 225 Amp MSM Stinger
Reply:Wow that is a nice project,been away for awhile,glad I clicked on this thread!Drink a Guinness Draught....Millermatic 140Do you still rememberDecember's foggy freeze --when the ice thatclings on to your beard isscreaming agony.Excellent work. First dirty H2 I've seen. Also the best looking. Whats your selling price going to be?-AaronJet 17.5" Drill Press1942 South Bend 16x84 Lathe1980s Miller 320A / BP --- 2013 Power Mig 2562012 Jet 7x12 Horizontal BandsawVictor O/A Setup
Reply:that's inspiring. You need to go park it (your truck) on top of a chromed out Jeep with a pompous "H2 recovery team" sticker.I own a Jeep. I aspire to own a roof rack as nicely made as yours.
Reply:Awesome build, good job... looks like it came from a factory.Prius' already tremble and wet themselves lol.
http://www.philswelding.com
Reply:That is one BADASS vehicle!!! Great work.
Reply:very nice, built one while back for my 110 landy made it to hold water and fuel cans as well.
Reply:Sweet! How did you make the H2 emblems?
Reply:Great job I haven't seen the other one but your looks nice,all you need now is a brush guard and some LED light bars
Reply:Wow! thanks for all the comments. I kind of lost this thread and didn't know there were so many more posts to it.
Originally Posted by rabidchimp
Excellent work. First dirty H2 I've seen. Also the best looking. Whats your selling price going to be?-Aaron
Reply:Here are some pics of some of the racks I have built for H3s. They seem to be more popular than H2s.
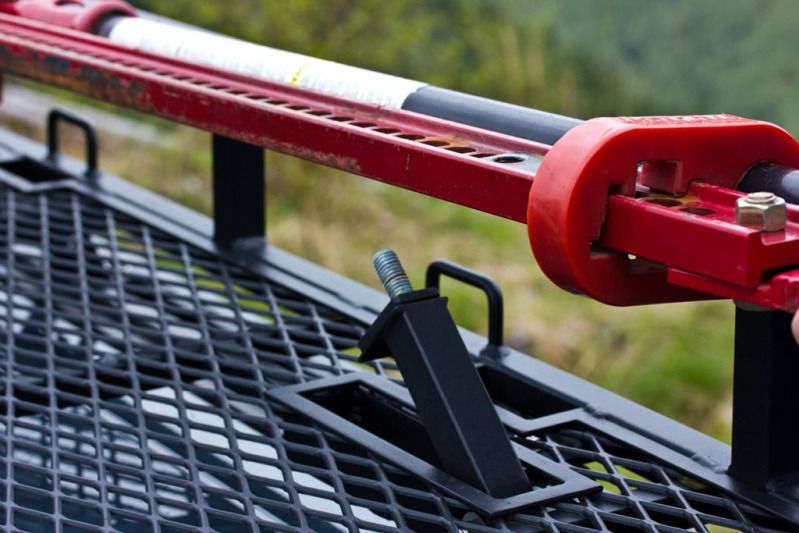
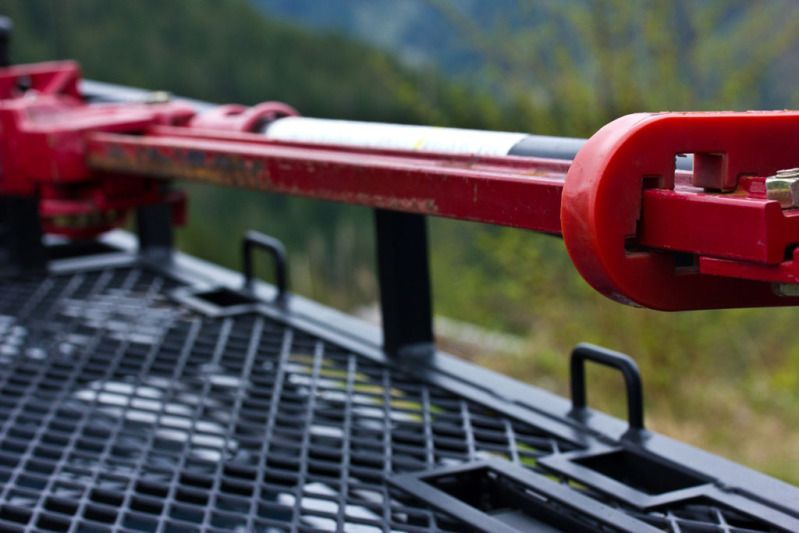
I came up with an integrated jack mount design so that there are no extra parts to lose. The leg just folds down into the deck when not being used, and is held by a spring so it wont rattle.
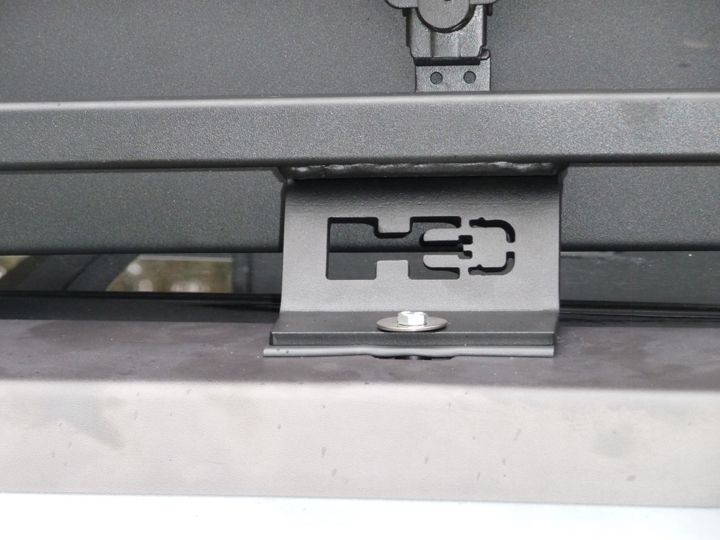
Here are the brackets I make myself now:
Reply:This one has shorter sides and no sunroof:
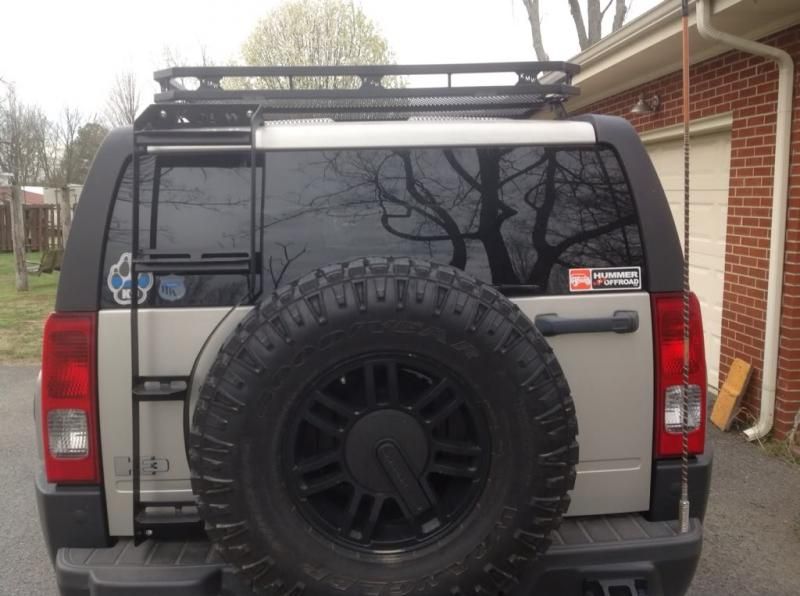
Did a ladder on this one:
Reply:Super nice workRegards,RobGreat Basin WeldingInstagramBlue weldersRed weldersMy luscious Table

DIY TIG Torch cooler
Reply:Very Nice!! But only one roll of toilet paper with 4 kids and wife? Thats living on the edge my friend. Heck I need a roll a day just for myself
Idealarc 250AC 225SVictor OA-older made in USA stuff.And a crap ton of other stuff.
Reply:
Originally Posted by kald
Very Nice!! But only one roll of toilet paper with 4 kids and wife? Thats living on the edge my friend. Heck I need a roll a day just for myself
Reply:What size is the outer tube.
Reply:I use 1" square with 3/4" square cross bars. I don't do the 3/4" around the cargo area anymore. That was WAY overkill. Sent from my C811 4G using Tapatalk
Reply:I liked the way it made everything look clean by not showing the end of the expanded metal. Are u still hiding that if so how. Going to build something like this for my expedition
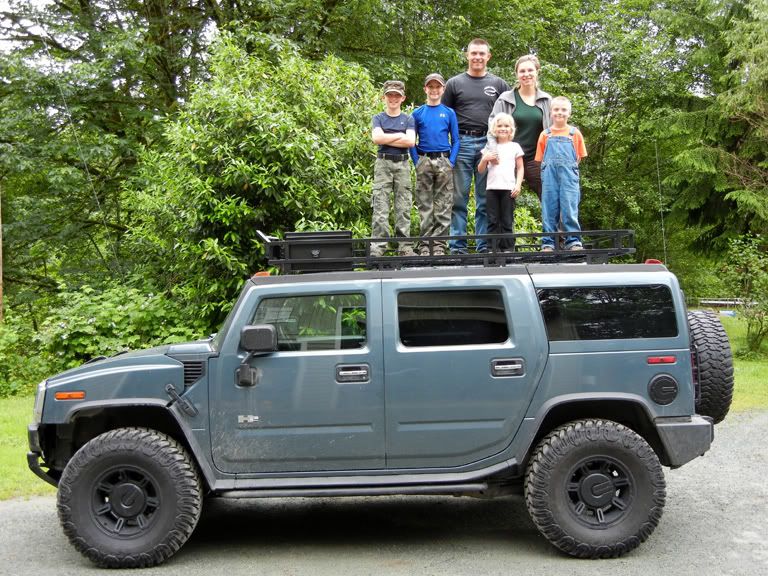
Reply:SIX MONTHS?? you got a lot of grit justme! that was an excellent build and great documentation. i really like the pic of you and the family on top of the rack.i.u.o.e. # 15queens, ny and sunny fla
Reply:
Originally Posted by fastcat
I liked the way it made everything look clean by not showing the end of the expanded metal. Are u still hiding that if so how. Going to build something like this for my expedition
Reply:
Originally Posted by vipermanz
maybe make something that lets the torch ride in buggy on a channel or on rails adjacent to the piece.i'll see if i can draw something up later
Reply:That is kick ***!! I need to build one of those for my Tacoma.Century AC 100 stick (dead but trying to fix it)Everlast PA 160 STHhttp://www.riograndehatters.comhttp://www.texashatcleaners.com
Reply:I really like this. What are size/gauge tubing did you use on the "floor" of the rack? If I had to guess, you used 3/4" 16 gauge tubing for the crossmembers and 1.25" 11 gauge tubing for the frame around the outside?
Reply:very nice work.. ! great job ! yeah those racks are $$ to buy them... looks awesome
Reply:That's a really beautiful work. The fold-down legs for the integrated Jack Mount is a nice touch.
Reply:
Originally Posted by Dirtyamaha
I really like this. What are size/gauge tubing did you use on the "floor" of the rack? If I had to guess, you used 3/4" 16 gauge tubing for the crossmembers and 1.25" 11 gauge tubing for the frame around the outside?
Reply:Great job ! I love doing roof racks.Nobody here wants to pay. They buy that MickeyMooose crap from the 4WD junk brokers. I guess I should get a graphics guy to make me some cupcake-lightening-skull and crossbone stickers to entice the yucking fuppiezzz.

Bubble gumTooth pixDuct tapeBlack glueGBMF hammerScrew gun --bad battery (see above) |
|


 发表于 2022-3-2 15:51:20