|
|
Started working on my headache rack last night. It is going to be a heavy beast!!! 2x3 angle iron bed caps, will be adding 1 1/2" tube the full length of the caps later.2x3 angle iron front cap with 1/4"x 2" flat bar to create a "channel"The uprights for the rack itself will be 1/8" plate that is bent and leaned in to follow the cab profile, (second to last pic). The plates are currently at the laser cutter to have a JR cut into them. Will match the JR I had lasered into the brushguard I built last yr, (last pic).Notching the front and rear of the bed caps to follow the same profile as the bed. I am using the old bed from my 91 Dodge as the building platform as I am replacing it with a much better non cancer infected bed. This way I don't burn, scratch, or dent the newer bed that should be freshly painted this weekend. Also sets it lower for me to work on and being on the dollies I can wheel it around easily.
Reply:The bed caps/rails will look similar to the first 2 pics. Also the lights will be recessed into the upper 2x3 rectangle tube similar to the 2nd pic. Also the window bars will mimic this pic too. But going to fab up a set of removable center bars to still allow access thru the back window.The uprights will be similar to the third pic but without the grab handles. Last edited by Idafrog; 03-11-2015 at 12:55 PM.
Reply:Another feature I plan to add is a receiver hitch tube to the front of the rack to be able to plug in a small 12V ATV winch. Loading elk, deer, dead 4 wheeler, snowmobile, etc will be much easier with the winch vs manhandling everything. Old and lazy is starting to rear its ugly head Which reminds me...... I need to route wires and quick connects for the winch before I put on the new bed.The LED lights in the upper bar will consist of normal brake/blinker/clearance lights and 2 clear LED ones that is wired to a toggle switch inside the cab. Will really be nice when loading things at night.Last edited by Idafrog; 03-11-2015 at 01:01 PM.
Reply:Originally Posted by IdafrogAnother feature I plan to add is a receiver hitch tube to the front of the rack to be able to plug in a small 12V ATV winch. Loading elk, deer, dead 4 wheeler, snowmobile, etc will be much easier with the winch vs manhandling everything. Old and lazy is starting to rear its ugly head Which reminds me...... I need to route wires and quick connects for the winch before I put on the new bed.The LED lights in the upper bar will consist of normal brake/blinker/clearance lights and 2 clear LED ones that is wired to a toggle switch inside the cab. Will really be nice when loading things at night.
Reply:Got the side uprights back from laser cutter. I friggen love how clean and perfect laser work is!!!!! Crisp lines and zero cleanup.Daughters boyfriend thinks I should box them in and add LED lights in there to light up the JR cutout. Can't believe I am actually contemplating this.........would look cool for sure...... hmmmmm. Anyone have a source for some good LED small lights that would work for this? If I box them in how would I get to the lights in case one fails?Anyway, mocked them up to get the right lean in angle to match the cab profile. 21º seems to be the sweet spot.Finally have a saturday all to myself tomorrow. Hoping to make some real progress on this.
Reply:Didn't get nearly enough done over the weekend. Ended up working on the local city softball field so our HS girls can practice on it this week, now that snow has melted off it.Anyhow.... I don't really care for the "dogears" that stick up both sides of normal racks. But..... still need them from time to time. Sollution..... make some removable ones. I welded in a pc of 3/4" ID pipe into the upper cross bar on both pcs, (yes I drilled drain holes). Then made some drop in pins with tie down points on them. Cut some little gussets to blend in where the flat 2x3 tube meets the angled uprights. And cut the center upright supports.Now is where it took me awhile to figure out the removable center bars. I made a "cup" to recieve the spring and the bar. The cup is slightly larger than the bar so it will slip in and hide the spring. As a stop for the springs I plug welded in a couple 3/8" flat washers inside the pipe. I can adjust the tension of the spring by adding or removing more washers. The cup will be flush welded into the 2" square tube upright. The other end will have a 1/4" pin to fit into the other upright. Idea here was to make it look as if all the window bars are one pc and welded solid, but able to remove the centers to allow access thru the back window if needed. Most headache racks for some reason or another leave the center section open or are solid all the way across.
Reply:The end of the center bars that will hold the 1/4 pin I had to make a bushing of sorts to fit into the pipe and still center the pin. Not having a lathe or fancy equipment I improvised. 1 1/4" hole saw I cut out 3 plugs out of some 1/4" flat bar. The 1/4" pilot bit is perfectly centered for the pin. I had to grind the plugs down a bit to slip into the tube. I chucked a pc of 1/4" allthread to the cordless drill and put the plugs on that. Put the drill in reverse and grind away. It took the plugs down nicely to fit the tubes. Now just need to cut the pins and weld them into the bars. Going to add some thin inner tube rubber or similar around the pin to stop any rattling of the bars on the pin end and wrap the other end with black tape or something to prevent rattling in the cup end.
Reply:The removeable bars work!!!!! Was still a little worried I couldn't pull it off the way my brain pictured it but got it done!!!Punched out the 2" sq tube to receive the spring cups. Weld and clean em up. Also got the pins welded into the bar plugs.Clamp the uprights in to test fit the bars. Burned the plug/pins into the bar ends too. After some trimming on the bar end I found the perfect fit to hide the spring and flush the pin end into the bar. Holds solid as heck!!!! The Herculiner I am going to spray on will take up any slack in the spring end and also help prevent any rattling.Cut and drilled the 2" ID receiver tube that will be the hitch for the winch to plug into. Also heated and wrapped the end with some 3/8" sq bar stock. Not sure I really needed this but figured why not.
Reply:That is looking good! Nice welds too.
Reply:Really showing signs of progress now. Got the other 2 removeable bars done.Then setup to cut the outer bars. Having a second chop saw was handy to cut the 21º angle on them. One saw for the strait 90º then cut angles. Everything is just tacked in place for now. Hope to weld it all out tonight as I will be gone over the weekend and can't touch this till monday at the earliest. Then on to the tube side rails.Question for all you..... How do you cope tube when you don't have a notcher? I haven't done much in the past but usually just used hand grinder and trimmed till it fit descent.
Reply:Man, that's looking really nice. I like the removable bar idea a lot. If the back window of my truck opened I'd probably be stealing that idea for my rack!Can't wait to see it finished.
Reply:Beautiful job and neat idea for removable center section!http://www.metalgeek.com/static/cope.pcgiI think I first saw this coping calculator on a thread here...I haven't played with it (yet) but plan to soon.DB
Reply:Looks great! im making one now but this is awesome
Reply:Thank you all for the kind words. Lots of thinking and planning went into this. Not much done last night. Spent the better part of an hr welding this out. Felt good to burn that much wire. After looking at it a while I think I will box in the angled uprights to give a much cleaner finished look. Made a cardboard template and then fiddled around with the light idea. I am thinking I will add the lights. Looked pretty cool lit up. If no lights I think the JR will end up blending in and not be seen as easily with the boxed in black behind it. Plan is to just wire them up to the clearance lights. The test light I used is an old oval 2 bulb marker light... the permanent one will be LED.Also added a pc of tubing in the drivers side upright to route the light wires thru.Just noticed in the pics that the lower cross bar kinda interferes with the JR a bit. Need to notch that out or heat it up and flatten it.Last edited by Idafrog; 03-19-2015 at 11:57 AM.
Reply:Finally got a little more done after being gone all weekend.Got the light cutouts done and set the rack on the actual bed it will be on to make sure I didn't have to tweek something a bit. Ya..... its still not painted yet but someday. Fits like a glove!!!Made some templates for the box in plates. The templates are trim coil which is really thin steel like what is used on house siding and window trim. Easy to work with and lots sturdier than cardboard. Need to get to town today to get the 12ga that will be the box in plate. Also ordered the LED lights for the boxes.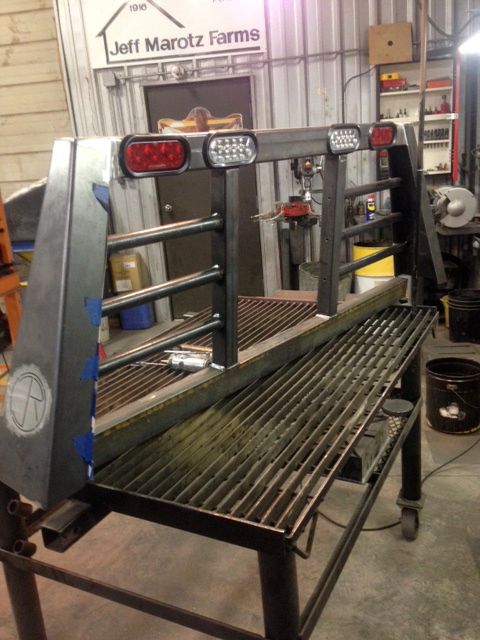
Reply:Looks great. You have some serious time in that rack . Good job.Dave ReberWadsworth Ohio
Reply:Little more progress.Cut and notched the 14ga sheet to box in the uprights. Lots of trimming and fitting to get them as close as possible. Bench is covered with chips off the die grinder!!! Also welded on a 24" pc of 1/2"x1.5" flat bar on the backside of the channel under the reciever tube. Goal here was to beef it up as much as possible to not bow the bed. That 24" section is now 3/4" thick. I might build some removable bars to help triangulate the hitch. Angle them from the hitch back to the bedsides at least 2' back, if that makes sense.Gotta say I am glad I took the time to box the uprights in. Looks sooooooo much cleaner and "finished" looking. Who says jigsaws are only for wood lol
Reply:Excellent work, well done thats going to look super when its all sprayed up
Reply:Nice work, I like the removable bars and the lighted logo.
Reply:Extremely slowwwwww progress the last week with this. Too many other spring chores and daughters softball games. grrrrrr.Anyway while I have been waiting for the LED lights that will light up the JR I did some wiring and more grinding/blending work. Wiring is my absolute worst nightmare. I know this project is fairly strait forward but I seem to always have to do things 2-3 times to get it right. Did some tests to confirm things work before going any further. Also added a 12v socket to the drivers side upright. Will use this for a portable spotlight and for winch connection. I think it will be handy having a socket like that on the outside of the pickup. The wires will all hook up between the bed and cab with OEM style weatherpack connectors. Love how good they work but hate building them.Here's some boring pics......
Reply:Ok..... question here for all you......... Where do you find "TIME"???????? I have searched e-bay, Amazon, etc and still can't find it.Took forever to get the LED lights for the box plates in but they are here and mounted. Add to that my liner in my welder went to chit and local parts house has been dragging their feet getting a new one in, and 3 day softball tournament 300 miles away over the weekend used up all my "time". Also took out the 12v cig style plug. The plastic nut that secured it in was a POS and broke before I even tightened it fully. Descided to go with a steel 4-wire trailer plug and only use 2 of the pins. This will also allow me to weld a nut on the backside of the plate and be able to remove the plug if need be in the future. The plastic one would have been dang near impossible to remove once things were welded solid. Also started making the tube side rails. Notched out the standoffs that will space the tube 1.5" above the 2x3 angle iron side rails. Not the easiest to do without a real tub notcher but worked out ok. Other than now needing a new hole saw as I ripped off 3-4 teeth doing this.Maybe by the end of summer I should have this near completion at this rate lol
Reply:Electric winches tend to be high current devices. Cigarette lighter plugs/trailer light connectors may not be up to the task depending on the winch. You might want think about upgrading your winch supply design to handle 100+ amps based upon the winch you are using. Trailer light connections are good for approximately 10 amps depending upon the wire size.Regards
Reply:Here is a clean option if you need some small power off of your rack. http://www.curtmfg.com/Category/226/...t%20Connectors Now if you are trying to pull winch power I would use something like this http://www.ebay.com/itm/50Amp-Anders...a3a4a3&vxp=mtr
Reply:Ya I realized later that the cig style plug was not going to handle the winch power add to that the crappy plastic it was made of. Here is the plug I am going to use now.... http://www.etrailer.com/Accessories-...-910030-4.htmlThe winch I am going to use is this one.... http://www.harborfreight.com/2500-lb...rol-61297.html I have another one just like it I have used for 5+ yrs on my tractor to raise and lower a 7' sickle bar. It is mounted on a pc of 2" sq tube so I can use it on my Polaris Ranger or on wheelers. It may be slow and not Warn quality but it has yet to fail. As for the wire size on the pickup it is 10 ga with inline fuse direct off the battery, (same as on my tractor). Have yet to pop a fuse or have any other wire issues so I figure it should work in this application for the minimal use it will see. Will upgrade the wiring if needed later. Thanks for the info tho.
Reply:And a tiny bit more progress For some reason or another I could not figure out the angles on the side tubes last night. I cut the 45º for the tailgate end but could not for the life of me get the 11º angle to match up to the headache rack. It was always a quarter turn in the wrong direction. After over half an hr fighting it I got pizzed and just drilled a 1.25" hole in the upright of the rack and stuffed the pipe in there. Should have done that from the get-go but I like doing things 3-12 times it seems.The end of the tube needed blending with the short 45º pc so it was a matter of trimming off the long tube a bit and cutting some V notches and heating and pounding to fold the tube to make it blend better. Need to build the other side, grind and blend it, and finish grind/blend the rack, and weld it to the side rails, but it is nearly ready for sand blasting and coating.Nice thing about the tube rail is I will always have an anchor point for tiedowns.Holy slooooooowwwwwww project Finally had some time now that daughters softball is over. Got the bed painted week and a half ago and now bolted down and ready. Paint don't match for chit...... but couple trips up and down my gravel road should blend it fine. Maybe need to find a mud hole and dirty it up real nice. Can't really complain much, bed was free as was the labor to paint it. Well....... paint labor did cost me a 12 pack.......Rack is fully welded out, sandblasted, and 3 coats of Rustoleum bed liner. Hope to install it tonight if the liner is cured.Turned out looking awesome!!!!!!!Term limits...... 1 in office...... 1 in jail.Lincoln WeldPak 175 HD w/ gasWelding PHD...... (Pile Higher and Deeper)Pen and paperHalf-azzed brain
Reply:More pics....Term limits...... 1 in office...... 1 in jail.Lincoln WeldPak 175 HD w/ gasWelding PHD...... (Pile Higher and Deeper)Pen and paperHalf-azzed brain
Reply:And the winch and receiver mount. Will be handy to use on either the headache rack or on the regular reciever hitch on the pickup. or other rigs.Last edited by Idafrog; 05-14-2015 at 01:38 PM.Term limits...... 1 in office...... 1 in jail.Lincoln WeldPak 175 HD w/ gasWelding PHD...... (Pile Higher and Deeper)Pen and paperHalf-azzed brain
Reply:Here's a handy trick to mixing the bed liner coating thoroughly. Old mixer beater on the drill at high speed blends the chunks evenly. Just don't tell the wife why she is missing blender partsTerm limits...... 1 in office...... 1 in jail.Lincoln WeldPak 175 HD w/ gasWelding PHD...... (Pile Higher and Deeper)Pen and paperHalf-azzed brain
Reply:And here she is bolted down and lights installed. Gotta be one of the coolest things I have ever built for sure!!Put a layer of foam between the bed and the rack to prevent metal on metal contact. Term limits...... 1 in office...... 1 in jail.Lincoln WeldPak 175 HD w/ gasWelding PHD...... (Pile Higher and Deeper)Pen and paperHalf-azzed brain
Reply:More pics.... The last pic is just awesome!!!!! Term limits...... 1 in office...... 1 in jail.Lincoln WeldPak 175 HD w/ gasWelding PHD...... (Pile Higher and Deeper)Pen and paperHalf-azzed brain |
|


 发表于 2021-8-31 22:04:26